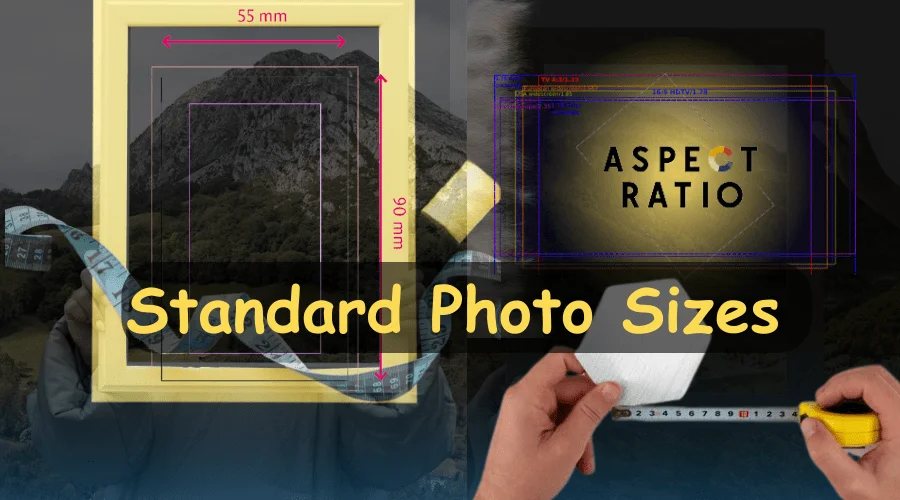
If you are working with photos or you are a photographer then you should have a good knowledge of photos sizes. Standard photo sizes vary with photos in different sites and purposes. Photo sizes are very important to maintain standards and fit the desired purposes.
In this context, we will learn today about the standard photo sizes. If you are related to photography, photo editing, or printing then this article will be very helpful for you.
What is the Standard Photo Sizes?
Standard photo size is the standard measurement of a photo. That size is used widely for a particular purpose. For example, the standard Photo size for the passport is 2.5 X 2 inches. This is the recommended size for the passport. Widely this size is used to print the photos for the passport.
So different photo sizes are used for different purposes. And every purpose or different use has its different standard size. So standard photo size does not mean one size of photo for every different use. Different photos are used in different uses and these have different standard sizes.
As for profile photos, square-sized photos are used most, or for content or feature photos, 900px X 500Px are used most. Before learning about photo sizes we should know ‘what is the aspect ratio?’. So let’s learn about the Aspect ratio.
What is an Aspect Ratio?
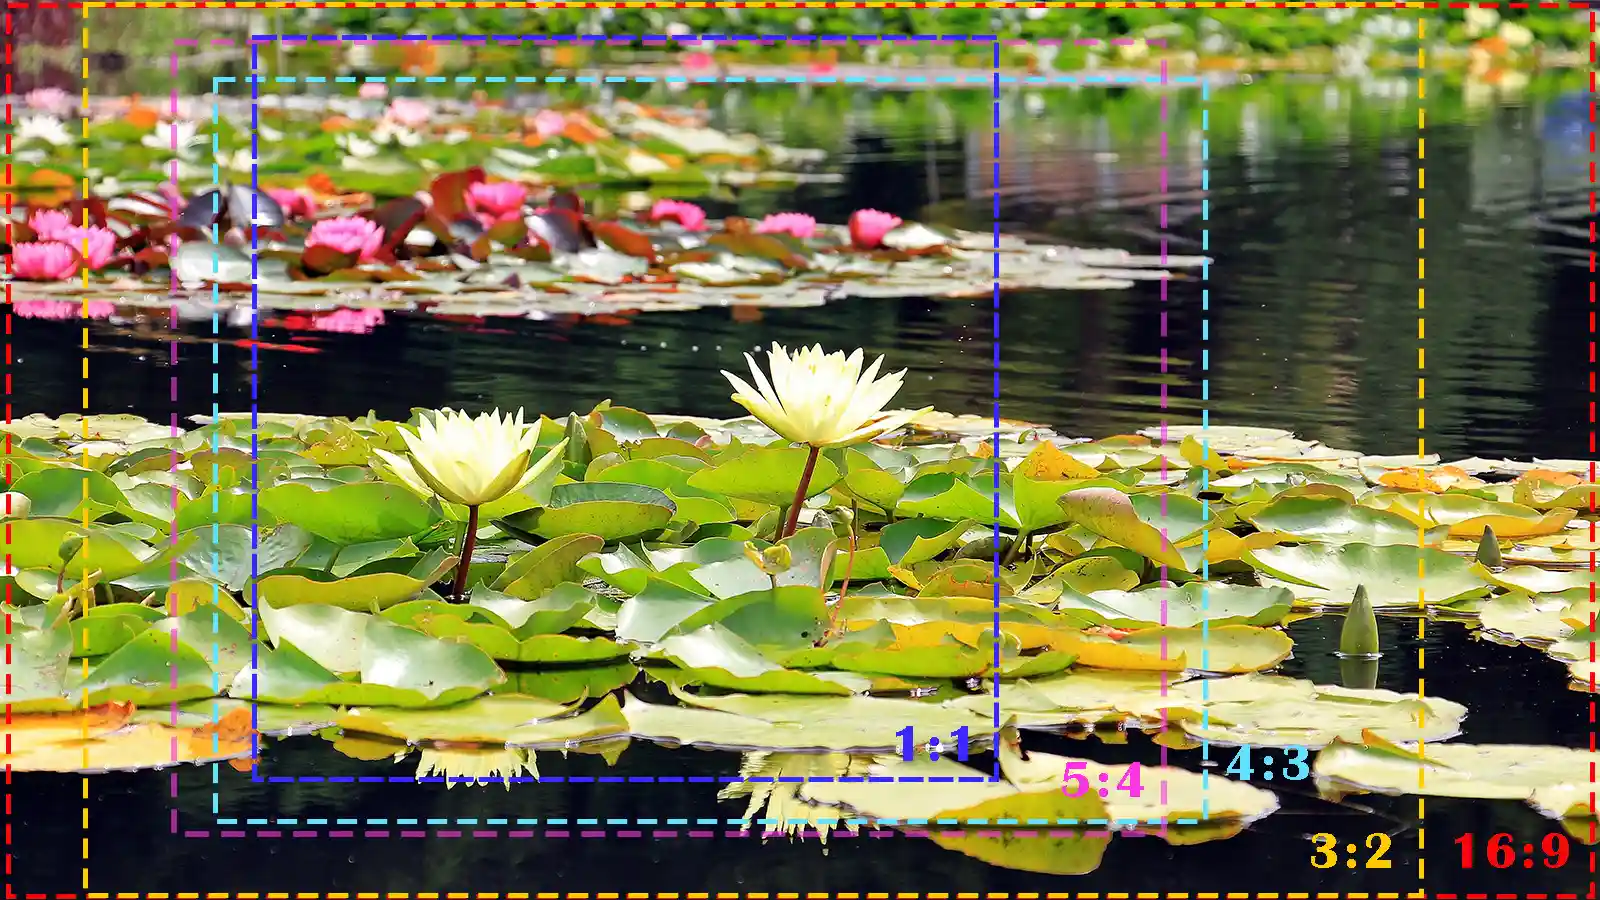
The aspect ratio is the ratio of the height and width of the photos. A square-sized photo’s aspect ratio is 1:1. Now it could be 512px X 512px or 20 X 20 inches. This means that the aspect ratio is related to the shape of the photos it is not related to the size.
When someone says 2:3 photos that person indicates the photos of aspect ratio 2:3. It could be 4 X 6 inches. Aspect ratios follow the rules of ratio in mathematics. Ratios are revealed at the minimum factor.
Different popular Aspect ratios of photos
Aspect ratios are used to indicate the shape of the photos different aspect ratio changes the view photo. Aspect ratios are very crucial for a photographer. photo size can be changed during the printing process or photo editing but aspect ratio change is hard.
If you want to change the aspect ratio then the photo will crop. Or your subject shape will be distorted. You should shoot your photos in the desired aspect ratio.
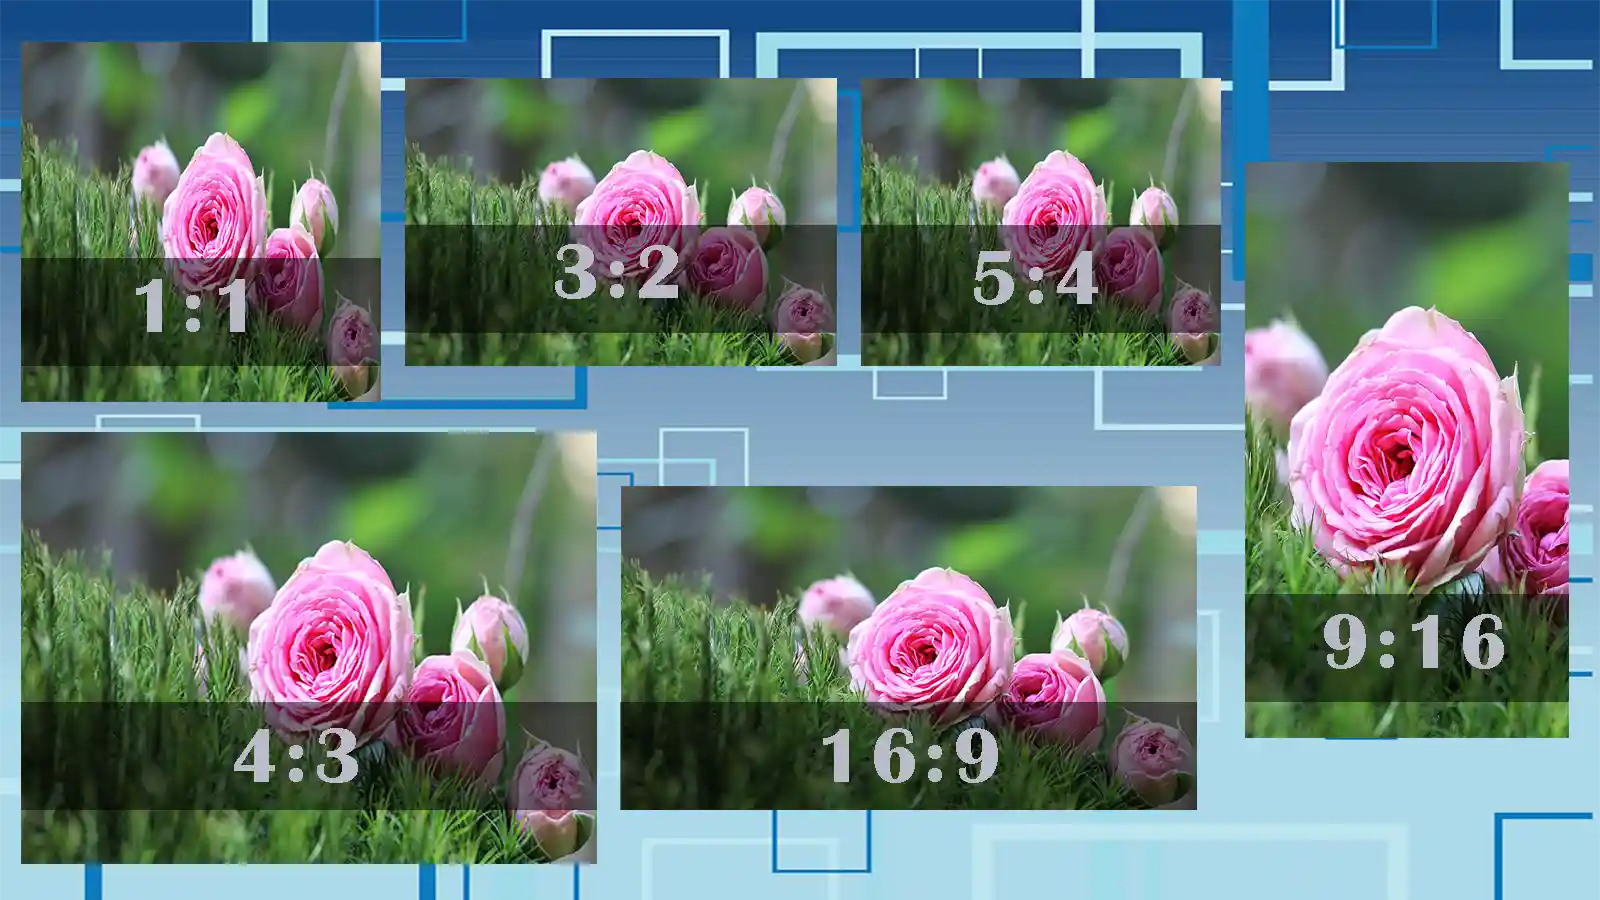
1:1 Ratio
A 1:1 aspect ratio means it is a square photo. 1:1 aspect ratio photos are mostly used in social media profile pictures. It is also used as a passport photo size in some of the countries. It could be an 8″X8″ or a 1080 X 1080 pixel photo. This aspect ratio is most used in print photographs, mobile devices, and social media platforms. But this ratio is not used for most TV or Digital formats.
3:2 Ratio
Another common aspect ratio is 3:2 is also the most used aspect ratio. This aspect ratio is used in film and photographs. The 3:2 is the ratio of the original film 35mm. That’s why is ratio is the most widely used aspect ratio. Photo framed at 1080 X 720 and 6 X 4 standard photo sizes are set at this aspect ratio.
4:3 Ratio
The 4:3 is the aspect ratio that is used most in computer screens, TVs, and digital cameras. If shooting films of photos that will be filmed on a screen then this 4:3 ratio will be recommended for standard photo size. Which will be set on the desired screen.
5:4 Ratio
The 5:4 is another important aspect ratio in photographs. This aspect ratio is used in photos and art prints. when large photos and art prints in this ratio are used. The standard photo sizes like 8″ X 10′ and 16″ X 20 ” are set in this aspect ratio format.
The most common video aspect ratio
As with the photo aspect ratio, there are some aspect ratios for video. Thus aspect ratios are used to fit the desired screens. Here we will learn about just the most used aspect ratios. which are as follows,
9:16 Ratio
The 9:16 aspect ratio is a common aspect ratio for video, presentation slides, computer monitors, or widescreen TVs. The 9:16 aspect ratio has become the international standard video size recently. And this standard video size and aspect ratio going to replace the 4:3 ratio for monitors and TV screens.
The 9:16 ratio is used in creating a slimmer and more elongated rectangular shape compared to the 4:3 format. The common sizes set on the format 19:9 are 1920 X 1080 pixels and 1280 X 720 pixels.
16: 9 Ratio
The 16:9 is a popular format for video stories on social media platforms, such as ‘Instagram’, ‘Facebook’, and ‘Snapchat’. This aspect ratio is just the inverse of the previous aspect ratio (9:16). This aspect ratio is for smartphone screen video filming. This photo frame size is equal to a smartphone’s vertical screen size. The most common dimension in this aspect ratio is 1080 X 1920 pixels.
Measurement of photo sizes
For web content, standard photos are sized in pixels. Almost all the photos uploaded on the internet are measured in pixels. There are other measurement units such as photo sizes in Inches or standard photo sizes in cm. Inches and cm (centimeters) are used in standard photo print sizes.
Standard Photo Sizes in Pixels
You can convert your photo size into pixels from inches or centimeters. Now let’s learn how to convert to pixels from inches and centimeters.
Converting inches to Pixels
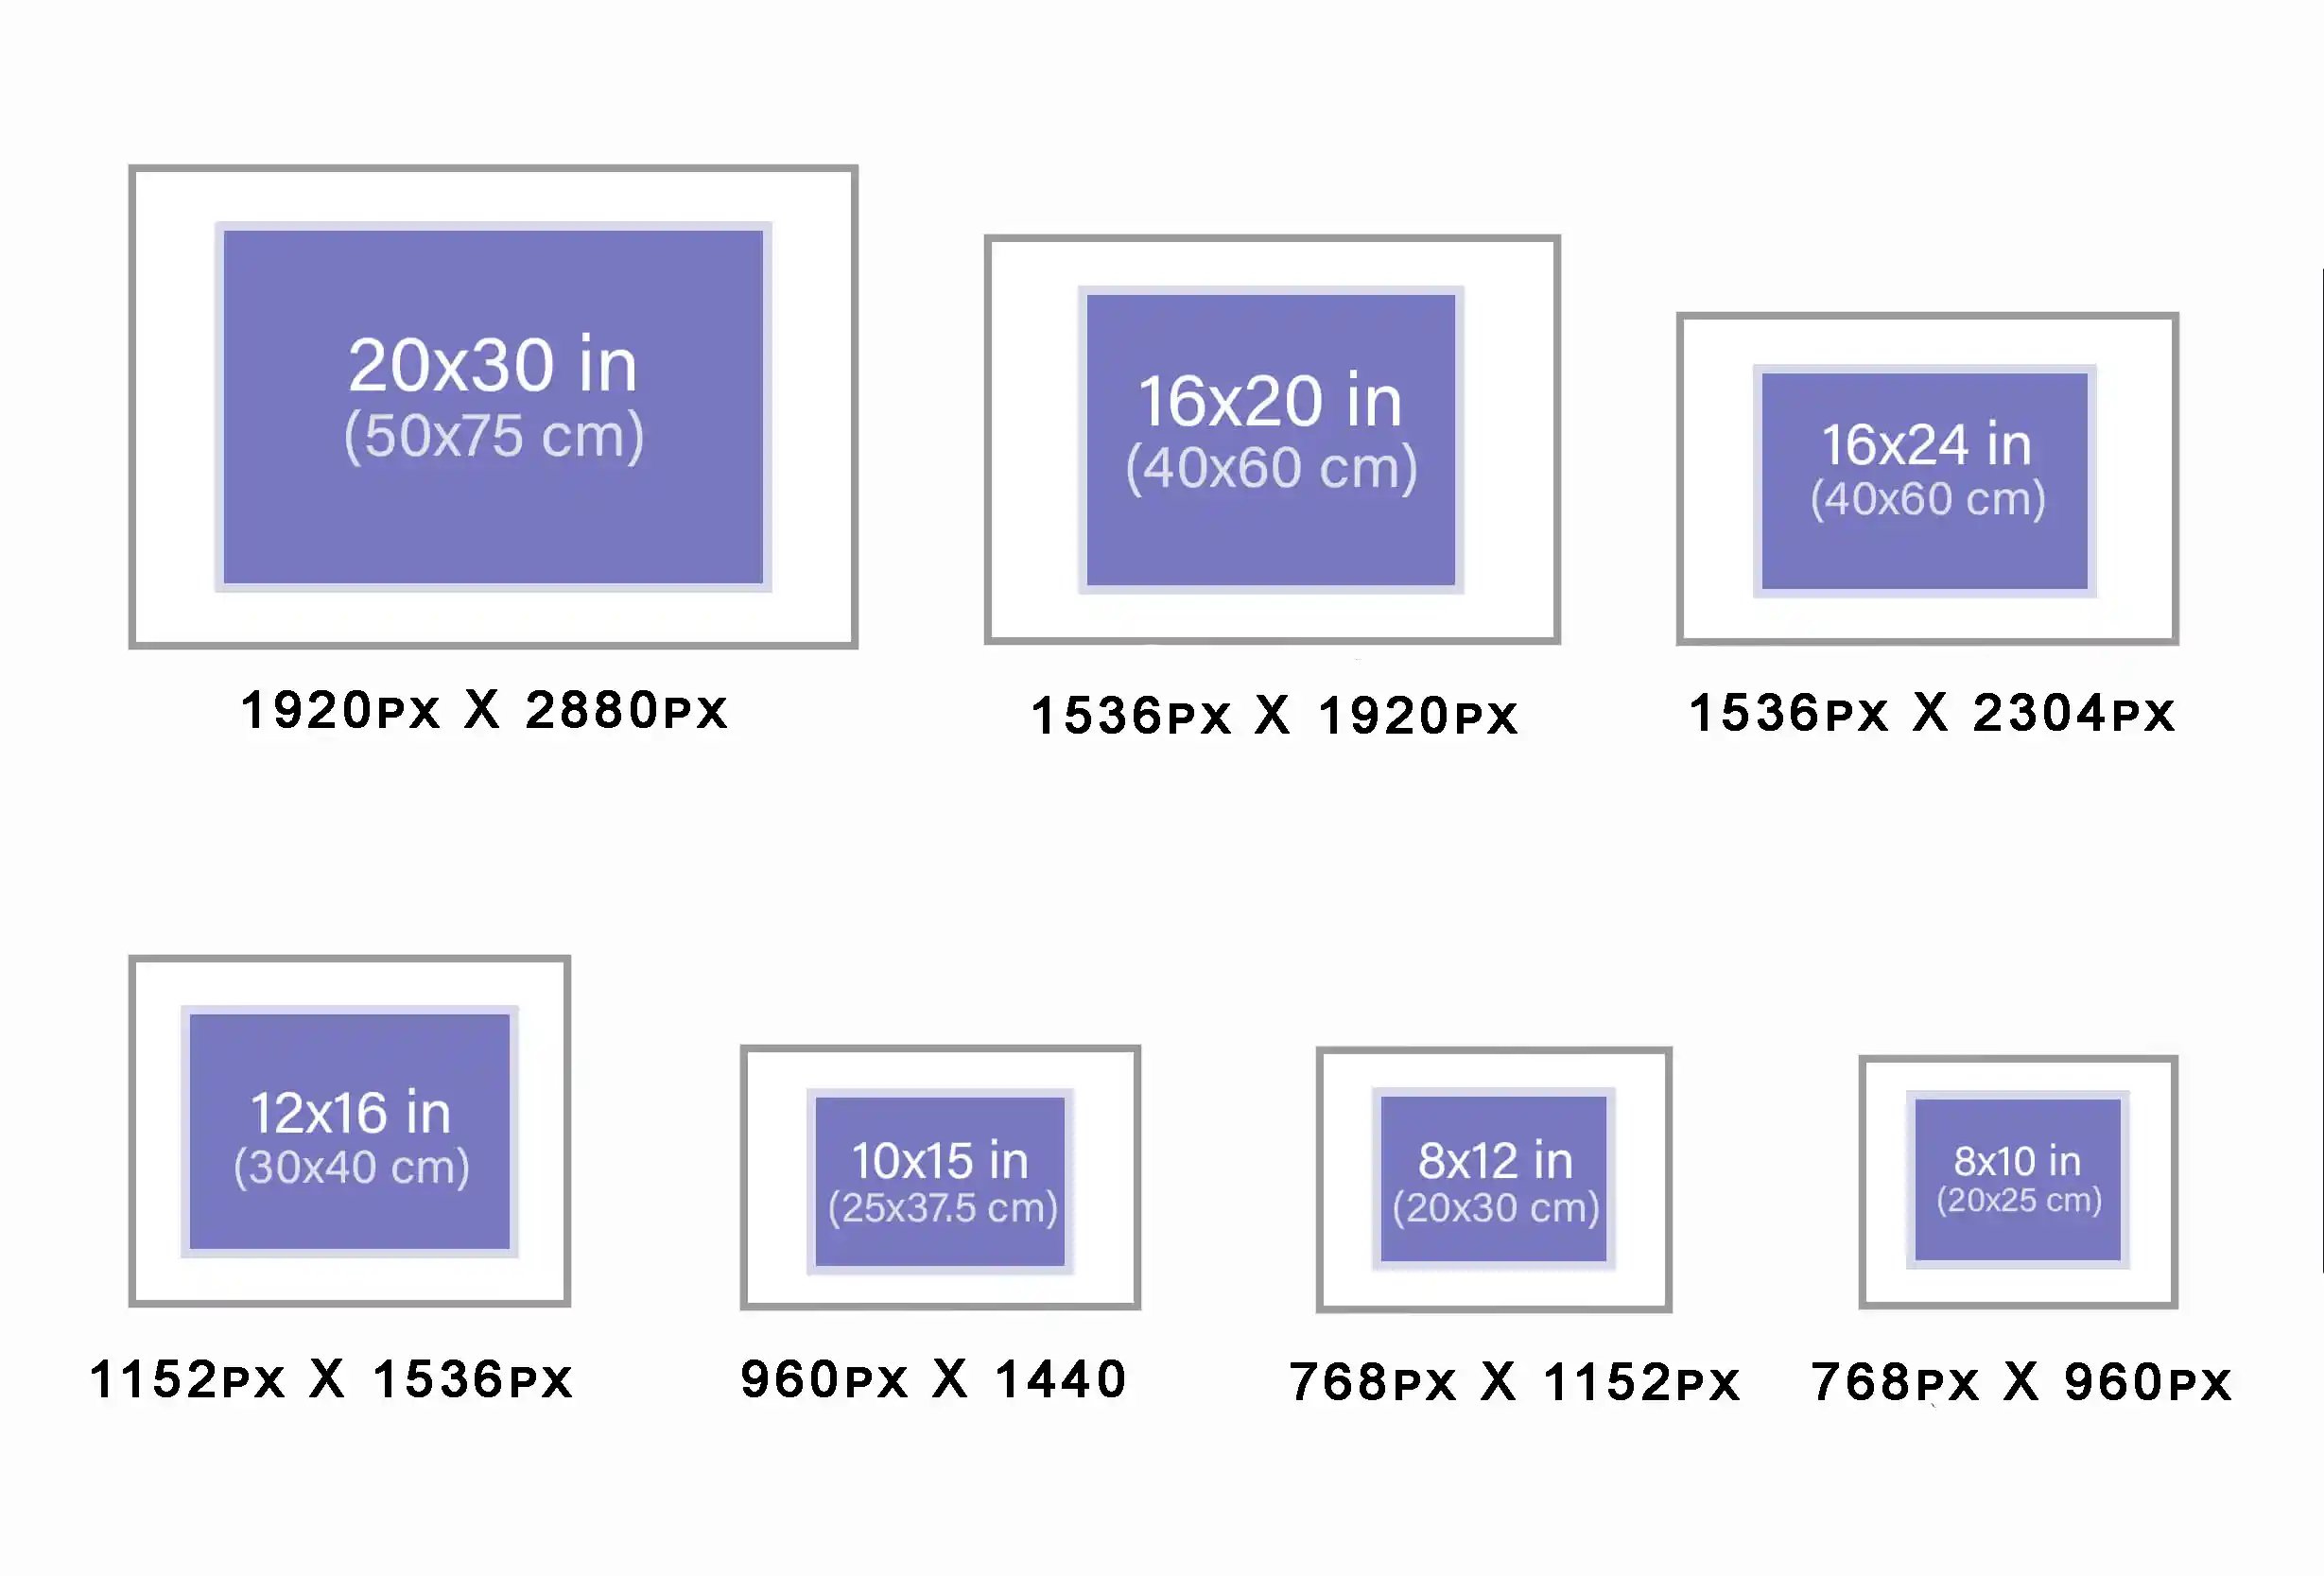
When you want to print a photo you need to know the measurement sizes of photos in inches. Most of the sizes of the printed photos are measured in inches. You can convert inches to Pixels you need to multiply the number of inches by 96.
For example, 20″ X 16″ photos can be converted by multiplying height by 96 and width by 96. So the converted size of the 20″ X 16″ photo will be 1920 X 1536 pixels.
Converting Centimeters to Pixels
In some standard photo print sizes standard photo sizes in CM are used as the measurement of the photo height and width. In small photo sizes and photo printing Cm unit is used to measure the photo. To convert the CM into pixels you need to multiply height and width by 37.795275591.
1 centimeter = 37.795275591 pixel (X)
For example, a photo with a size of 254 cm X 254 cm can be converted by multiplying its height by 37.795275591 and width by the same number. So the size of 254 X 254 will be 9600 X 9600 which is a square shape photo and its aspect ratio will be 1:1.
Photo sizes chart
There are two series of sizes one is the ‘R series’ and the other one is the ‘A series’. R series is used in Standard photo size measurement. The A series is used to measure the size of the paper. Here are the two tables of sizes of the two series below.
Standard Photographic Sizes ‘R series’
| Prints | Inches | CM | MM |
| R2 | 2.5 x 3.5 | 6.35 x 8.89 | 635 x 889 |
| 3R | 3.5 x 5 | 8.89 x 12.7 | 889x 127 |
| 4R | 4 x 6 | 10.2 x 15.2 | 102 x 152 |
| 5R | 5 x 7 | 12.7 x 17.8 | 127x 178 |
| 6R | 6 x 8 | 15.2 x 20.3 | 152 x 203 |
| 8R | 8 x 10 | 20.3 x 25.4 | 203 x 254 |
| 10R | 10 x 12 | 25.4 x 30.5 | 254 x 305 |
‘A series’ International Paper Sizes
| Paper size | Inches | CM | MM |
| A1 | 23.4 x 33.1 | 59.4 x 841 | 894 x 841 |
| A2 | 16.5 x 23.4 | 42.0 x 59.4 | 420 x 594 |
| A3 | 11.7 x 16.5 | 29.7 x 42.0 | 297 x 420 |
| A4 | 8.3 x 11.7 | 21.0 x 29.7 | 210 x 297 |
| A5 | 5.8 x 8.3 | 14.8 x 21.0 | 148 x 210 |
| A6 | 4.1 x 5.8 | 10.5 x 14.8 | 105 x 148 |
| A7 | 2.9 x 4.1 | 7.4 x 10 .5 | 74 x 105 |
| A8 | 2 x 2.9 | 5.2 x 7.4 | 52 x 74 |
| A9 | 1.5 x 2.0 | 3.7 x 5.2 | 37 x 52 |
| A10 | 1.0 x 1.5 | 2.6 x 3.7 | 26 x 37 |
Different Photo Sizes
There are different sizes for different uses like web content, printing photos, or social media photos. Let’s learn the different sizes for the different uses one by one.
Different standard photo sizes for web content
Web contents are respectably large and here we mainly talking about then images and video content. However, Images in different content vary in size. However, most of the image websites and video content on the websites use standard sizes for their web content.
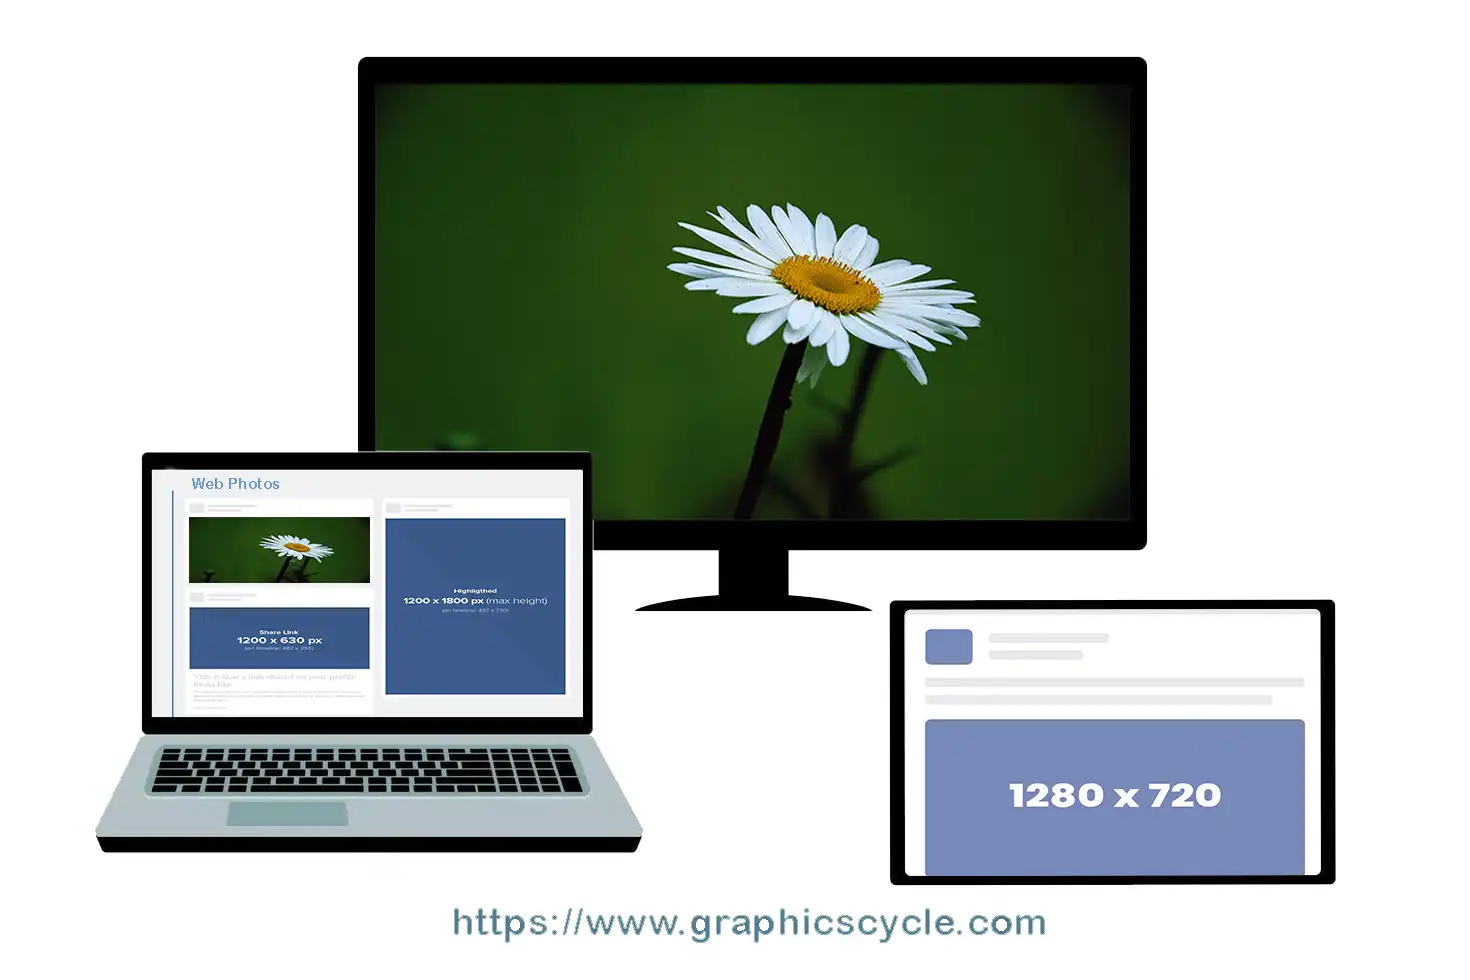
1920 X 1080 Pixels
This standard photo size is used for GIB screens, Presentations, and social media cover photos. This Standard photo size for the web follows the 16:9 aspect ratio.
1280 X 720 Pixels
This is the standard size of feature photos for web content. This standard photo size also follows a 16:9 aspect ratio.
1080 X 1080 Pixels
This standard photo sized for web content is used for different social media profile photos like Facebook and Instagram. This size follows a 1:1 aspect ratio.
Standard photo sizes for High-Definition photos
HD stands for high definition. When we said HD images we indicated the images with high-definition quality. There are different standard sizes of HD images which are as follows,
HD Quality
An image size of 1280 x 720 pixels is large enough to be HD standard and is commonly used in photography and film. All sizes above this standard photo size are in the HD category standard.
4K quality
4k is four times the number of pixels of 1080 x 1080 images. The minimum pixel size to achieve 4k image quality is 3840 x 2160. This was one of the benchmarks of HD images and video.
8K quality
8K size is a larger image size. It’s producing impeccable quality video and photography. The dimensions used for this standard photo size are 7680 x 4320 pixels.
Different common standard photo sizes for photographs
Most of the standard photo sizes measure in inches. You can also convert the inches to CM (centimeters) you just need to multiply the height and width by 2.54. Here we will discuss the most standard sizes of photos which are sized in inches.
4 X 6 Inches
“4 X 6 Inches” is the most used standard photo size for photographs. This standard photo size perfectly fits into the 3:2 aspect ratio. If you shoot your photos in a 3:2 aspect ratio then you don’t have to crop your images to fit standard photo print size.
5 X 7 Inches
“5 X 7 Inches” is the standard photo size for framed photos and greeting cards. You can use a 3.5:2.5 ratio on your camera for the best result. If you use this ratio you will need to crop your images to fit this size. For a perfect fit and quality when printing, make sure your photo is 1500 x 1200 pixels.
8 X 10 Inches
“8 X 10 Inches” is another standard photo print size and a good choice for photographs. Use a 5:4 aspect ratio if you want to print your images at 8 X 70 inches size. You need to crop some parts of the photo on the long side. So when you taking photos make sure there’s nothing important at the bottom or top. For the best result when printing photos make sure your photos print in 2400 x 3000 pixels to first this printing size.
8.5 X 11 Inches
“8.5 X 11 Inches” is a more appropriate standard photo size for frame photos than previous sizes. For the best result use a 4:3 aspect ratio on your camera. And when printing your photos make sure photos printing in 3600 x 5400 pixels.
12 X 18 Inches
For the best for this printing, photo size make sure the images are large enough. Your photos should taken in the aspect ratio 3:2 and your image might be edited or resized at 3600 x 5400 pixels.
18 X 24 Inches
For a much larger printing size, you have to make sure your photos are in 5400 x 7200 pixels. And that photos are taken at the aspect ratio of 3:4.
24 x 36 Inches
You should make your image large enough to fit this extra-large photo size. For the best result print image in the digital image size of 7200 x 10800 pixels. Use an aspect ratio of 3:2 when you’re creating a photo of this size.
Standard Photo Sizes for Social Media
When you are uploading your photos on social media you should know the required standard photo sizes. Some social platforms do not let you upload photos unless your photos are in the correct size. So it is important to get it right.
Standard Photo Sizes For Instagram
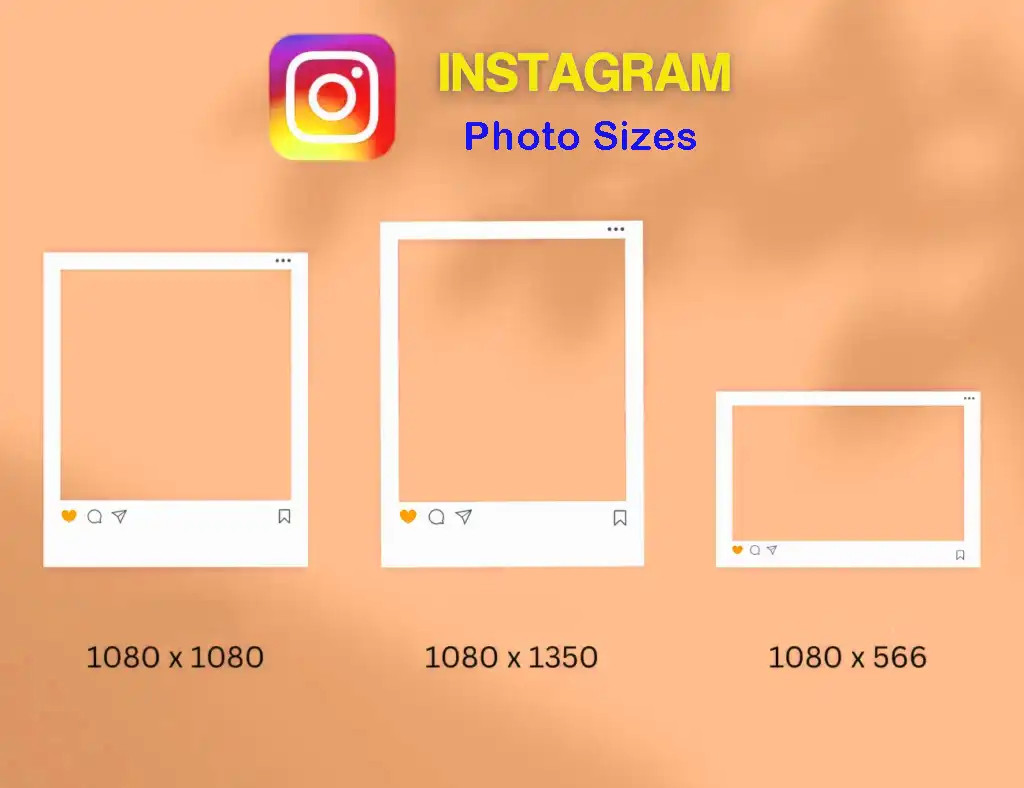
Instagram Post
If you want Instagram to keep your photo at its original resolution try to upload your images in 1.91:1 and 4:5 aspect ratio. And resize your photo between 320 and 1080 pixels. If you upload photos at a lower resolution Instagram will enlarge them to a width of 320 pixels. Or if you share a photo at a higher resolution then Instagram will size it down to a width of 1080 pixels.
Instagram Stories
Instagram stories are vertical, So you need to rotate your photos to fit in Instagram stories. you can also take any photographs in portrait orientation ( taller than they are wide ). You can also make an Instagram template for photos that are intended for stories. The pixel dimension for an Instagram story is 1080 x 1920. The aspect ratio is 9: 16 for photo sizes of Instagram stories.
Standard Photo Size for Facebook
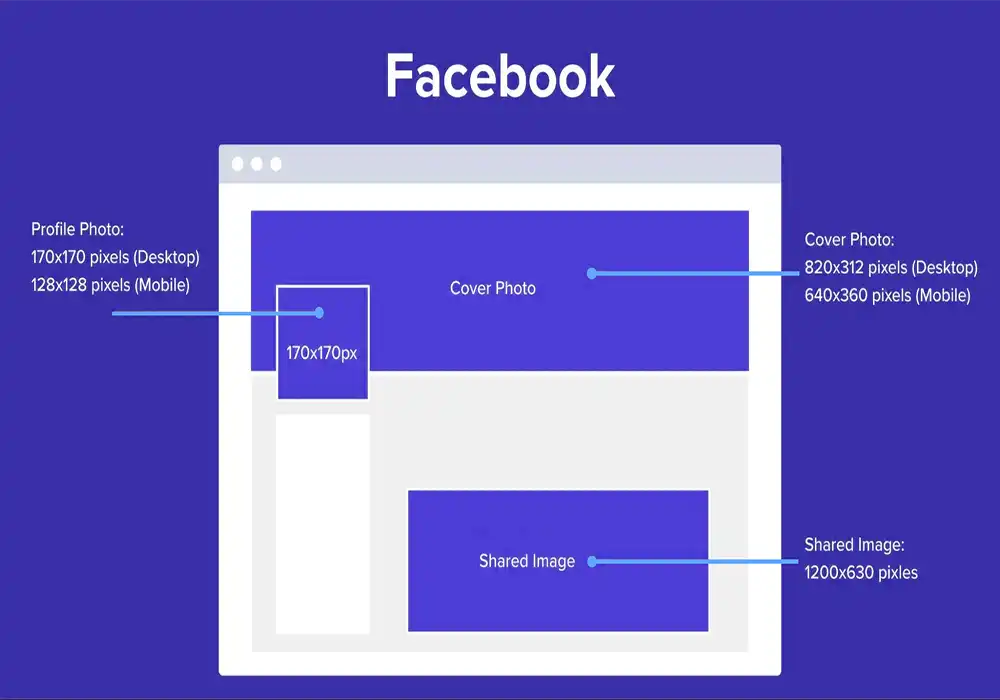
Facebook Posts
The minimum resolution that Facebook allows is 479 x 246 pixels with a link on a desktop for mobile phones minimum width is 320 pixels. The standard photo size for Facebook is 1080 x 1350 pixels. For the right-column ads (only shown on desktop) the standard photo size is 1200 x 1200. This is a square photo whose aspect ratio is 1:1. The minimum resolution for the right column ads is 254 x 133 pixels.
Facebook Stories
Facebook stories are vertical, So you need to rotate your photos to fit in Facebook stories. you can also take any photographs in portrait orientation ( taller than they are wide ). You can also make a Facebook story template for photos that are intended for stories. The pixel dimension for a Facebook story is 1080 x 1920. The aspect ratio is 9: 16 for photo sizes of Facebook stories.
Facebook Profile Photos
Facebook accepts the minimum size for a profile photo is 176 x 176 on your page on computers, and for smartphones, it will be 196 x 196 pixels. The highest resolution Facebook will allow you to upload as your profile picture is 2048x 2048 pixels. Facebook recommends uploading a higher resolution image of 720 x 720 pixels with an aspect ratio of 1:1.
Facebook Cover Photos
The photo you want to upload as your Facebook cover photo must fit into the aspect raion 16:9. The minimum resolution of an image that Facebook allows is 400 pixels wide and 150 pixels tall. Lads Fastest as an sRGB JPG file that’s 851 pixels wide, 315 pixels tall, and less than 100 kilobytes.
Standard photo Sizes For Twitter
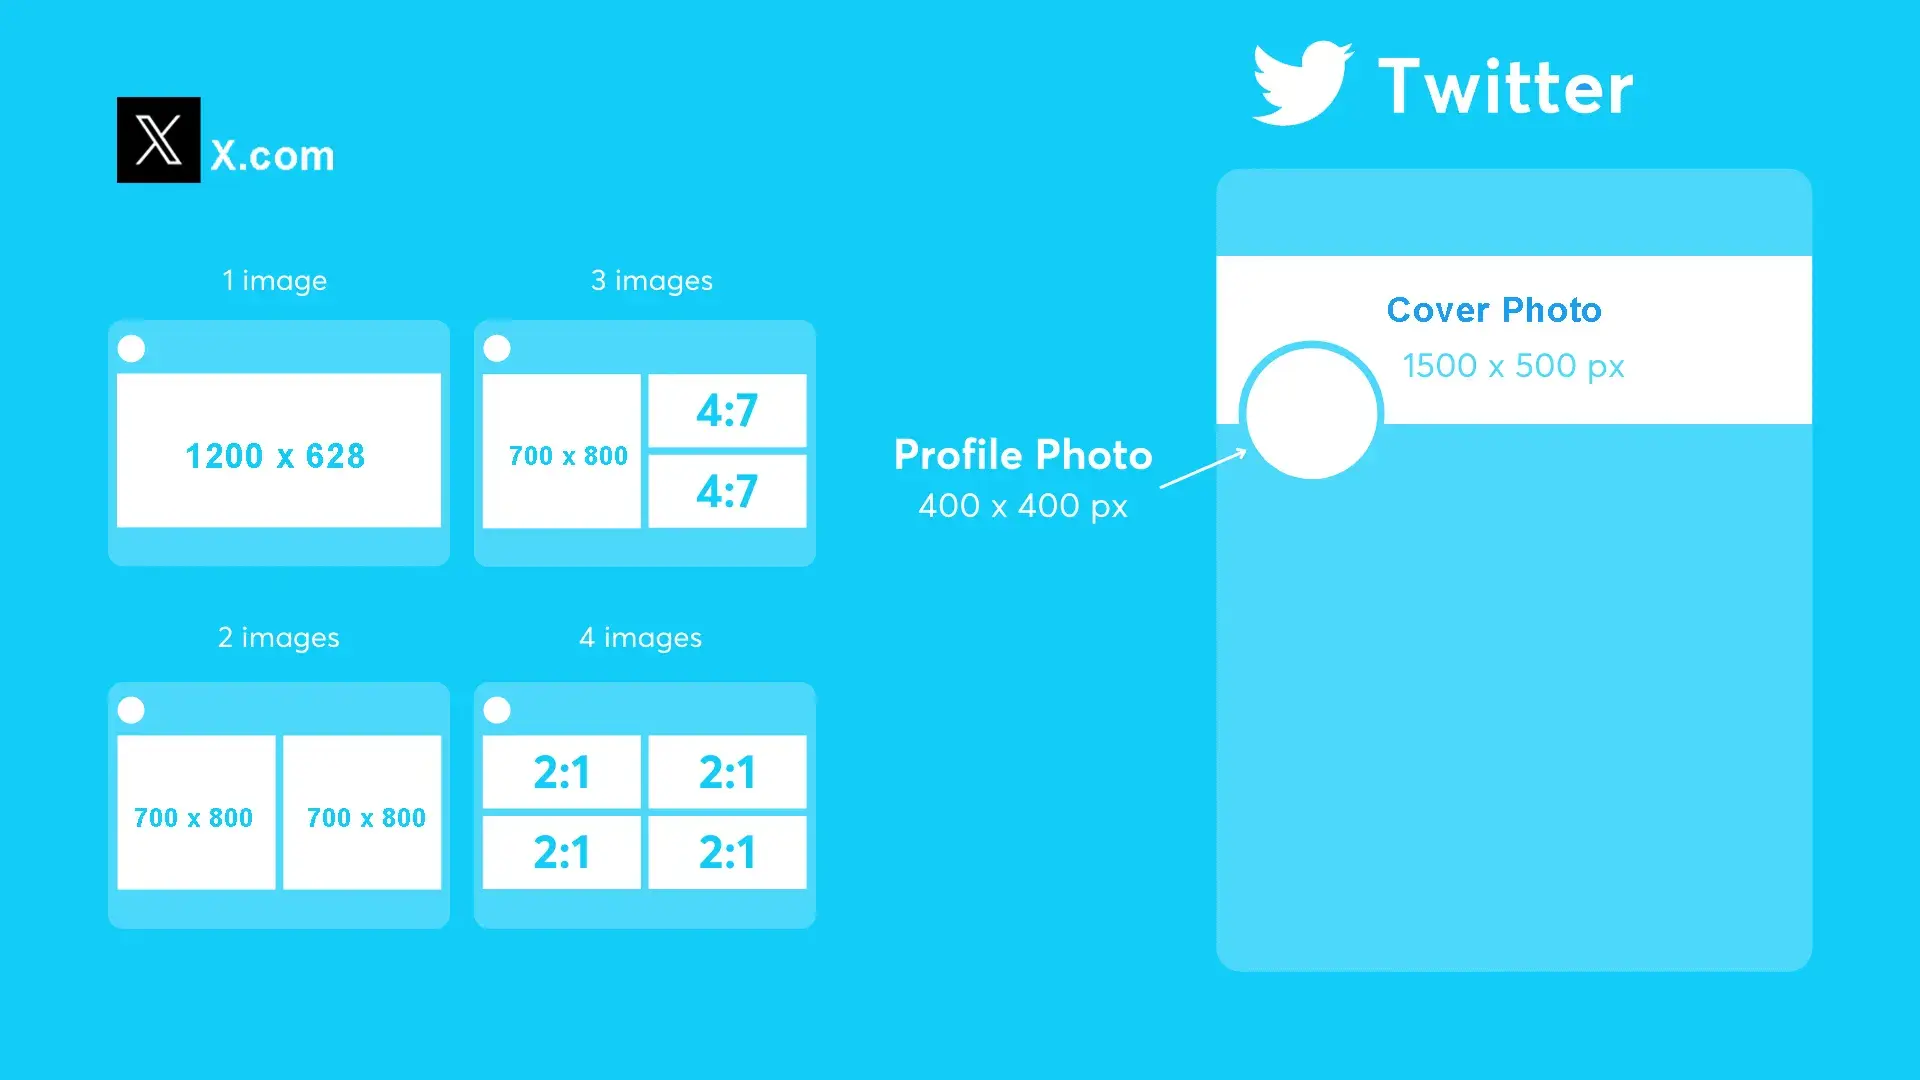
Twitter Posts
If you want to use a photo with your Twitter post you have to use different sites for a single photo post, a photo with a link, or a group photo post.
- The standard photo size for a twitter post with a link is 1200 x 628 pixels.
- The standard photo size for the Twitter single photo post is 1200 x 6 75 pixels
- And the photo size for the Twitter post for a group of photos is 700 x 800 pixels.
Twitter Cover Photos
Your cover photo is the image that goes across the top of the profile page. the standard size for the Twitter cover photo is 500 x 1500 pixels.
Twitter profile photo
The minimum standard photo size for a Twitter profile photo is 400 x 400 pixels. TWitter’s recommended dimensions for header images are 1500 x 1500 pixels.
Standard photo sizes for Pinterest Pins
There’s no standard photo size for interest pins. The best interest in size is 1000 x 1500 pixels. You can also use 600 x 900 pixels, 1200 x 1800 pixels, or 2000 x 3000 pixels. These all are ideal for the interest pins photos. Which fits into the aspect ratio of 2:3.
Standard Photo Sizes For LinkedIn
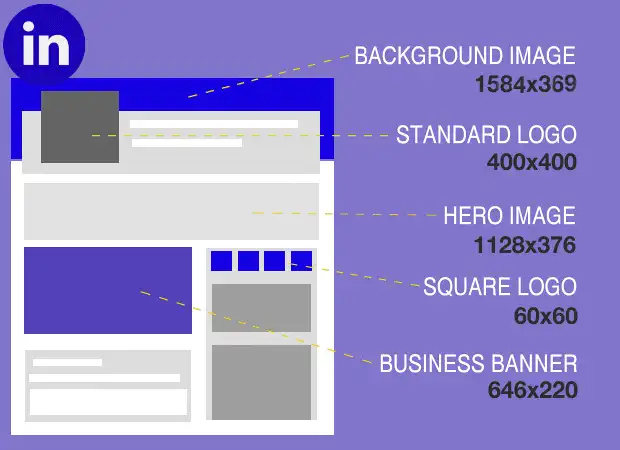
LinkedIn Post
The standard photo size of LinkedIn is 1200 x 627 pixels. This size will fit the feed for LinkedIn and help to make sure it’s not distorted or stretched so that it looks professional.
LinkedIn Background Image
LinkedIn Background phtos size is different photo size which is slightly long in size. you should use a photo in the resolution of 1584 x 396 pixels.
LinkedIn Profie Picture
The ideal size for your LinkedIn profile picture is 400 x 400 pixels. Which aspect ratio is 1:1. On the other hand you can a square photo as your LinkedIn profile picture.
The recommended photo sizes are very with the websites and their recommendations. Such as Walmart will allow you to upload any photo under a width of 8000 pixels and height of 8000 pixels. A maximum file size of 16 MB will be allowed to upload.
On the other hand, Walgreens recommended different sizes for different photos. Product photos, banner photos, or ads with different images require different-sized photos.
Final Thought | Standard Photo Sizes & Best Aspect Ratios
If you planning to build a career as a professional photographer then you should have good knowledge about photo sizes. You also have to understand the concept and relation between the standard photo sizes and aspect ratio. It will help you to get the best result if you decide on the photo size before taking a short.
For example, if you want print photos for framing then you should capture images in the aspect ratio of 3:2. Or if you are capturing photos for upload to your social media account as a cover photo then you should take photos into the aspect ratio of 16: 9. So is very important to have a clear understanding about the standard sizes if you want to build a career related to photography and printing.
Don’t Miss Out
FAQ | Standard Photo Sizes
Is 5×7 Normal Picture Size?
If you want to frame your photo and hang it on your wall then you can print your image in 5 x 7 size. 4 x 6, 5 x 7, and 8 x 10 are the most used sizes for print images.
What is the Smallest Photo Size?
The smallest photo size is 2×2 inches. If you want to resize photos below this size you will not be able to edit the photo due to the tiny photos size.
What size is the Lowest Resolution Photo?
Photos below 200 PPI are the lowest resolution photos. Photos below 200 PPI are called low-res images. low-res images will appear blurred after printing even though it might seem good on the computer screen.