The styles of graphic design are evolving unimaginably. The designers are now more careful about choosing their colors for every piece of art. And, lilac color has been one of the go-to colors for graphic designers. The creative artists of today’s world are focusing on making the best use of this shade. So, learning the uses of lilac colors has become a necessity for painters and graphic designers.
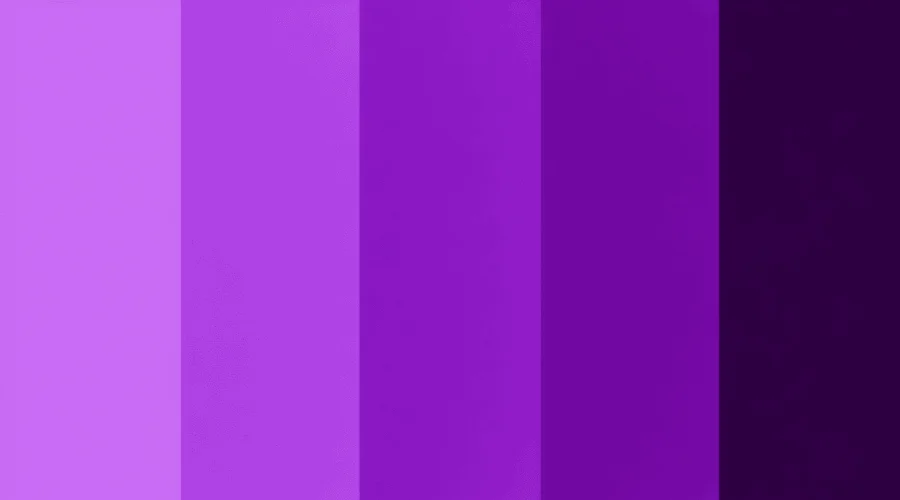
The lilac shade is also known as “lilac purple”. It is a light purple color. Specifically, you can describe this shade as pale to medium purple with a slightly pinkish hue. The lilac color is versatile. You can use it with 34 other colors. The charm of this color makes the photos more eye-soothing.
Lilac colors work like magic for creating stunning designs. Let’s learn everything about this beautiful color so we can apply them in our designs.
What is Lilac Color?
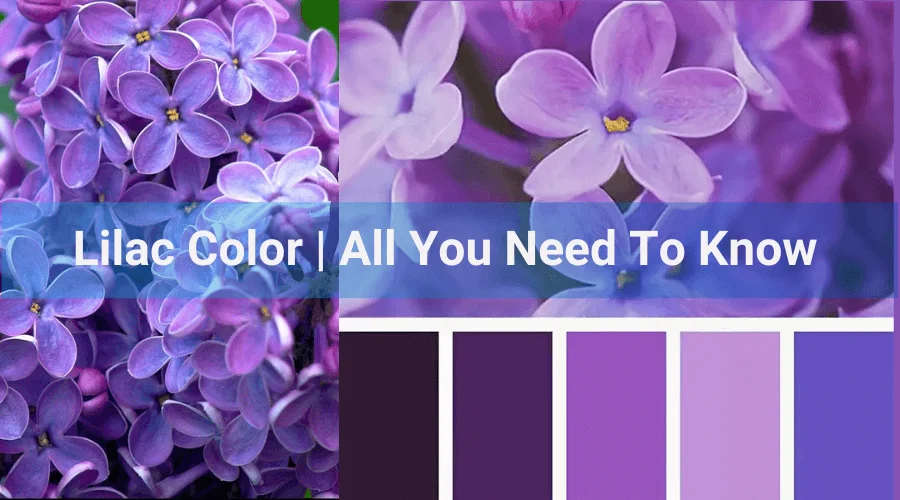
Lilac is a flower with a strong fresh fragrance. The lilac perfume is also famous all over the globe. However, lilac as the color name was first used in 1775. The pale purple color creates a sense of freshness.
The softness of lilac attracts the viewers and makes the artists experiment with variations of this color. Thus, the lilac color has been incorporated into the artworks in unique ways. Now, you will get different variations of lilac colors. You need to use them wisely in your artwork.
The lilac is also famous for symbolizing youthfulness and purity. However, there are variations of their exact hue. You will get hue ranges from reddish purple to bluish purple. You can create joyful and romantic modes using this color.
The hexadecimal code for lilac is represented as #C8A2C8. This translates to RGB (200, 162, 200) and CMYK (0%, 19%, 0%, 22%). It’s important to note that the codes may vary slightly depending on the specific shade of lilac you’re interested in.
The Color Theory Aspect of Lilac Color
Hue: 300.0 degrees
Saturation: 0.19
Lightness: 0.78
Hue is a position in the color wheel that measures in degrees. The hue for the lilac color is 300 degrees. It indicates that the lilac in the color wheel places in the violet/purple range.
Saturation is the measure of the amount of gray mixed into the pure color. Here the value of 0.19 indicates the desaturated condition in the color wheel. So, there is a significant amount of gray mixed with the color that creates a soft tone.
Meanwhile, lightness is the relative brightness of the color. The contrast we see in the photo is because of brightness. The high lightness value of lilac indicates it is a light color. The value leans toward the white end of the color wheel. This high lightness value generates a calming view of lilacs.
How Lilac Is Created?
“How is lilac created?”-it has been one of the most asked questions by the painter. The most effective way to create a lilac color is by mixing the red and blue. However, you can follow two methods for creating lilac solid color by the traditional paint mixing process.
The first one is by mixing violet and white. It is the easiest method to create lilacs. Start with the base of violet paint. The selection of the violet or pale shade depends on the desired shade. Thus, violet will become lighter and less saturated, resulting in a soft lilac hue.
The other way is red, blue, and white color. Here you will get more control over the color. Mix red and blue paint in equal parts to create a basic violet. Then, add white to desaturate the violet into lilac.
In the meantime, the lilac color can easily be created for the digital arts. There are also two ways to get the lilac color in the digital medium. The first one is using the color picker. And, the other one is mixing the RGB values. The gray lilac color is a desaturated form.
Comparing Shades of Purple
Purple is a beautiful and versatile color, but with so many shades, choosing the right one can be tricky! Here’s a closer look at four popular purples: lilac, lavender, mauve, and periwinkle.
Features
Lilac
Lavender
Mauve
Periwinkle
Undertone
Pink
Blue
The Mix of Pink & Purple with Significant Gray
Balanced Blue & Purple
Temperature
Warmer
Cooler
Cooler
Cooler With A Touch of Brightness
Vibrancy
More Vibrant
Less Vibrant
The least Vibrant (Muted)
Brighter Than Lilac
Feeling
Soft, Romantic, Calming
Vintage Charm
Muted, Vintage
Fresh, Tranquil, Whimsical
What Colors Go with Lilac?
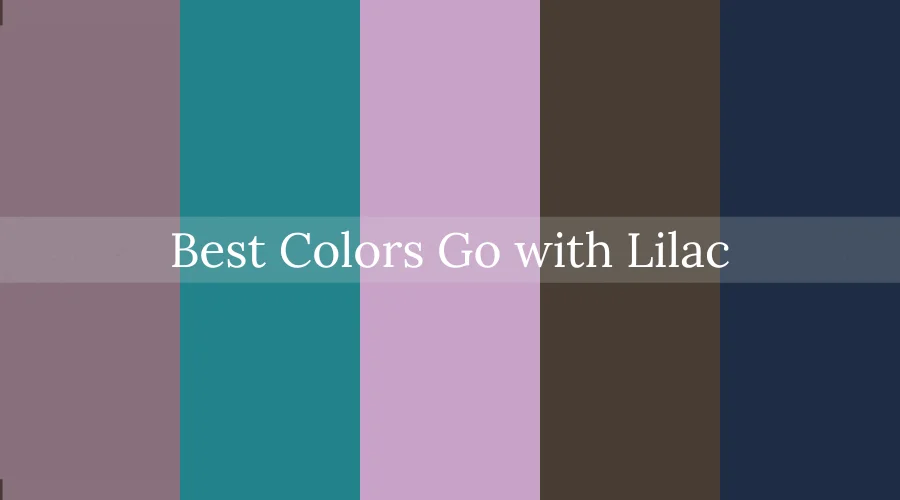
The versatility of the lilac color makes it ideal to use with other colors. If you need a bright palette you can use contrasting colors. For example, yellow creates a cheerful combination. Meanwhile, orange is for warmth and green brings a natural contrast.
You can also combine lilac with other colors for a soft and harmonious palette. Artists create a cohesive look by pairing lilac with colors next to it on the color wheel.
The Light Pink color amplifies the softness and femininity of lilac. But rose brings a sophisticated and romantic combination. Also, the pale mauve is an elegant pairing. Additionally, by combining lilac with white you can create a clean foundation for lilac to shine. Adding gray allows you to create variations in the shade.
Symbolism of Lilac
Color psychology has an important role in our lives. Specific color evokes a specific emotion. However, it varies from person to person. The specific shade of lilac also generates a specific emotion. Understanding the emotions and characteristics of lilac is important to use it efficiently in the arts.
The light and cool shades of lilac create a sense of calmness. You can use this color in a busy environment to get a relaxing atmosphere. Also, lilac color is so effective in the new spaces. You can apply a new idea using this color as it is versatile.
Another characteristic feature of the lilac color is its innocence and purity. The gentle nature of the color evokes a feeling of freshness. Artists also use lilac for a romantic and feminine touch. It can be used to create a soft and inviting atmosphere.
In ancient times, the tyrian purple was incredibly rare and expensive to produce. It was a shade of lilac. That’s why the powerful and rich people of the country only use this color. Lilac, with its regal heritage, can add a touch of grandeur and sophistication to designs.
Uses of Lilac in Design
The hex code of lilac #C8A2C8 is one of the most used codes in the digital color spectrum. You may use it as the main color or combine it with other colors to create an eye-catching design.
The versatile color palette of lilac widens its application in the designs. You can use this color to create a calming environment in your designs. Meanwhile, pairing lilac with black or charcoal for a modern and sophisticated feel, is ideal for workspaces or studios.
The deep lilac shades allow you to bring a blood accent to the design. You can also combine lilac with complementary colors like yellow, orange, or olive green. Thus you will get a more vibrant look. Thus, lilac’s versatility makes it shine across the design fields. As lilac adds a touch of femininity, fashion designers use this color in dresses, blouses, or scarves.
Lilac Color Palette Ideas
Now, do you want to use lilac color for creative designs? Creating a lilac color palette will help you apply this color more efficiently. There are different types of color palettes you can create like a lavender lilac color palette.
To create a tranquil space, use lilac light shade as a base color. Then add white and sage green for freshness. The medium lilac shade with light pink and dusty rose combination helps in creating a romantic atmosphere.
Add deep lilac as a base with Gray and metallic gold to create a modern dramatic atmosphere. Moreover, you can also create a mysterious color palette by adding forest green, lilac, eggplant-purple, and grays.
How to Use Lilac Colors in Wedding Events?
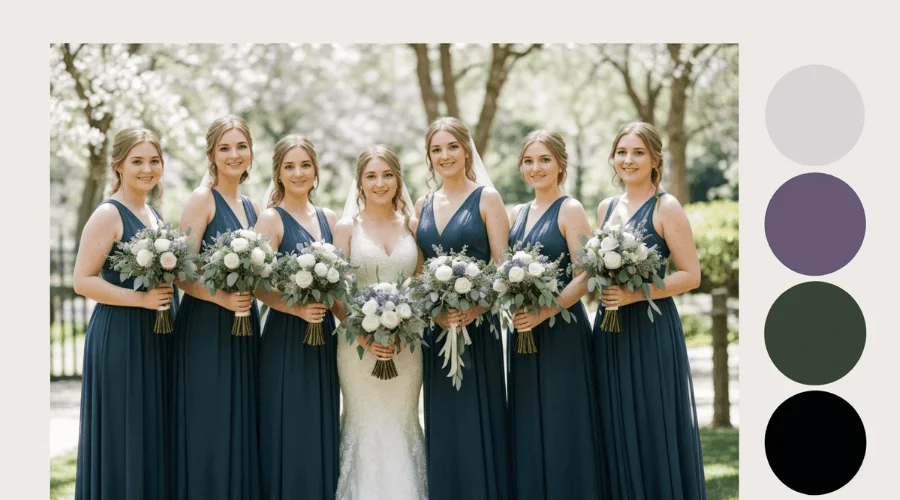
Lilac is a perfect choice for wedding events. From the decoration of the venue to the wedding attire, lilac brings elegance with a soft romantic vibe. Lilac bridesmaid dresses in various shades create a cohesive and stunning look. You can experiment with different designs and fabrics.
Though lilac seems to be a feminine color, you can also use it for the dresses of groom and groomsmen. The groom can add a touch of lilac with a lilac tie, pocket square, or boutonniere. Groomsmen can follow suit for a coordinated look. The lilac color shirt is also an option.
Moreover, lilac is useful for bridal accessories. A lilac sash or veil can add a subtle pop of color to the bride’s white dress. Lilac, lavender, and wisteria are natural choices for bouquets, centerpieces, and floral arrangements. You can use other flowers in white, ivory, or blush. It will create a more textured look.
Lilac uplighting is also a good choice. Thus, you can create a magical ambiance during the reception. For a spring wedding, use lighter shades of lilac with pastel accents. For a summer wedding, go for bolder lilacs with pops of yellow or orange.
FAQ
What is Special About Lilacs?
Lilac color evokes specific emotions. It symbolizes royalty, calmness, innocence, and romanticism. This versatility has given lilacs a special palace in the color wheel.
What Affects the Color of the Lilac Flower?
The color of the lilac flower depends on a few factors. The soil pH is one of them. Also, it depends on the local climatic conditions.
Is Lilac A Happy Color?
Yes, lilac is a happy color. The soft nature of the color calms our eyes. Also, it evokes emotions of positiveness. It feels pleasing to see this color.
So, lilac as a color has a range of uses in artworks. This soft, pale purple hue is mainly used for the calming effect. It’s created by mixing red, blue, and white, leaning slightly warm. This soft, pale purple hue is mainly used for the calming effect. It’s created by mixing red, blue, and white, leaning slightly warm.
Lilac’s enduring appeal comes from its ability to evoke feelings of peace, innocence, and creativity. In design, it shines due to its versatility. However, creating outstanding designs using lilac color requires practice to achieve. You follow the blogs of the experts in this industry.
Moreover, photo editing experts can help you to get the desired designs of lilac color. So, contact them to get your designs.
You can use different methods to convert raw to jpeg. For example, you can use dedicated photo editing software. Also, the free online image converters help convert image formats. In this article, I will be discussing the three different ways to convert your images from raw to jpeg. Also, you will get bonus tips on batch conversion.
However, you need a good understanding of these two image formats. It will help you to choose the right format for your projects. Let’s start.
Understanding the RAW and JPEG Image Formats
As a photographer or image editor, it is important to choose the right image format. However, both raw and jpeg image formats are the most commonly used image formats. Each has distinctive features that allow you to use them for different needs.
The raw images are like the fresh ingredients of a recipe. You capture all the raw details through your camera lens. That’s why the raw images contain unprocessed information. It gives you the maximum flexibility in photo editing. Moreover, in the raw images will have the control in your hands. So, altering the image parameters such as white balance or shadows becomes more efficient.
On the other hand, JPEG or JPG is the more compressed image format. You can compare it with the pre-cooked dishes. Here your camera will process the data. It will take decisions on certain image parameters including white balance and sharpness. Thus you will get a more manageable and smaller file format.
01. Convert RAW to JPEG Using Adobe Photoshop
Converting RAW photos to JPEGs in Photoshop is the easiest way if you have Photoshop on your PC. It is the best raw-to-jpg converter software for PCs. Let’s learn about the individual file conversion and batch photo conversion techniques:
Individual File Conversion
Step 1: Open the raw file in Photoshop.
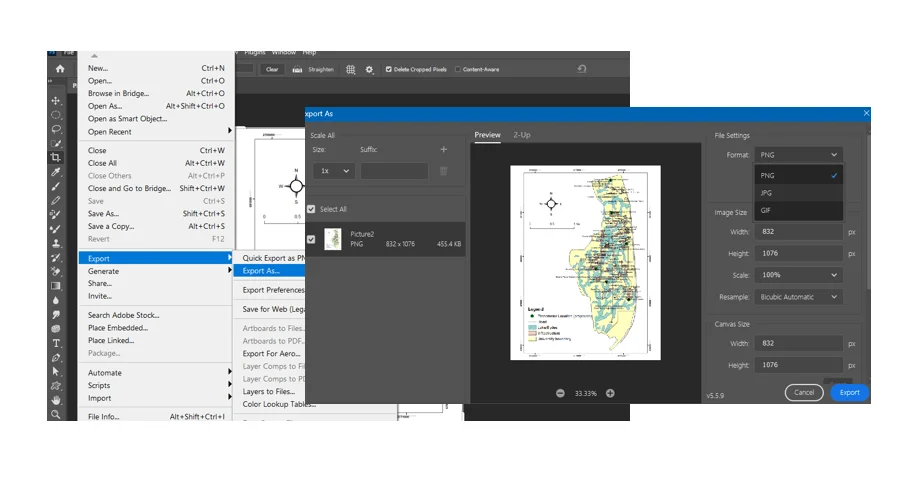
Step 2: Go to File > Export > Export As.
Here, you have to choose JPEG as the file format. Moreover, you will get a slider to adjust the quality. Then choose the destination folder, rename the file, and hit the “Export” button.
Batch Conversion | Convert RAW to JPEG
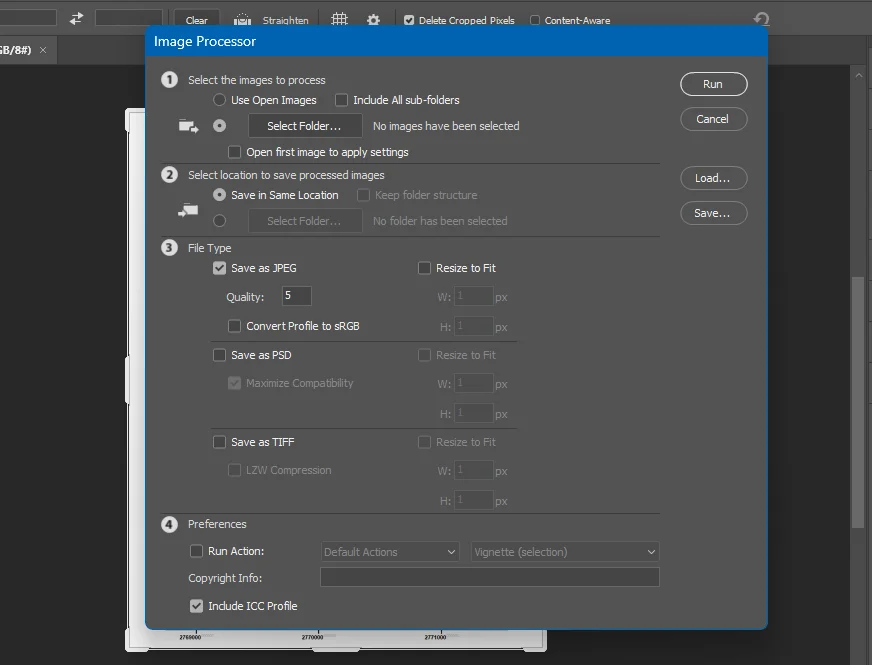
Step 1: Go to File > Scripts > Image Processor.
Step 2: In the “Source Folder” section, click “Select Folder” and choose the folder containing your RAW files.
Step 3: In the “Destination Folder” section, click “Select Folder” and choose where you want the converted JPEGs to be saved.
Step 4: Make sure “Save as JPEG” is selected in the “File Type” section. Then click “Run” to start the batch conversion.
Following these steps, you can convert raw to jpeg in Photoshop.
02. Converting RAW to JPEG Online: 10 Top Converters for Occasional Use
Capturing photos in RAW format unlocks the full potential of your camera. However, you have to convert them into JPEG before sharing or storing them. Photoshop may require some time for the conversion. Also, you may not have access to Photoshop on your computer.
In this scenario, you can use the online converter for the quick conversion of RAW photos to JPEG. These websites are free and you need only one click on the “generate” button to get the file.
Let’s learn about the 10 most used raw to jpg converters online free:
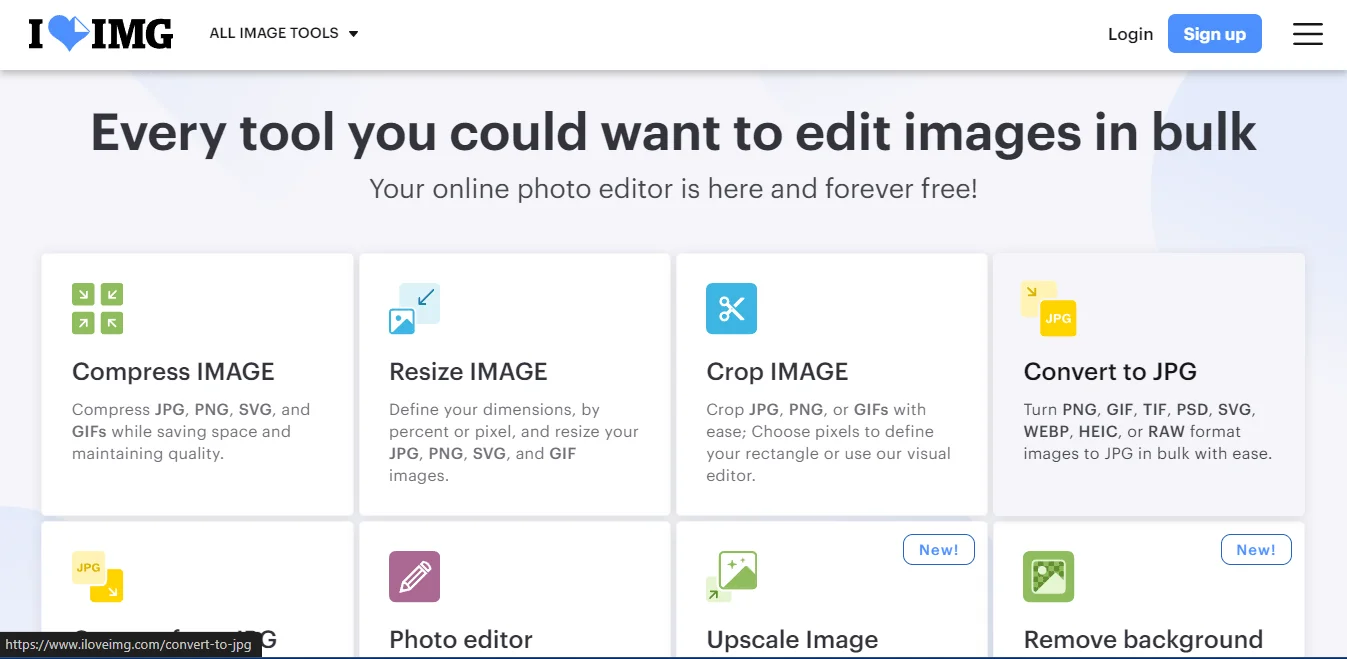
1. iLoveIMG | How To Convert RAW to JPEG
This user-friendly platform has a clean interface. The iLoveIMG supports over 200 formats, including RAW and JPEG.
How to Use
Step 1: Drag and drop your RAW file or click “Select Image.”
Step 2: Choose JPEG as the output format.
Step 3: Click “Convert Now.”
Step 4: Download the converted JPEG.
2. Convertio
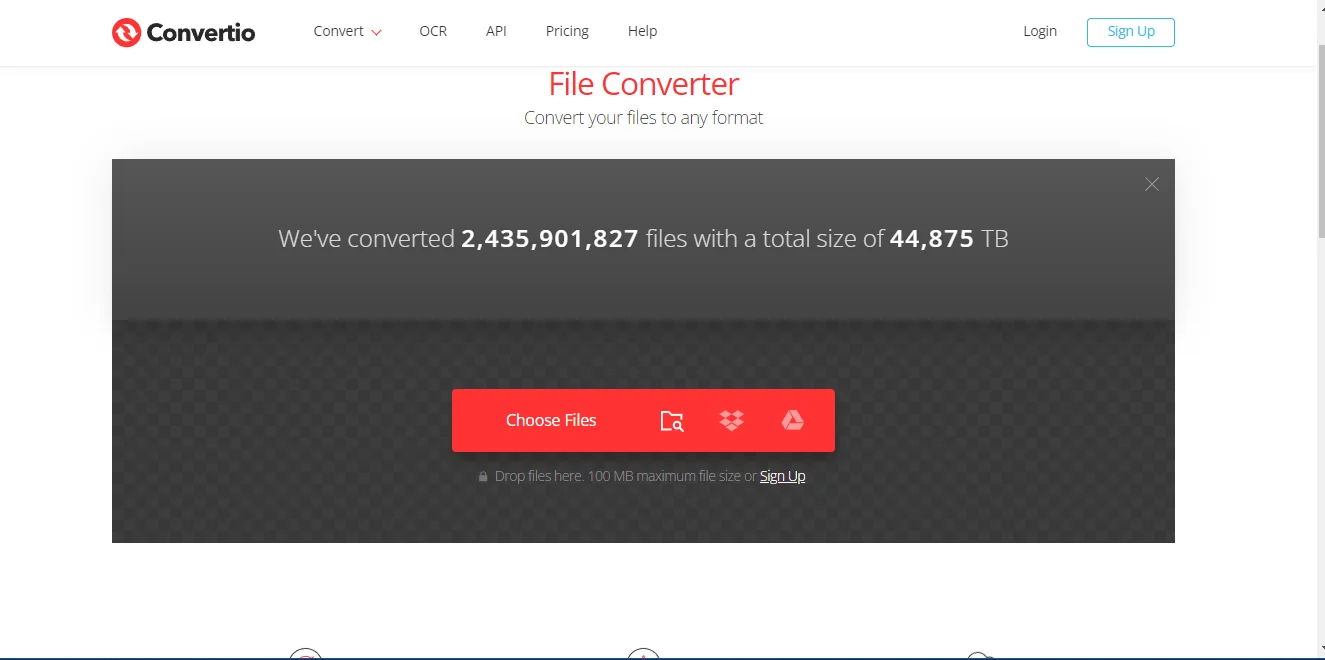
Convertio offers an extensive file format library. It supports over 300 formats. You can easily convert the RAW images to JPEGs.
How to Use
Step 1: Click “Choose Files” or drag and drop your RAW file.
Step 2: Select JPEG as the target format.
Step 3: Click “Convert.”
Step 4: Download the converted JPEG.
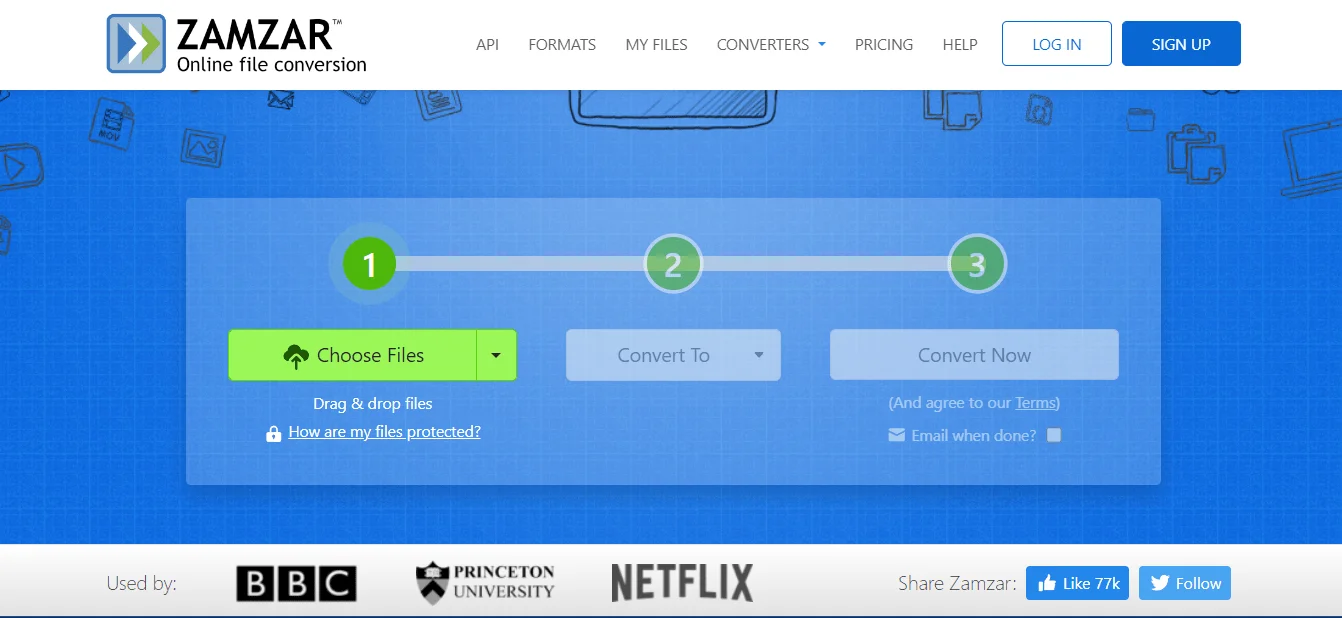
3. Zamzar
Zamzar is a popular online platform for image format conversion. It is a veteran in the online conversion field. It is convenient, super speedy, and supports 1200+ formats.
How to Use
Step 1: Click “Choose File” or drag and drop your RAW file.
Step 2: Select JPEG as the “Convert To” format.
Step 3: Enter your email address to receive the converted file.
Step 4: Click “Convert Now”
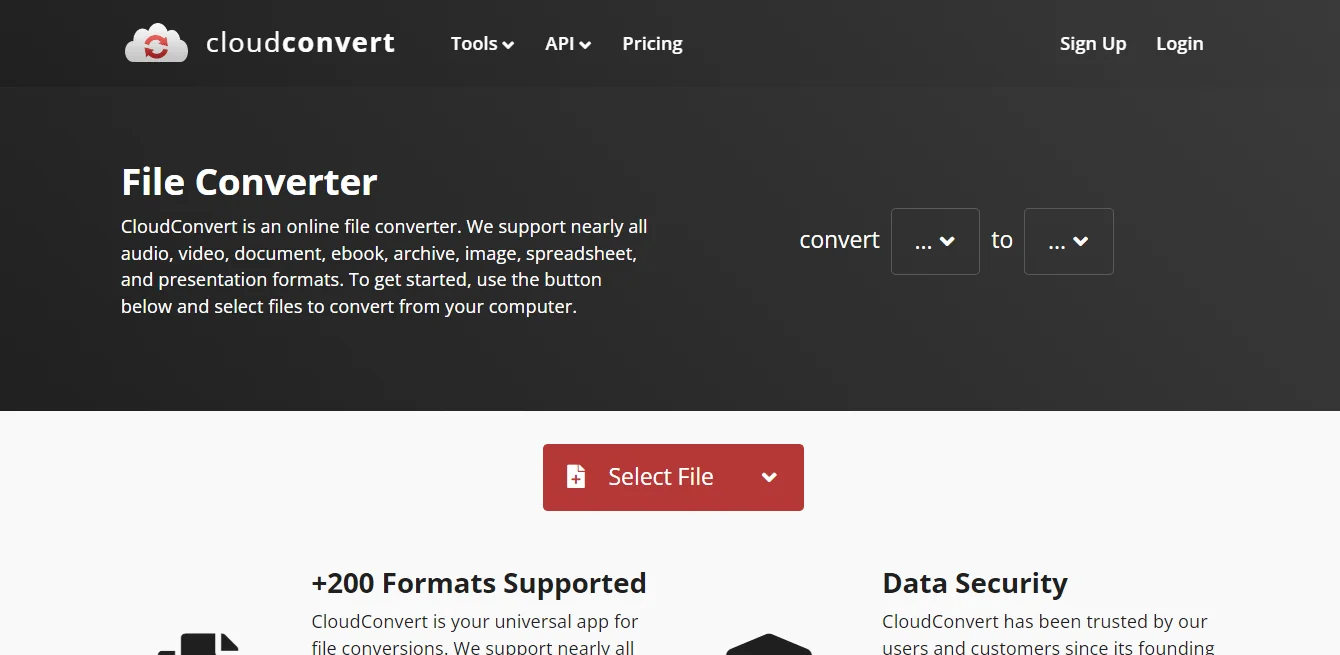
4. CloudConvert
CloudConvert supports almost all types of audio, video, image, and document file formats. It offers the highest data safety to its users.
How to Use
Step 1: Click “Select Files” or drag and drop your RAW file.
Step 2: Choose JPEG as the “Output format.”
Step 3: Click “Start Conversion.”
Step 4: Download the converted JPEG.
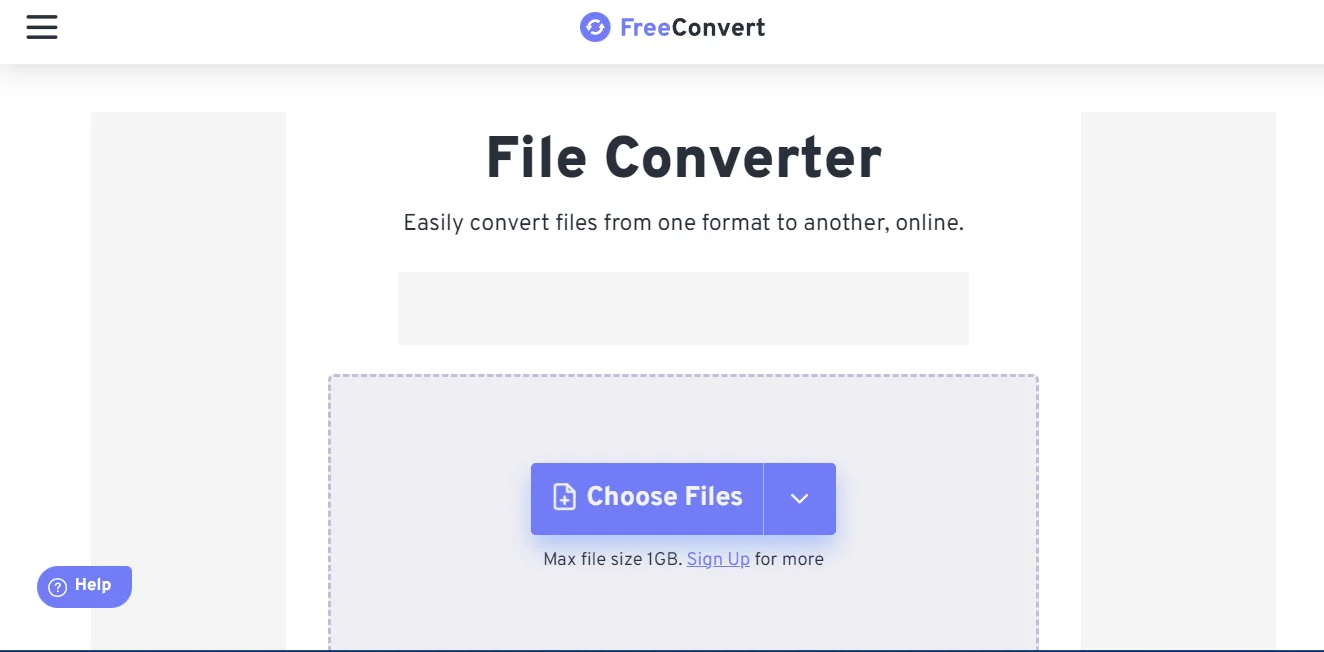
5. FreeConvert.com
Highly convenient image conversion tool. FreeConvert.com excels at basic file conversions like you can convert raw to jpeg. It supports more than 1500 formats.
How to Use
Step 1: Click “Choose File” or drag and drop your RAW file.
Step 2: Select JPEG as the “To format.”
Step 3: Click “Convert Now.”
Step 4: Download the converted JPEG.
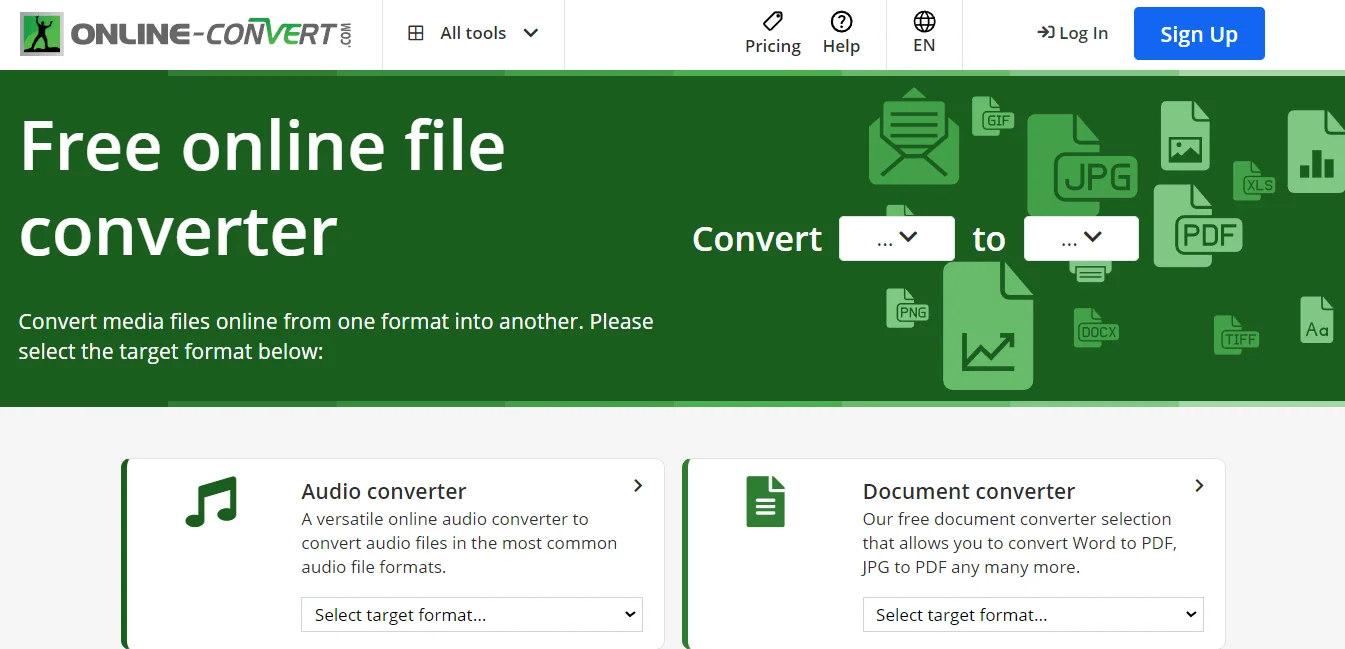
6. Online-Convert
What type of file do you need to convert? You will get all the file conversion services at the same place.
How to Use
Step 1: Click the convert button. From the drop-down menu select Image. Then select RAW.
Step 2: Now click the To button. Again, from the drop-down menu select Image and then select JPEG.
Step 3: Click “Choose File” or drag and drop your RAW file.
Step 4: Click “Convert File.”
Step 5: Download the converted JPEG.
7. ConvertImage.io
Another veteran image conversion tool. It is a minimalist platform with a focus on user experience.
How to Use
Step 1: Click “Browse” or drag and drop your RAW file.
Step 2: Choose JPEG as the “Convert to” format.
Step 3: Click “Convert.”
Step 4: Download the converted JPEG.
8. Aconvert
The Aconvert is another online tool that allows conversion of raw image files to jpg or jpeg.
How to Use
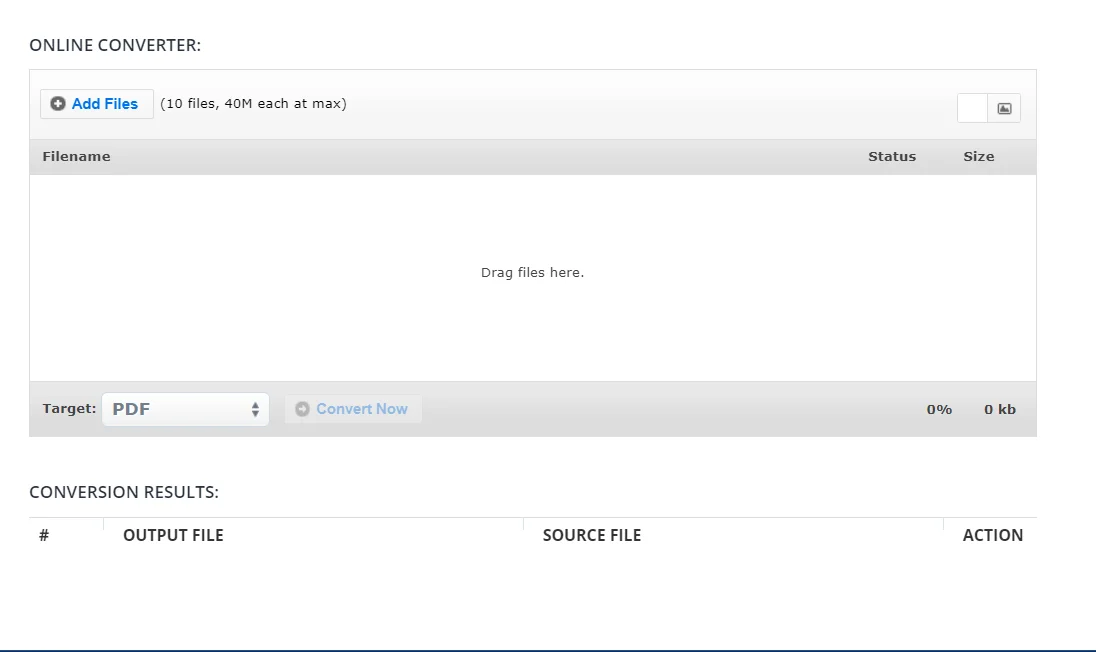
Step 1: Click on Add Files. Then select the raw image.
Step 2: From the drop-down menu of Target, select the JPEG file format.
Step 3: Click the Convert Now button.
Step 4: Download the file.
9. Pixlr.com
This online image editor includes a free conversion tool with support for RAW formats.
How to Use
Step 1: Click “Open Image” and select your RAW file.
Step 2: Click on the “Download” icon and choose “JPEG” as the format.
Step 3: Adjust quality settings if desired.
Step 4: Click “Download” to save the converted JPEG.
10. ImageResize.org | Convert RAW to JPEG
This platform specializes in image resizing but also handles conversions. This is one of the best tools to convert raw to jpeg.
How to Use
Step 1: Click “Upload Image” and select your RAW file.
Step 2: Choose “Convert to JPEG” from the format drop-down.
Step 3: Optionally adjust image size and quality.
Step 4: Click “Start Processing” and download the converted JPEG.
03. Convert RAW to JPEG with Built-in Apps: A Mac & Windows Guide
Your operating system might already have the answer to your RAW-to-JPEG conversion needs. Let’s dive into the built-in apps of macOS (Preview) and Windows (Photos). Here is how to use them for the image file format conversions:
A. MACOS (Preview)
Preview, the default image viewer on Macs. can surprisingly handle RAW conversion!
Process:
Step 1: Right-click your RAW file and select “Open With” > “Preview.”
Step 2: Click “File” > “Export.”
Step 3: In the “Format” pop-up menu, choose “JPEG.” You can adjust the quality further using the slider.
Step 4: Select the folder and rename the file.
Step 5: Click “Save” to convert your RAW file to JPEG.
B. Windows (Photos)
Windows Photos app also offers basic RAW conversion features.
Process
Step 1: Open your RAW file with Photos.
Step 2: Click the three dots (…) in the top right corner and select “Edit in Photos.”
Step 3: Click “Edit” > “Save a copy.”
Step 4: In the “File format” drop down, choose “JPEG.” You can adjust the quality using the slider.
Step 5: Click “Save” to convert your RAW file to JPEG.
04. Convert RAW to JPEG on iPhone
If you are an iPhone user, you will get the easiest way to convert the raw photos to JPEG. It will take less than a minute to get your files. However, you can do it in two different ways.
The first one is the Photos app on your phone. And, the other method is a third-party raw to jpg converter app.
Amongst the two methods, the Photos app is readily available and secure. So, open the Photos app and select the RAW image you want to convert. Then click the Share button. You will get in at the bottom part of the app.
After that, scroll down and tap “Save to Files.” Choose the folder to save the file. Then tap “Save” in the top right corner.
As you have completed this process, now we can convert raw to jpeg.
Here are the Steps You Need To Take
Step 1: Open the Files app and locate your saved RAW image.
Step 2: Long press on the image thumbnail and tap “Quick Actions.”
Step 3: Select “Convert image.”
Step 4: Choose “JPEG” as the format.
Following this process you can convert the RAW image into JPEG on your iPhone.
Final Thoughts | Convert RAW to JPEG
Every file format has specific benefits. You have to use the file format according to your requirements. The RAW files give more flexibility in editing while the JPEG files need less storage capacity.
However, you can convert raw to jpeg by the methods that we have discussed in this article. These methods are also helpful for converting any type of image file format. Moreover, some online conversion tools offer PDF and document conversions.
So, make the best use of these tools and improve your project.
Converting the RAW images to JPEG may affect the resolution, but you need the JPEG format for different purposes. The JPEGs are more manageable and need less storage.
Why does JPEG Look Better than RAW?
The JPEGs are the compressed files. The camera sensors process the information and image parameters and give the final image to you. Meanwhile, the RAW images are the unprocessed photos. That’s why the JPEG looks better than the RAW.
If you are a beginner in Photoshop learning, it will be best practice to draw different shapes or use Content-Aware Fill Photoshop tools. So let’s today learn how to draw different shapes. For example, pumpkin drawing could feel hard. It will be hard for beginners in Photoshop. But don’t worry it will be going to fun in this tutorial.
Drawing a pumpkin in Photoshop is not a hard task for a beginner. All you need is just some basic knowledge of Photoshop tools and functions.
Suppose you are a stranger to Photoshop photo editing software and start learning. Then you are in the right place this tutorial is for you and is about pumpkin drawing.
Or if you are a regular Photoshop user looking for answers to some queries, you will find your answer. You also can browse our FAQ section.
Photoshop Panels and Bars
If you are very beginner in Photoshop let’s First of all, let’s introduce to the tools which we will be going to use in this tutorial. Remember we just discussed the tools which are needed only in this tutorial for pumpkin drawing.
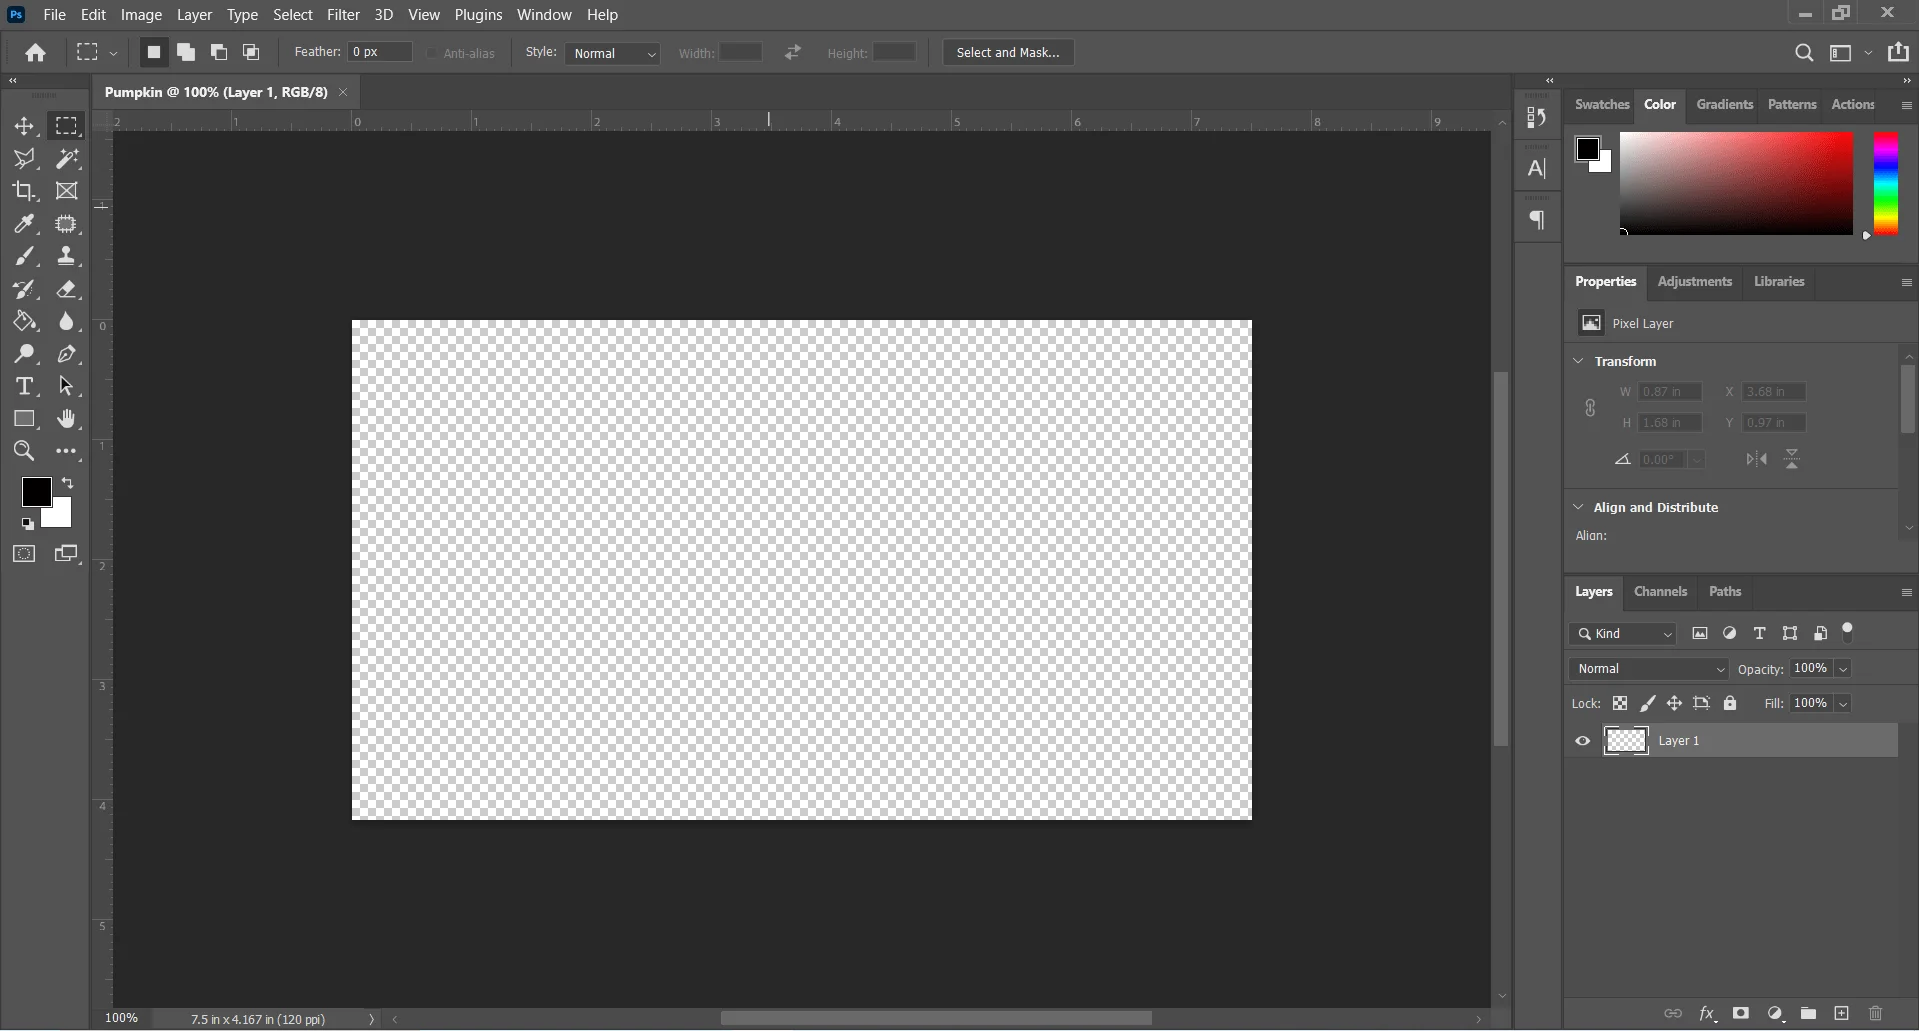
New Document Window
When you create a new document in Photoshop for drawing a pumpkin, a new window will appear with some measures and samples. On the left side of the image above the area is marked with a big rectangle there are sample examples for a new document.
You can select any of them to start your work. All parameters are pre-determined in these sample examples.
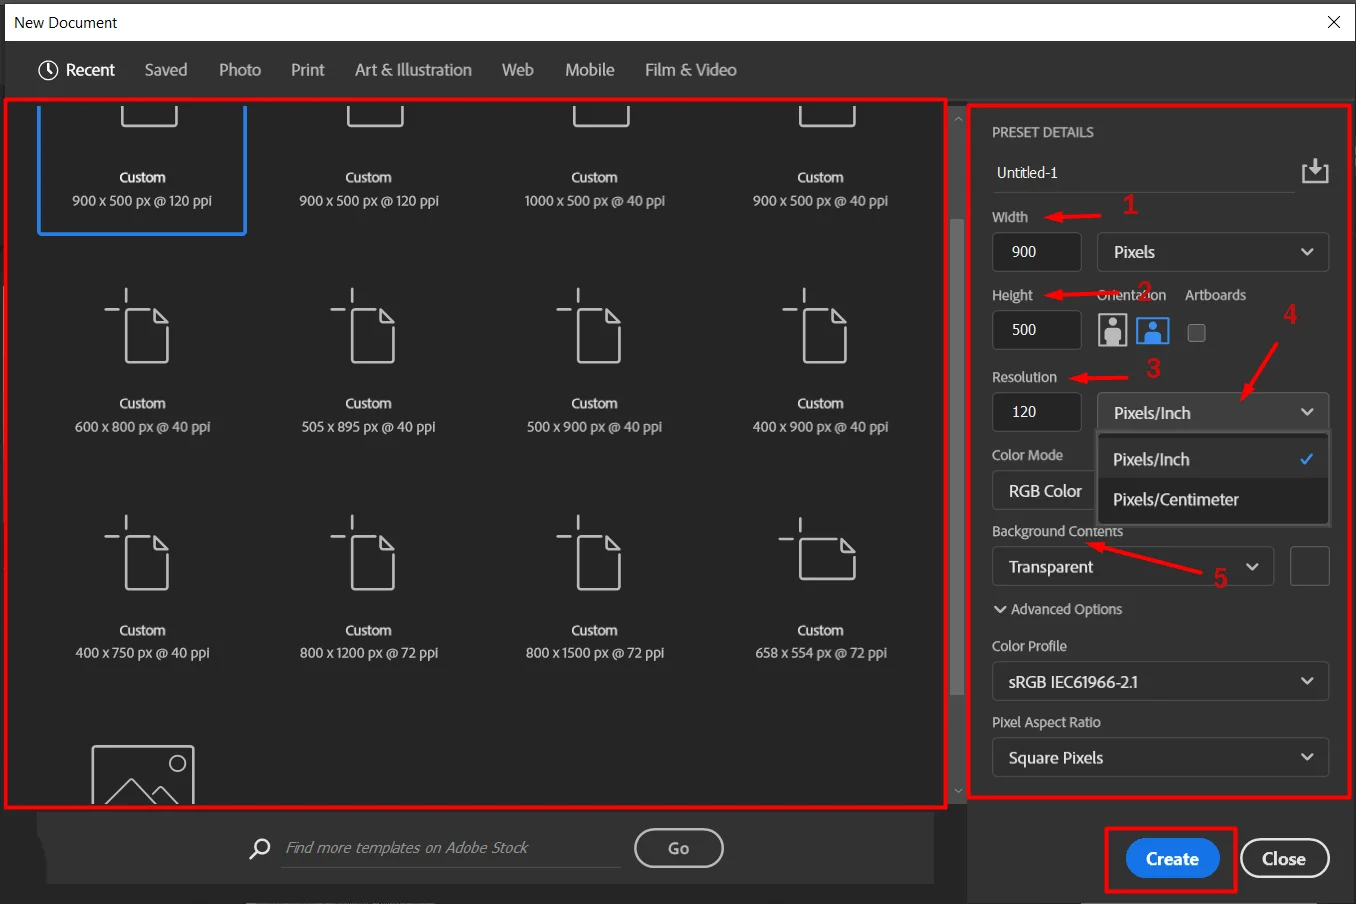
On the right side, there are the parameters that you can customize according to your needs. At the top of the options panel, the name input box is present. By default, the ‘Untitled-1’ name is inserted. You can change it and rename it as you want to name it for the pumpkin drawing or how to draw a pumpkin in photoshop. The parameters are as follows,
Width: Width is the total width of your document. There are two input boxes, the right one is for the insert number amount, and the left one is for the unit of measurement. By default pixel is selected, you can change from the drop-down menu to inches, centimeters, Millimeters, points, and Picas. As a beginner ‘inches’ will be easier for you to measure the height and width of images.
Height: like the width also enter number digits on the input box. There are also three options besides the input box first two for switching in height, and width respectively. The next one is called ‘Artboards’ Click on the checkbox if you want to use your new document as a canvas.
Resolution: Resolution is the multiple of the height and width. In this case, Resolution is indicated as the number of pixels per unit. This is very important for the sharpness of your image.
Resolution Unit: The resolution unit decides the pixel number per inch or centimeters. The given number’s pixels will consist of one inch or one centimeter.
Background Contents: Here you can select the background of your document. Click on the arrow-down icon a drop-down menu will appear then select a background color. you can also select a transparent background.
Color Profile and Pixel Aspect Ratio
The Color Profile is the color that describes the color behavior of the monitor. By default ‘sRGB’ color profile is selected in Photoshop. The ‘Pixel Aspect Ratio is simply a fancy way of saying that the length of one side of a pixel is related to the length of the other. Listen to the Podcast on Drawing Pumking Step-By-Step
By default Pixel Aspect Ratio is ‘Square Pixels’ is selected. For the beginner both are good. So we don’t need to change anything on the color profile and Pxil Aspect Ratio.
After creating a new document with your desired height and width for the pumpkin drawing. You need to know about the Photoshop interface. ‘Adobe Photoshop‘ is very advanced photo editing software and is user-friendly.
You don’t have to select tools or option parameters on the menu every time. You will find the most used tools and options in different panels on the Photoshop interfaces. Let’s learn about different tools and planes of Photoshop interfaces.
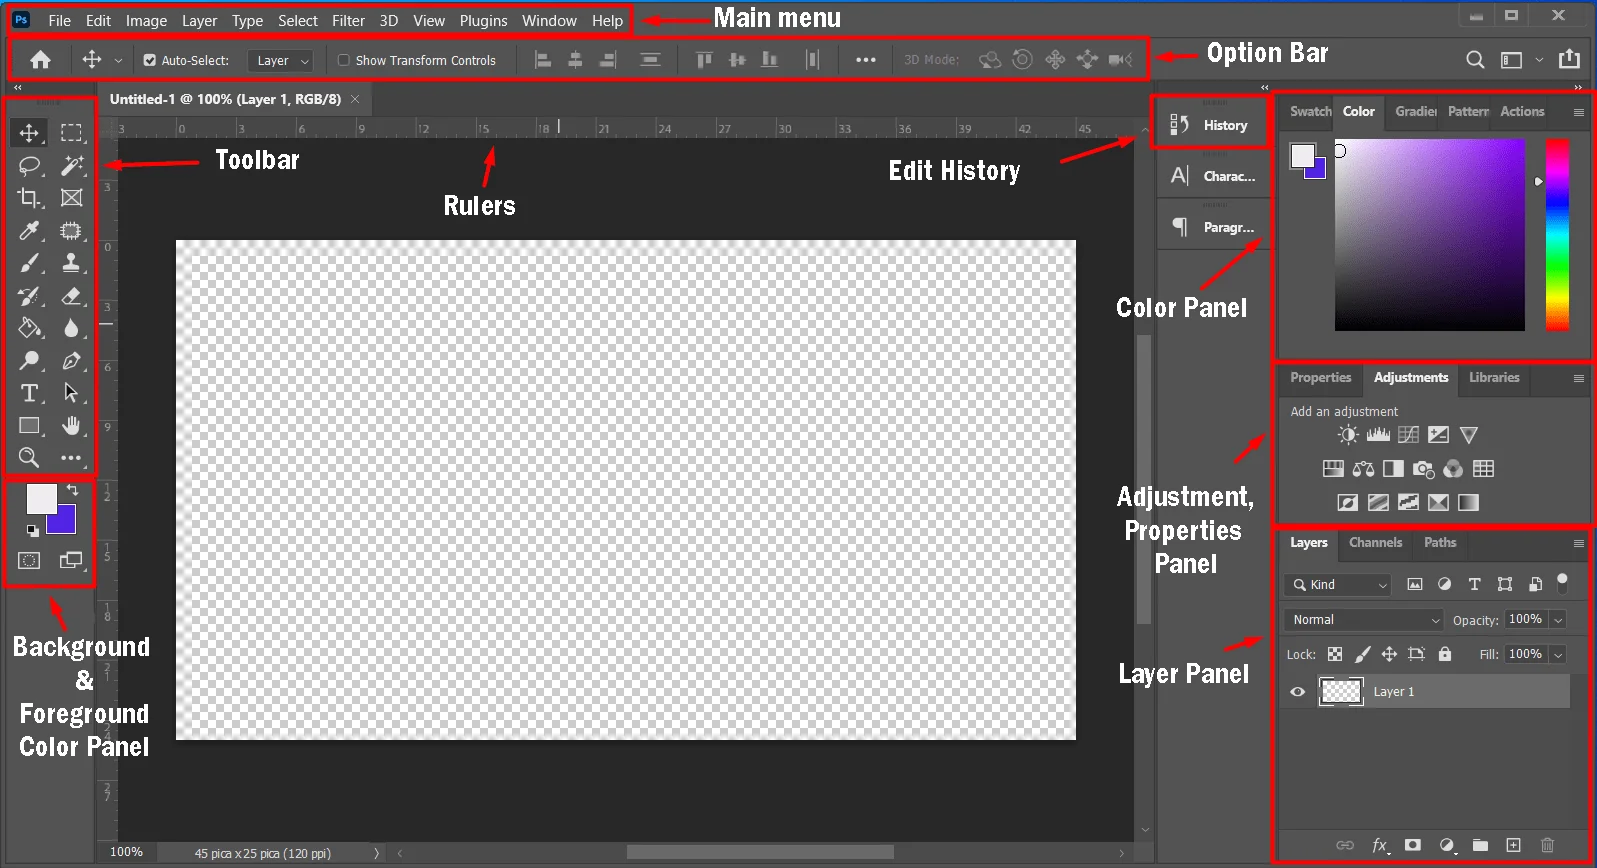
A. Main Menu
The area’s main menu is also called the menu bar of Photoshop. The menu bar consists of 11 items, ‘File’, ‘Edit’, ‘Image’, ‘Layer’, ‘Select’, ‘Filter’, ‘Analysis’, ‘3D’, ‘View’, ‘Window’, and ‘Help’. Each of those main menus has an additional sub-drop-down menu for related options.
The different drop-down option also has different sub-options. All tools and options of Photoshop software are available in the menubar. All options are categorized into 11 options.
B. OptionBar
The options bar exists under the menu bar. If you select any tool from the tool bar the available options of that tool are shown in the option bar. The options bar shows the options of the selected tool such as brush size, shape, effect, etc.
C. Toolbar
‘Adobe Photoshop’ is user-friendly photo editor software. Photoshop brings the most used and important tools together on the toolbar. If you are learning Photoshop you must know all the tools and usage of the toolbar.
D. Foreground And Background
At the bottom of the toolbar, you can change the color of your default background and foreground of your document. The background color is the background of your document.
If you erase any area of your document the erased the background will appear on the erased area. The foreground color is the color for your brush and pencil when you use them to make any drawing.
E. Rulers
Rulers help you position your document and elements precisely. Two rulers appear on the Photoshop interface. One is on the top of the active window and another appears on the left side of the active window which helps you to align and place elements on your document.
F. History
Into the history option, the history of your every movement of editing will be listed. If you need to undo any editing simply Go to history and click on the last edit you want to keep.
G. Color Panel
You can choose different colors for the color panel. To set the background color click on the bottom color preview in the toolbar. Then select a color from the color panel. Similarly to select foreground color select the top color preview or foreground color review option and select any color.
H. Adjustment and Properties Panel
The adjustment and properties panel contains different options for parameters and different properties. You can change and edit the shape, size, curve, and Hub/Saturation values of an element of your document.
I. Layer Panel
Layer panels show the layers of your document. Layer panels also contain different options such as opacity, layer mask option, layer curve, new layer, and delete layer option.
So now you know the names of the different bars and panels of Photoshop. We will learn about the brushes of the toolbar in another tutorial. You can also learn the usage of different brushes from the ‘Adobe Photoshop’ official website. Now let’s draw a Hallowing Pumpkin.
Drawing Pumking Step-By-Step
As you know the bars, panels, and height-width of Photoshop this tutorial will be easier for you. Follow our guidelines step by step and remember some of your brush’s parameters are not the same as the tutorial.
Step 1: Open Photoshop and Create a New Document
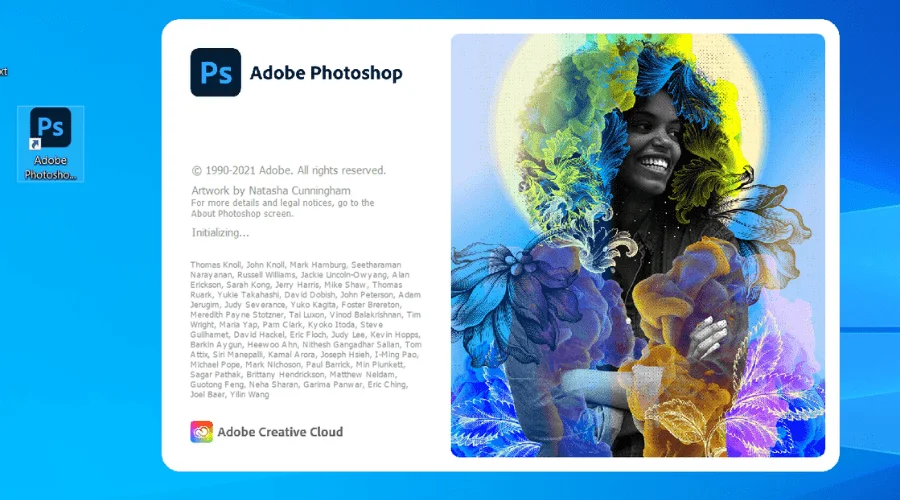
First of all, open your Photoshop. If you have Adobe Photoshop on your PC, you will find it on the start menu. if you don’t have to install ‘Adobe Photoshop’ then first install it.
You will find many online tutorials on the topic ‘How to install Adobe Photoshop’. If you have a shortcut on your monitor double click on the Photoshop icon. Your Photoshop will start opening an image that will appear on the screen like the image above.
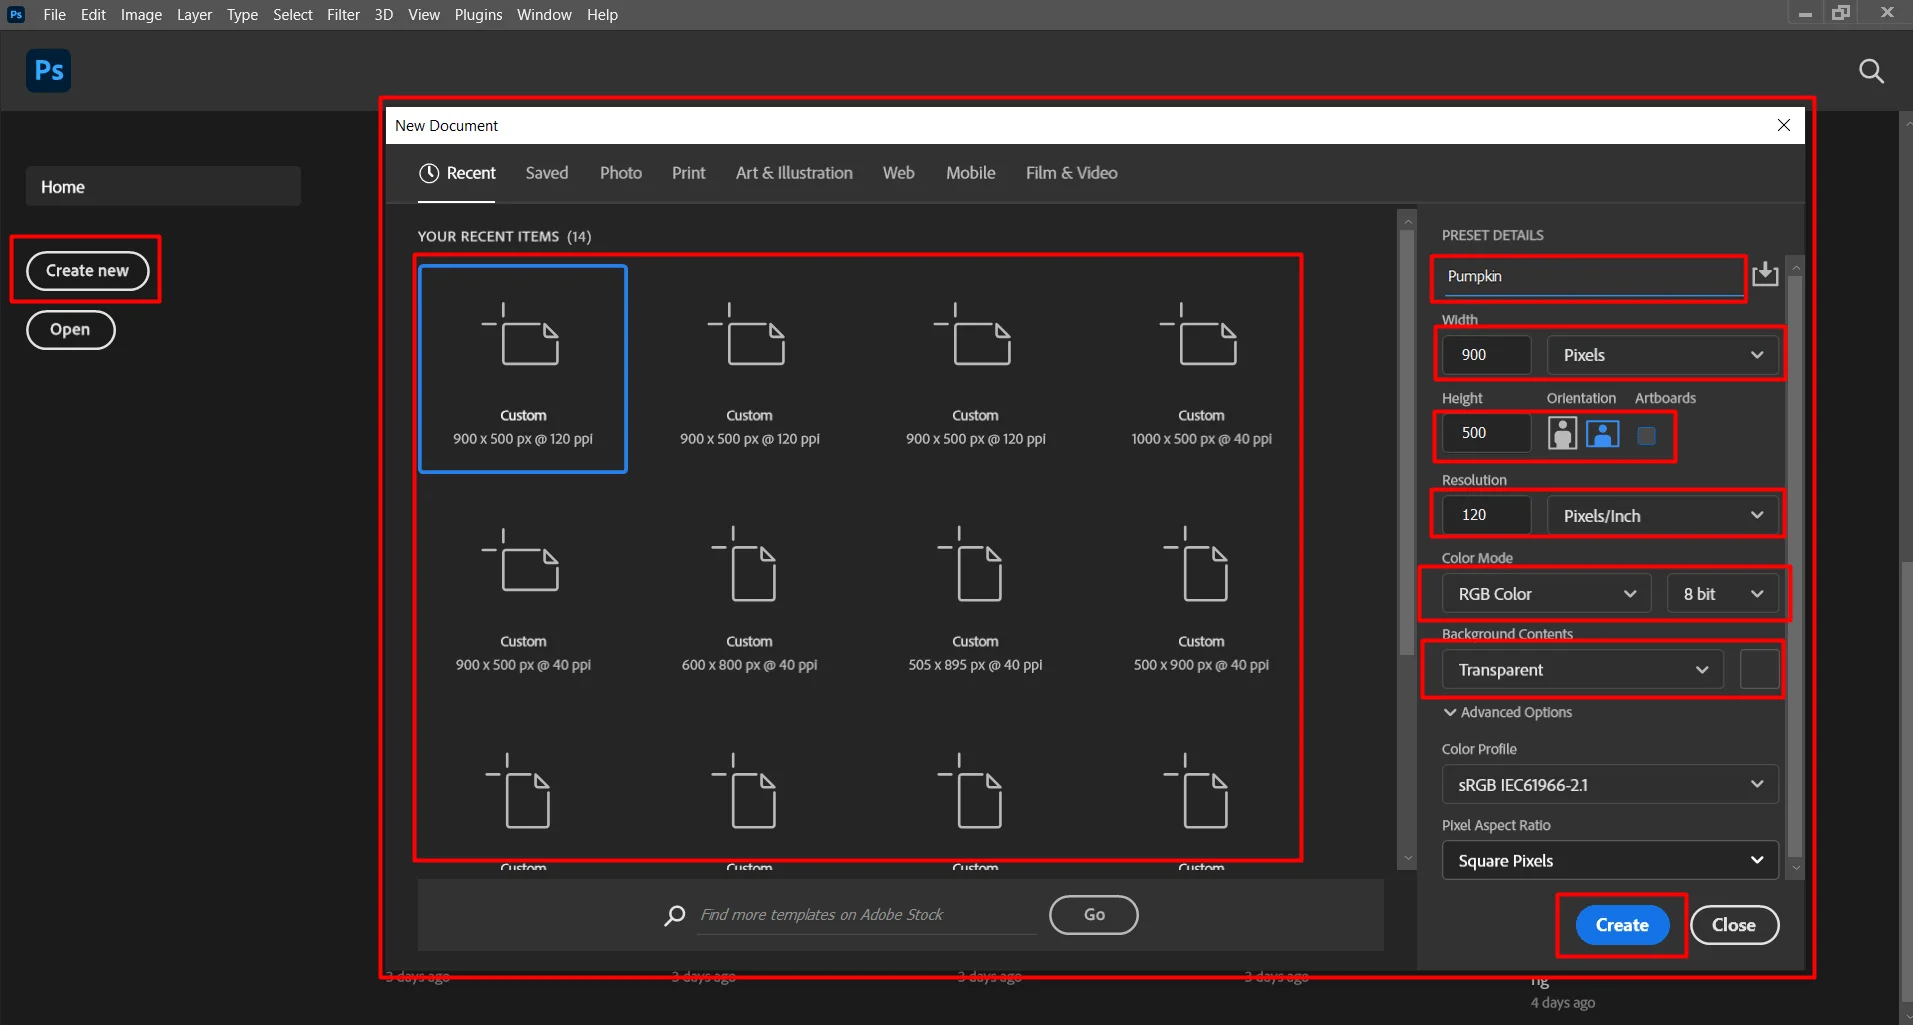
Wait till your Photoshop is ready to pumpkin drawing. Or until the Photoshop software opens with the interface like image two. Click on the ‘Create New’ button. A new window will open as red marked on the screen. We learn about this window at the beginning of this tutorial.
Set your document’s Name. Set height-width and other parameters. You can also select a sample document from the right side.
Step 2: Draw an Eclipse
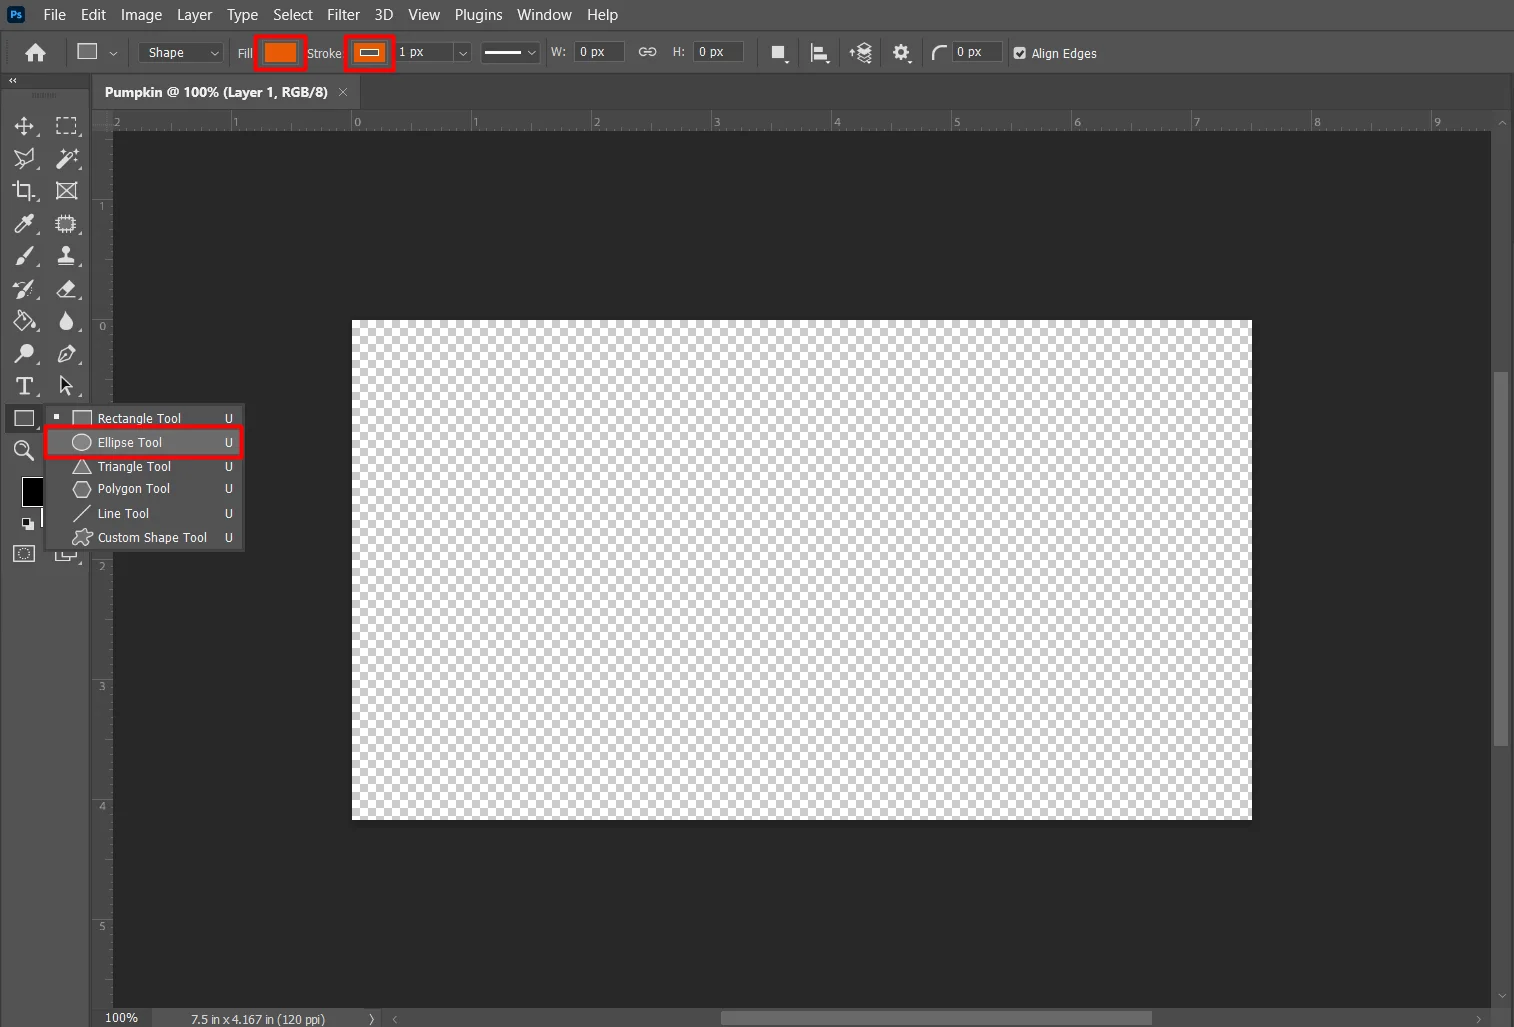
At first in pumpkin drawing select the Eclipes tool from the toolbar of your Photoshop. The ‘Rectangle tool’ is shown by default, Right-click on it. If you don’t find the tool simply press the ‘U’ key on your keyboard.
A tool will be selected from the toolbar. If it is the ‘Eclipse Tool’ then it’s fine. If no Right-click on it. A drop-down tool list will appear select the ‘Eclipse Tool’ as shown in the picture above.
After selecting the eclipse tool go to the option menu. Set the ‘Sotroke’ color. which is the outline color of your Eclipse. Then Fill in the color of your pumpkin.
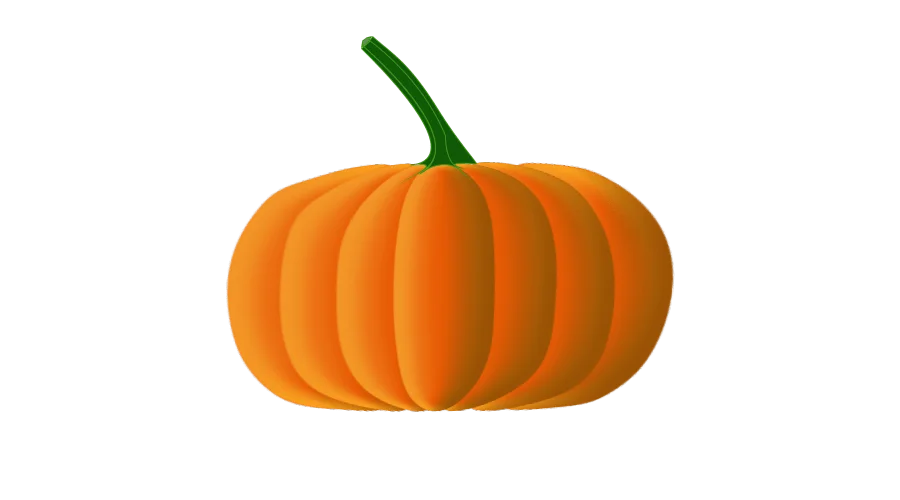
Set the same color for both Strock and Fill. Don’t be confused if the given picture of the pumpkin does not look like a pumpkin. But it is a part of pumpkin drawing.
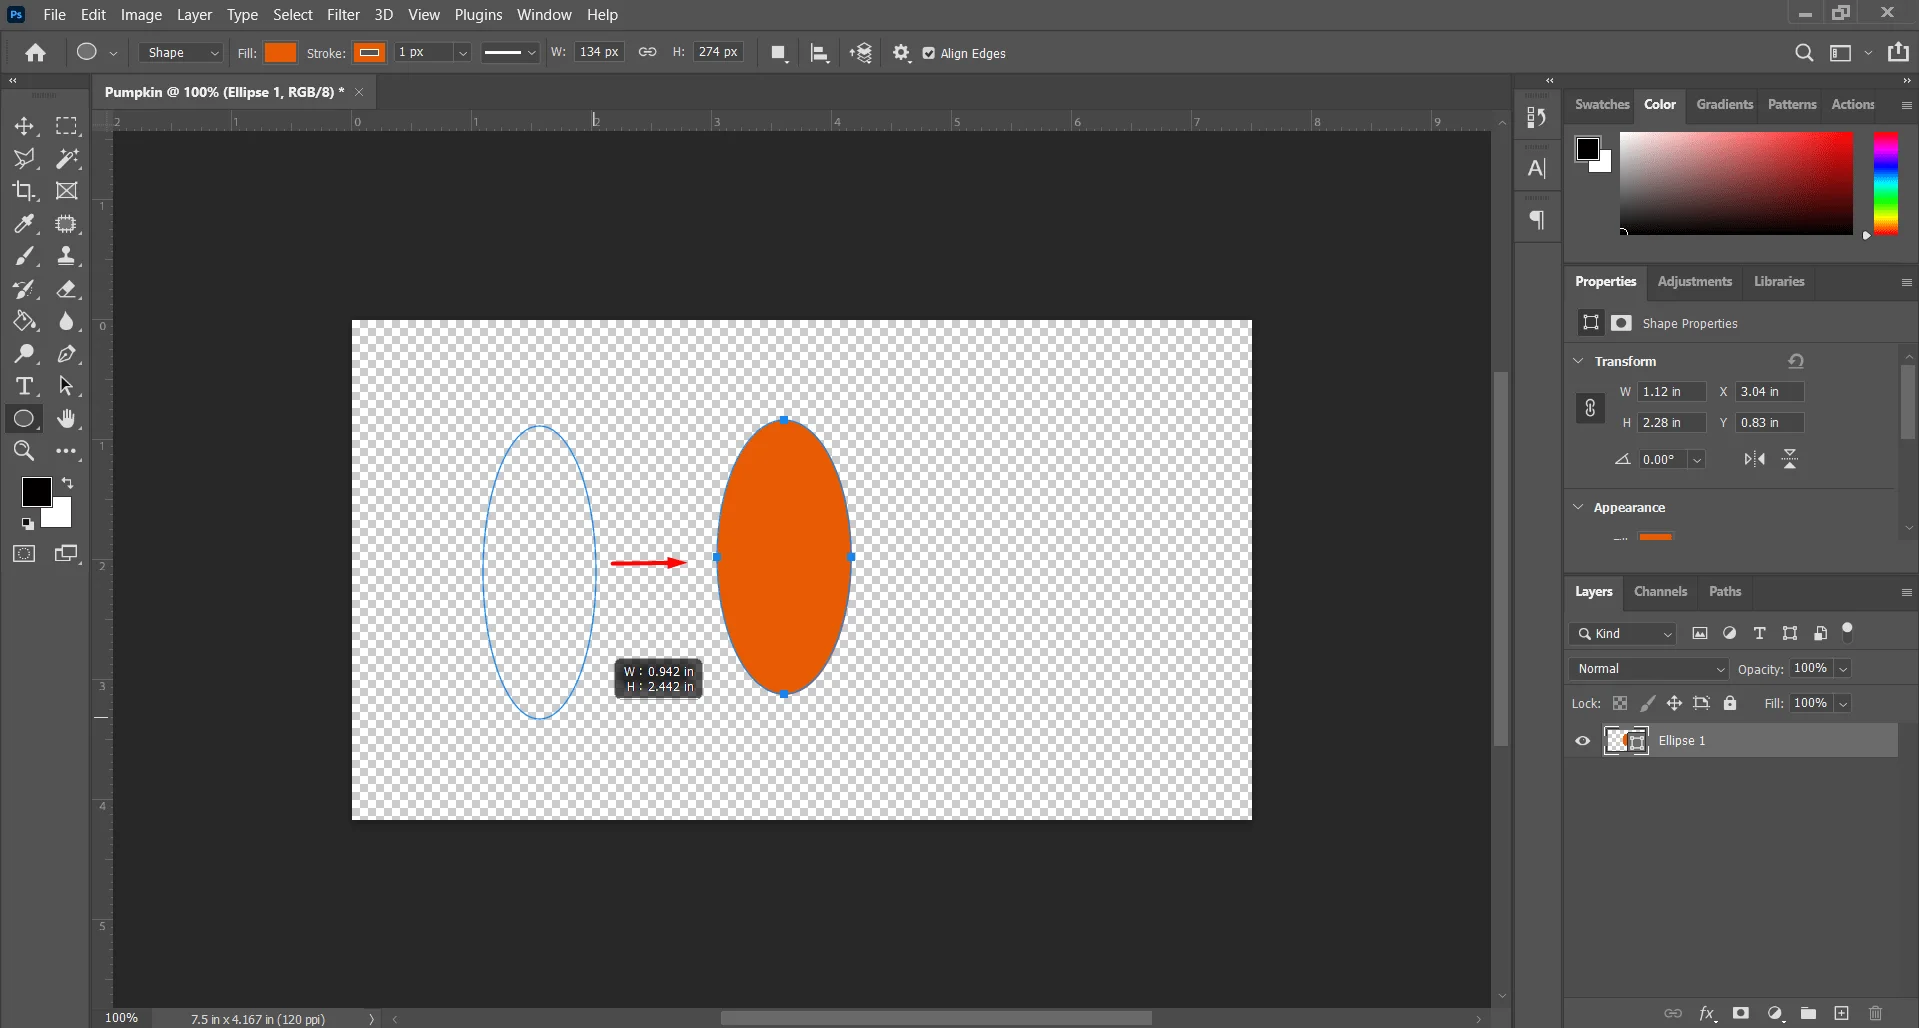
Now draw an Eclipse, the height of the eclipse will be the height of your Pumpkin. Shape your Eclipse according to the slice of a Pumpkin. So draw a longish Eclipse as shown in the picture of the pumpkin drawing.
To draw an Eclipse, click and hold on the active window and drag the mouse toward the window’s bottom-right corner. If you are satisfied with the shape release the mouse button. The Eclipse will selected by default you can change the shape of the eclipse manually.
To deselect the Eclipse press the ‘Enter’ key on the keyboard. Just maintain the height and width like a slice of pumpkin. We will give a look-alike pumpkin on the other steps of this tutorial.
Step 3: Open Layer Style Window
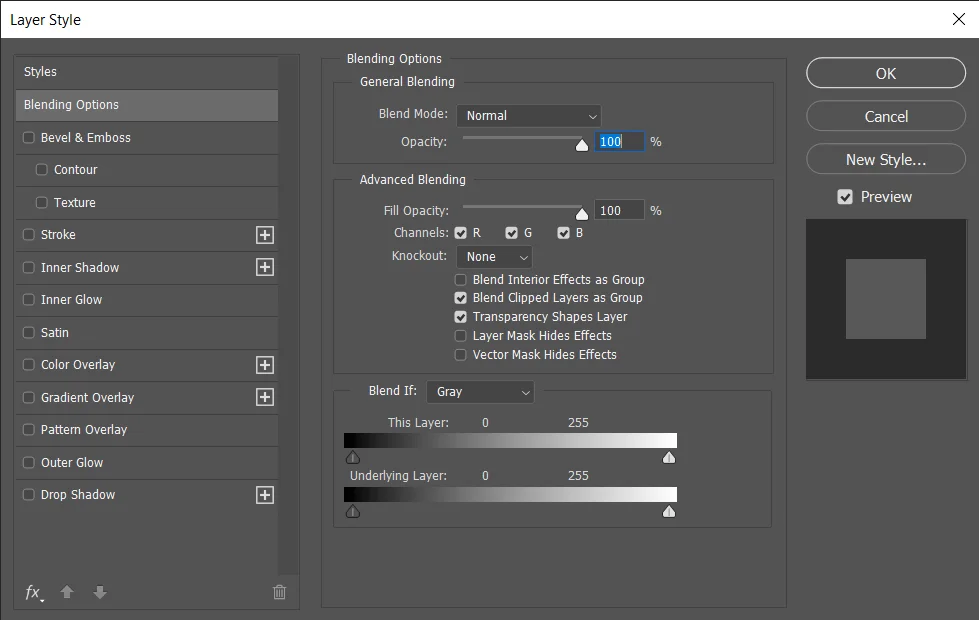
Sometimes the Layer Style window is also called Blanding Options. Although there are other important layers style options are available. The options that are available on the Layer-style window are,
Blending Options
Bevel &Emboss
Stoke
Inner Shadow
Inner Glow
Satin
Color Overlay
Gradient Overlay
Pattern Overlay
Outer Glow
Drop Shadow
We will use only two of these options Bevel & Emboss (not all options) and Inner Glow for pumpkin drawing.
How to open Layer-Style Window
There are three ways to open the layer-style window.
Sl.
Ways
Methods
Description
01
Open Layer-stye From the Menu bar
Menu Bar > Layer > Laeyr Style > Inner Glow
To open the Layer-Style window select the Eclipse layer on which we will draw the pumpkin. Click on ‘Layer’ on the menu bar at the top of the screen. Then go to ‘Layer Style’ a drop-down sub-menu will appear. For this tutorial select ‘Inner Glow’. Otherwise, you can select any of your desired options it will open the ‘Layer-Style window’.
02
Open Layer-Style From Layer Panel
Layer Panel > Right-Click on Eclipse Layer > Drop-Down Menu > Blending Option > Layer-Style Window
To open the Layer-Style Panel ‘Right-Click’ on the Eclipse layer. A drop-down menu will appear. The Blending Option will be the first option on the menu. Or just click on the ‘Blending Option’ the layer-style window will appear on the screen. Now select ‘Inner Glow’ to give the Eclipse inner glow effect.
03
The shortcut way
Double-click on layer > Layer-Style Window
To open the Layer Style Window simply double-click on the layer. Remember if you double-click on the layer name the layer name will become editable. So click on the layer beside the layer name and the eye icon of the layer.
Step 4: Give an Inner Glow Effect
When the ‘Layer-Style Window‘ opens click on the Inner Glow ‘CheckBox‘. It now will open the Inner Glow options. To open the Inner ‘Glow option panel’ click on the Inner Glow Option.
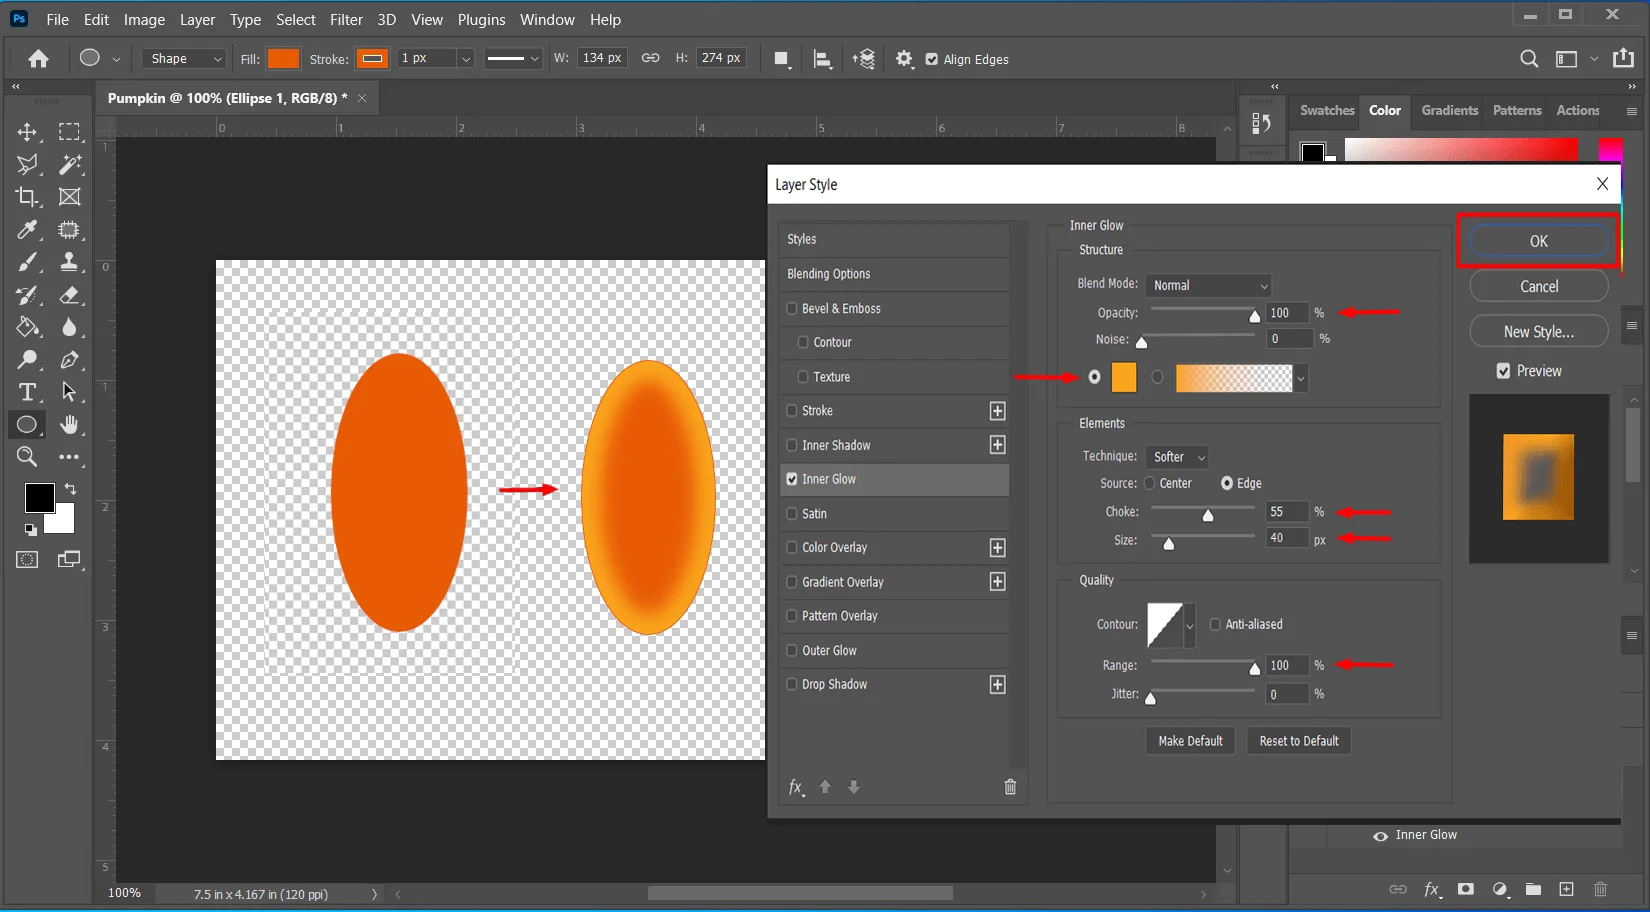
Now on the Layer-Style window set different parameters to give your Eclipse ‘inner glow effect’. Remember it could not be the same effect for the same parameters in every Photoshop for pumpkin drawing. So for better results don’t focus on the number of parameters.
Focus on the overall outcome of the pumpkin on the preview panel. The options and parameters we use for the best result of Eclipse on our pumpkin drawing tutorials.
Blend Mode: Normal
Opacity: 100%
Noise: 0%
Color Option: Plane Color
Choke: 55%
Size: 40%
Range: 100%
you can use different numbers for the options above for your pumpkin drawing. Try and change these numbers if your color processor and Adobe Photoshop software are required for the best result.
Step 5: Bevel and Emboss Effect for Eclipse
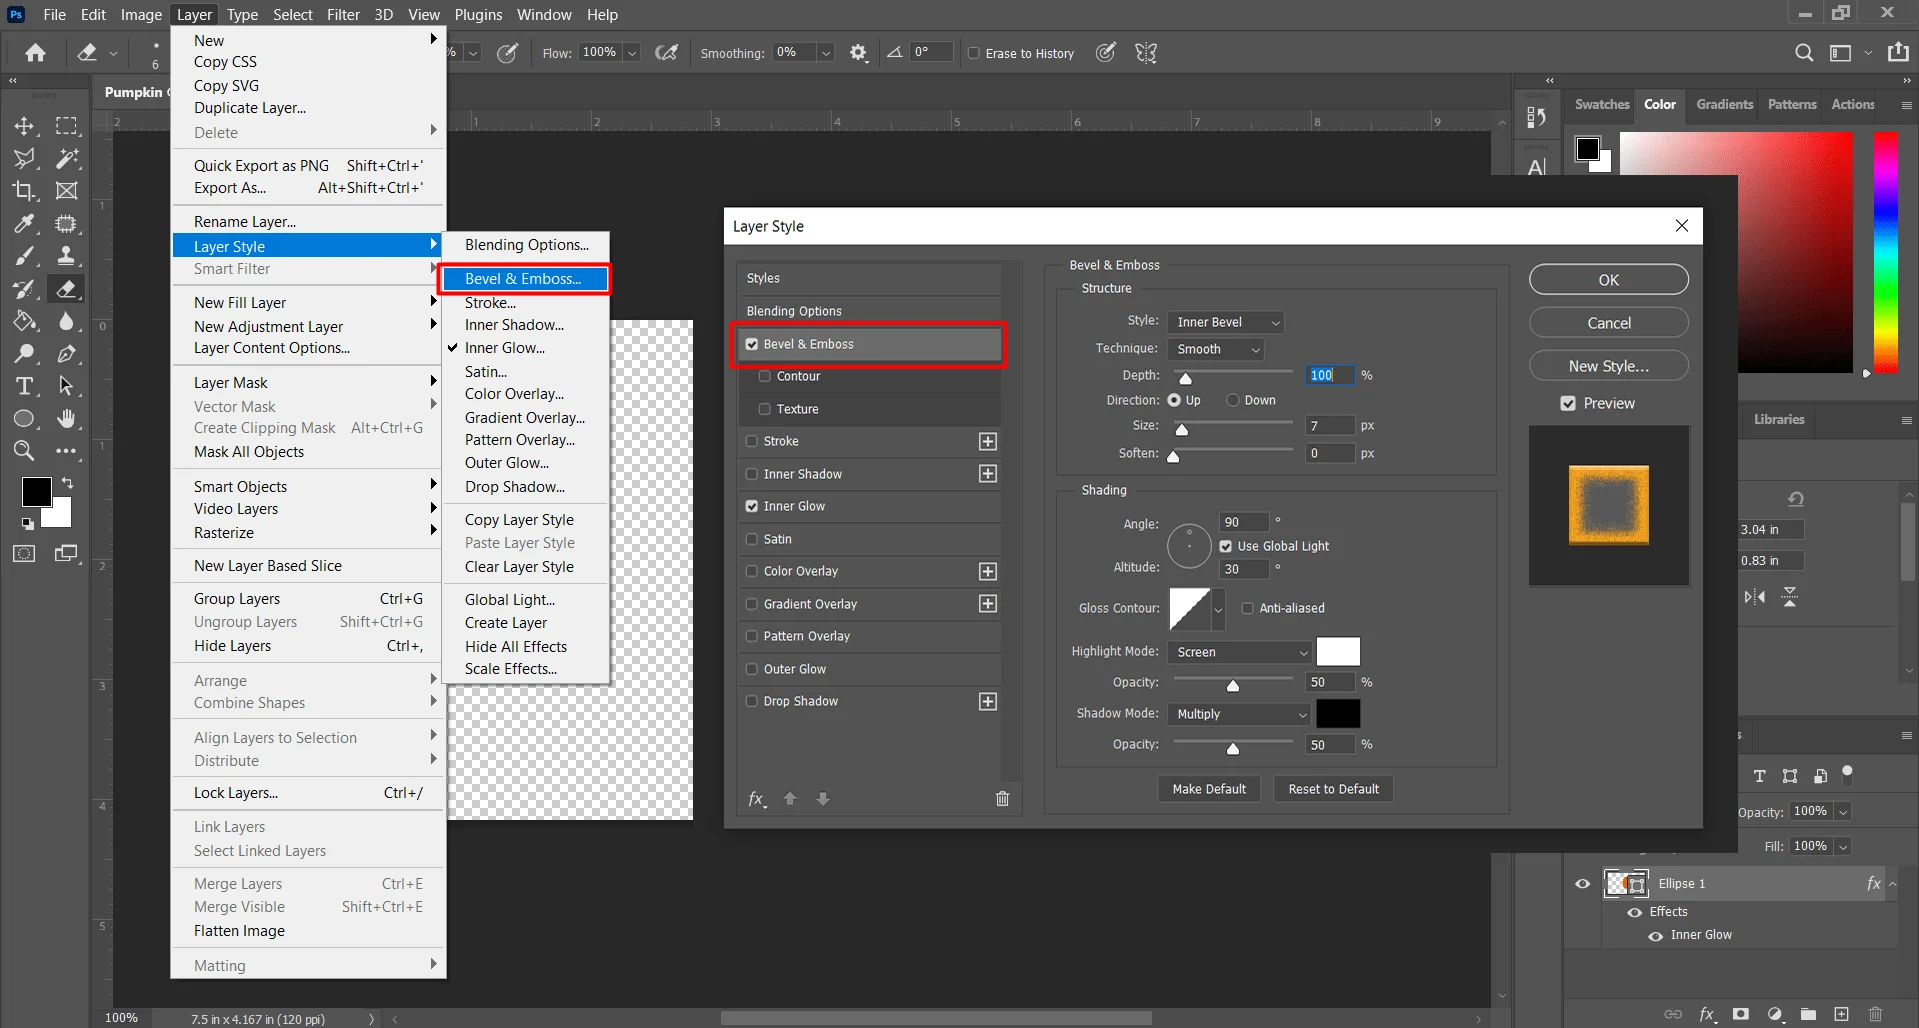
The ‘Bevel & Emboss’ Option exists in the Layer-Style window, open it in any one way you feel comfortable. Open the Layer-Style panel and select the ‘Bevel and Emboss’ option from the window.
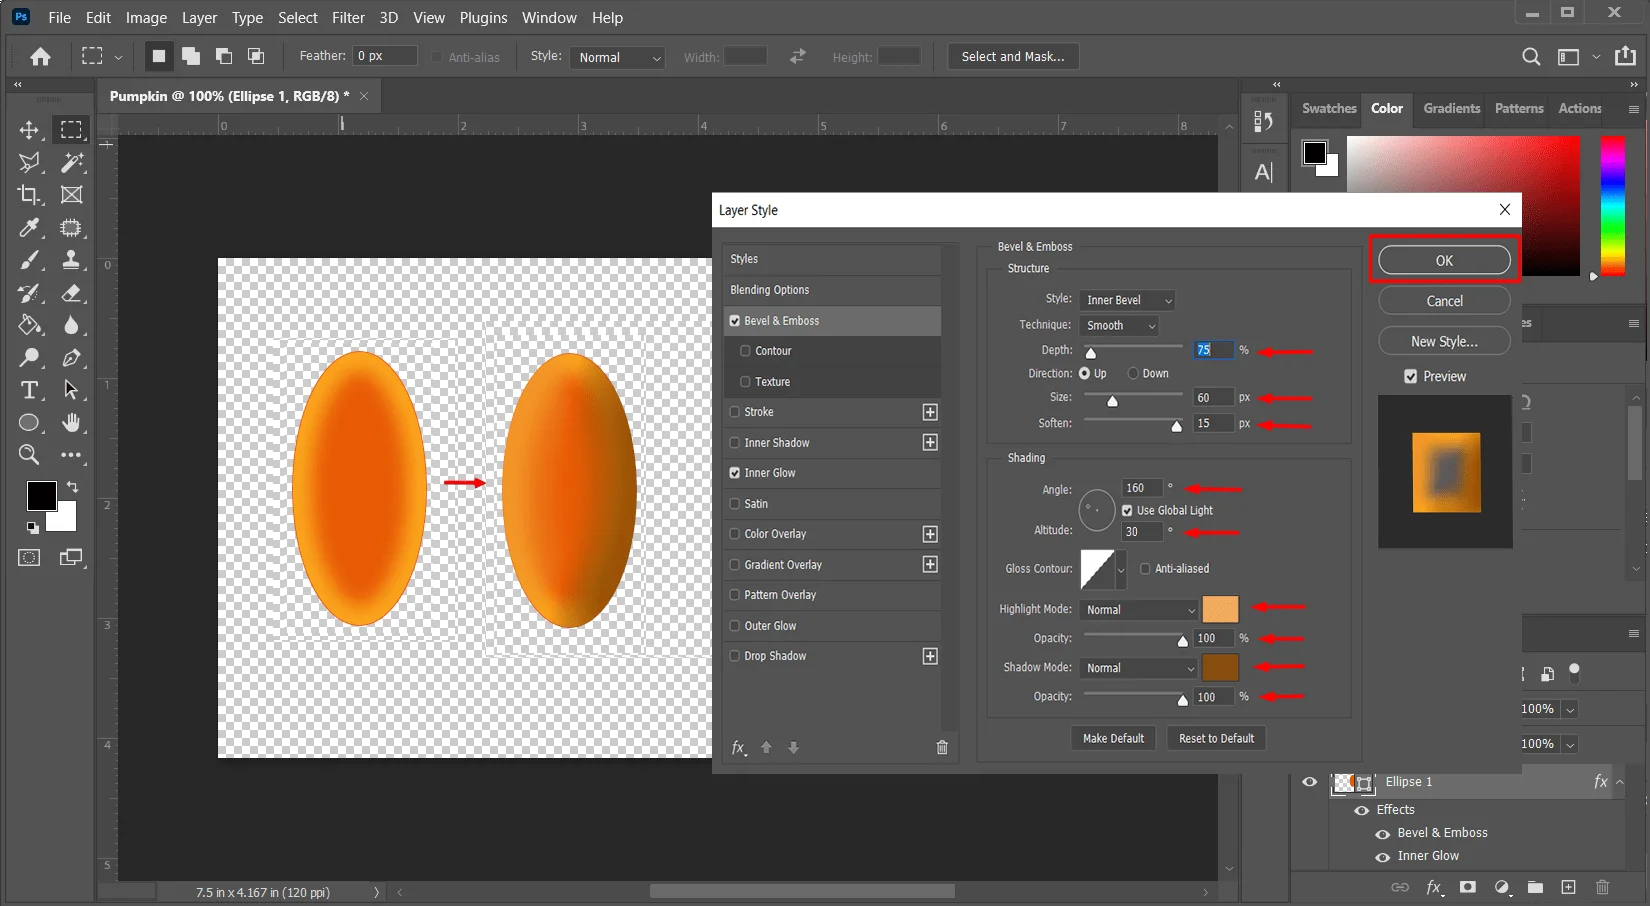
The parameters that we will change to give the best Bevel and Emboss effect to the Eclipse of pumpkin drawing are as follows,
Style: Inner Bevel
Technique: Smooth
Depth: 75%
Direction: Up
Size: 60 px
Soften: 15px
Sading Angle: 160 Degree
Sading Altitude: 30 Degree
Gloss Contour: linear
Highlight Mode: Normal
Highlight Color: #F1A95C
Highlight Opacity: 100%
Shadow Mode: Normal
Shadow Color: #864D10
Shadow Opacity: 100%
As we told you before, all software does not require the same parameters for the same outcome of pumpkin drawing. Try and change these numbers if your color processor and Adobe Photoshop software are required for the best drawing. Try to give a similar effect as shown in the photo above.
Step 6: Duplicate and Rasterise Layer in Photoshop
Duplicate Layer in Photoshop
Like opening the Layer Style window you can duplicate one layer in Photoshop in three ways. These are described as follows,
Sl.
Ways
Methods
Description
01
Duplicate form Layer panel
Layer Panel > Select Layer> Double Click on The Layer > Select Duplicate
To duplicate one layer Double-Click on the layer a drop-down menu will appear on the screen. select the duplicate layer from the drop-down menu. A dialog box will appear in the middle of the screen. Set the Layer name and press on the ‘OK’ Button. Your selected layer will be duplicated and a new layer will appear on the layer panel.
02
Duplicate Form Menu bar
Select layer > Menu Bar > Layer > Duplicate Layer OR press ‘D’
You also can duplicate a layer from the menubar at the top of your screen on the Adobe Photoshop interface. First, select the layer that you want to duplicate for the pumpkin drawing. Then go to the menu bar and click on “layer”. From the drop-down menu select the ‘Duplicate Layer’ or press the ‘D’ key on your keyboard. A dialog box will appear. You can set a new layer’s name here. set the new layer name and press ok. Then continue your pumpkin drawing.
03
The shortcut way
Select layer > press ‘Ctrl’ + ‘J’
You can also duplicate one layer in a shortcut. Just select the layer you want to duplicate and then press ‘Ctrl’ + ‘J’ together.
Rasterize Layer
Photoshop creates Type, Eclipes, and shapes in vector layers. When you zoom in, you can see the edges, made up of tiny squares. No matter how much you enlarge the layer the edges remain sharp and clear. Which can destroy the realistic look of your pumpkin drawing.
When you rasterize a layer, it loses its vector features. You can no longer edit the Eclipse or shapes without losing quality. it is good practice to keep one Duplicate before rasterizing any layer.
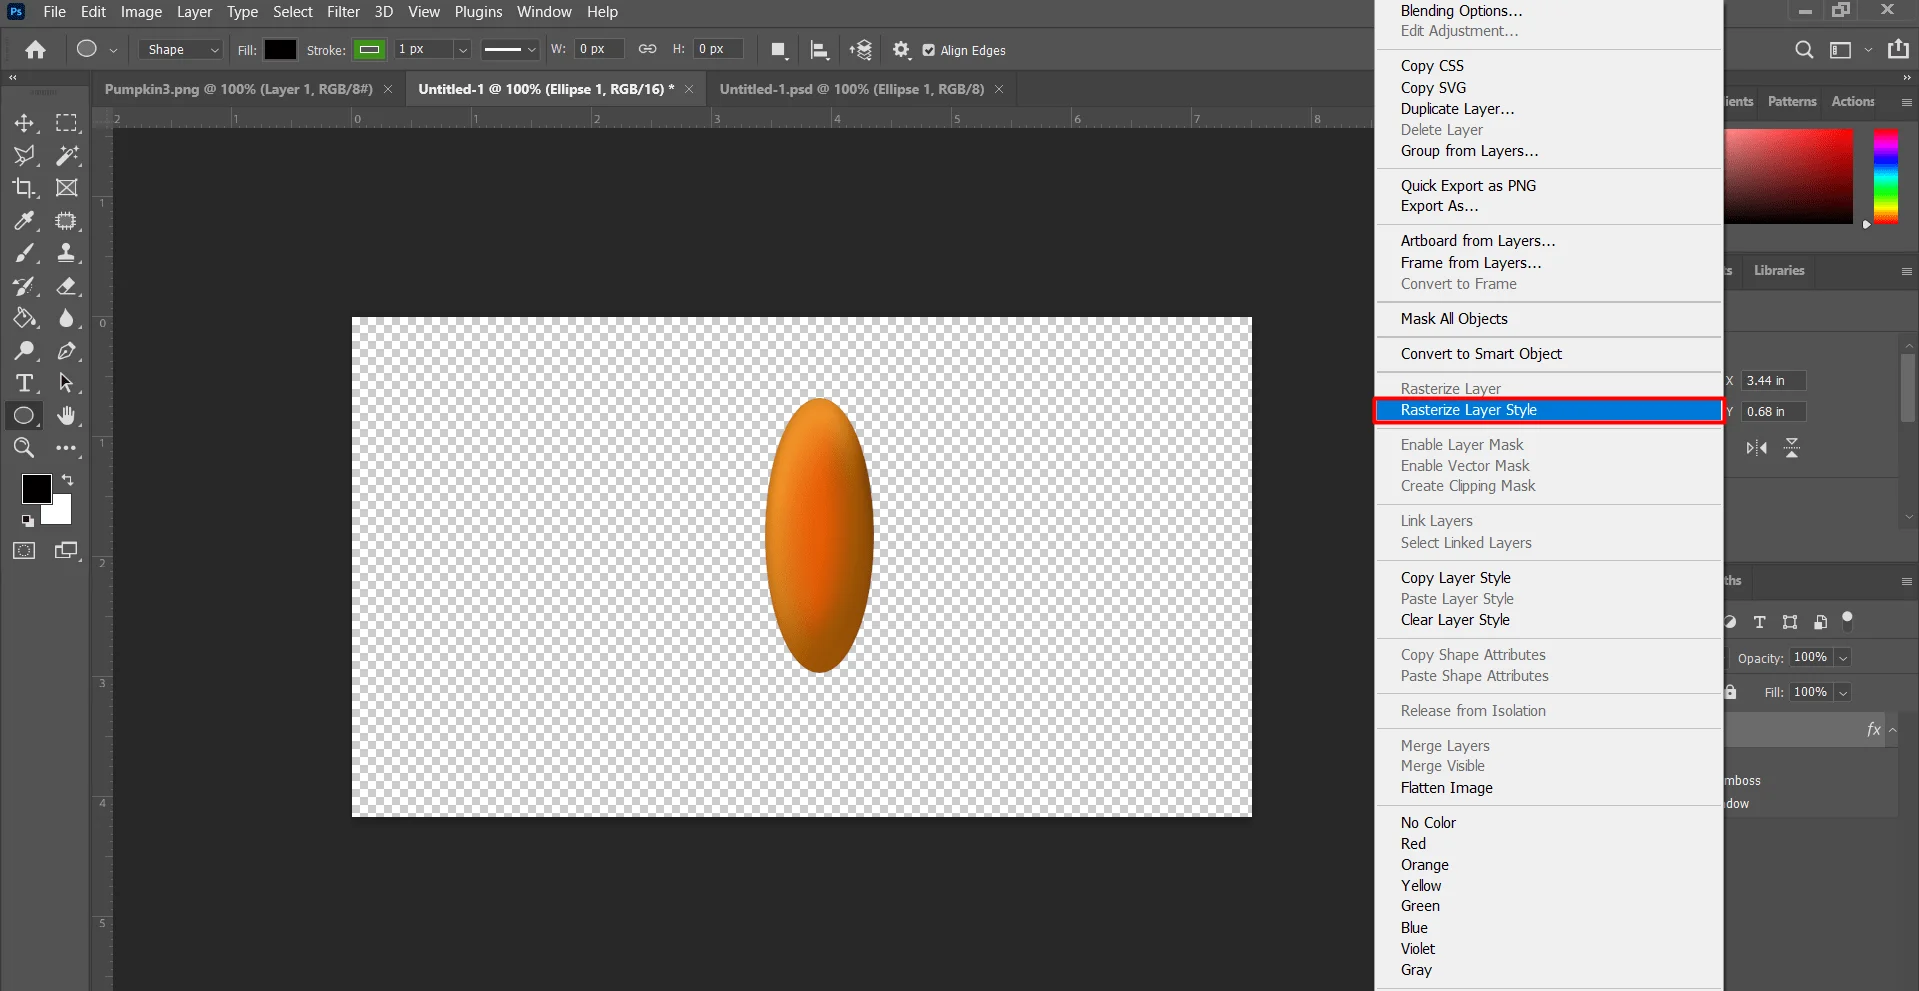
Layer Panel > Right-Click on layer > Rasterize layer
You can rasterize the layer from the layer panel. Please select the desired layer and right-click on it. Then from the drop-down menu select the ‘Rasterize layer’ to Rasterize the layer. Or ‘Rasterize layer Styel’ for rasterizing the Layer staples. Then follow the next step of pumpkin drawing.
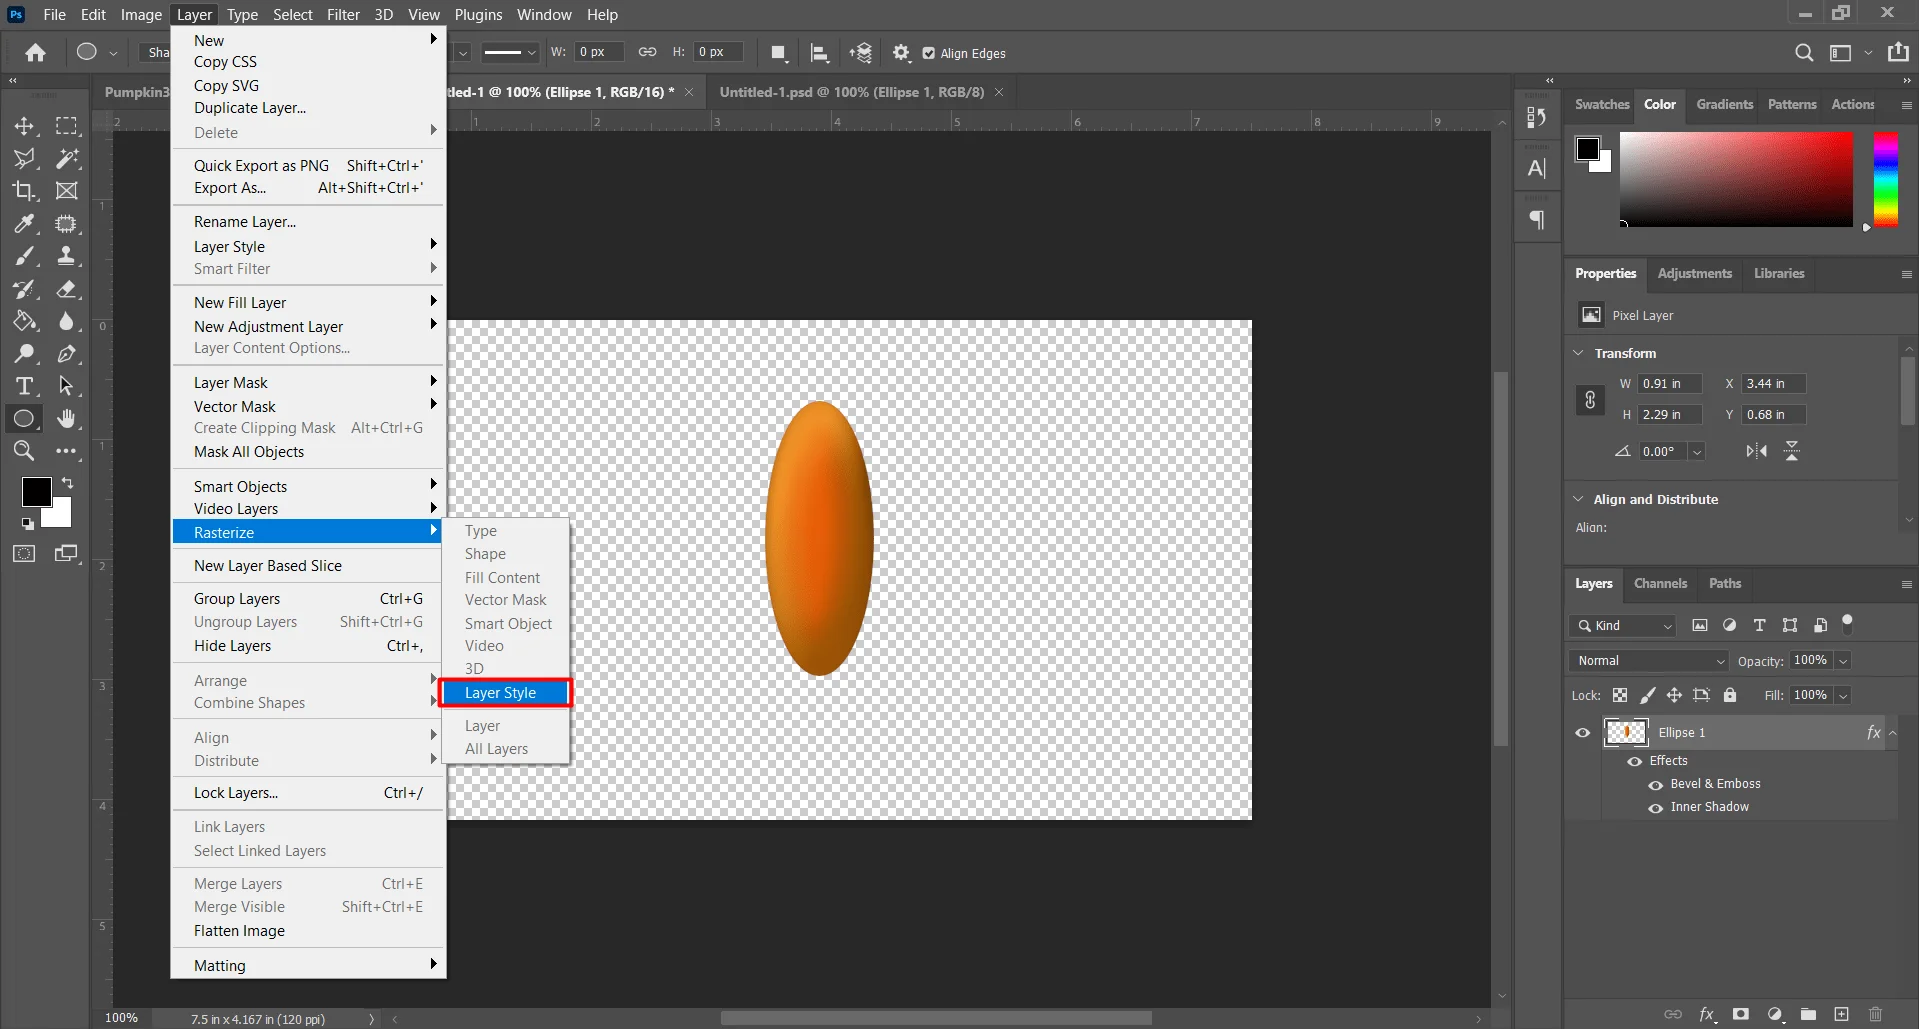
Menubar > Layer > Rasterize > Layer Styel
You can also rasterize the layer and layer style from the menubar. Click on the layer option of the menubar. Then select the Rasterize option from the drop-down menu. Another sub-drop-down menu will appear and select the ‘Layer Style’ Option.
The rasterizing of layers is very important. You cannot follow the next step of pumpkin drawing without rasterizing the layer.
Step 7: Skew with Shear Tool
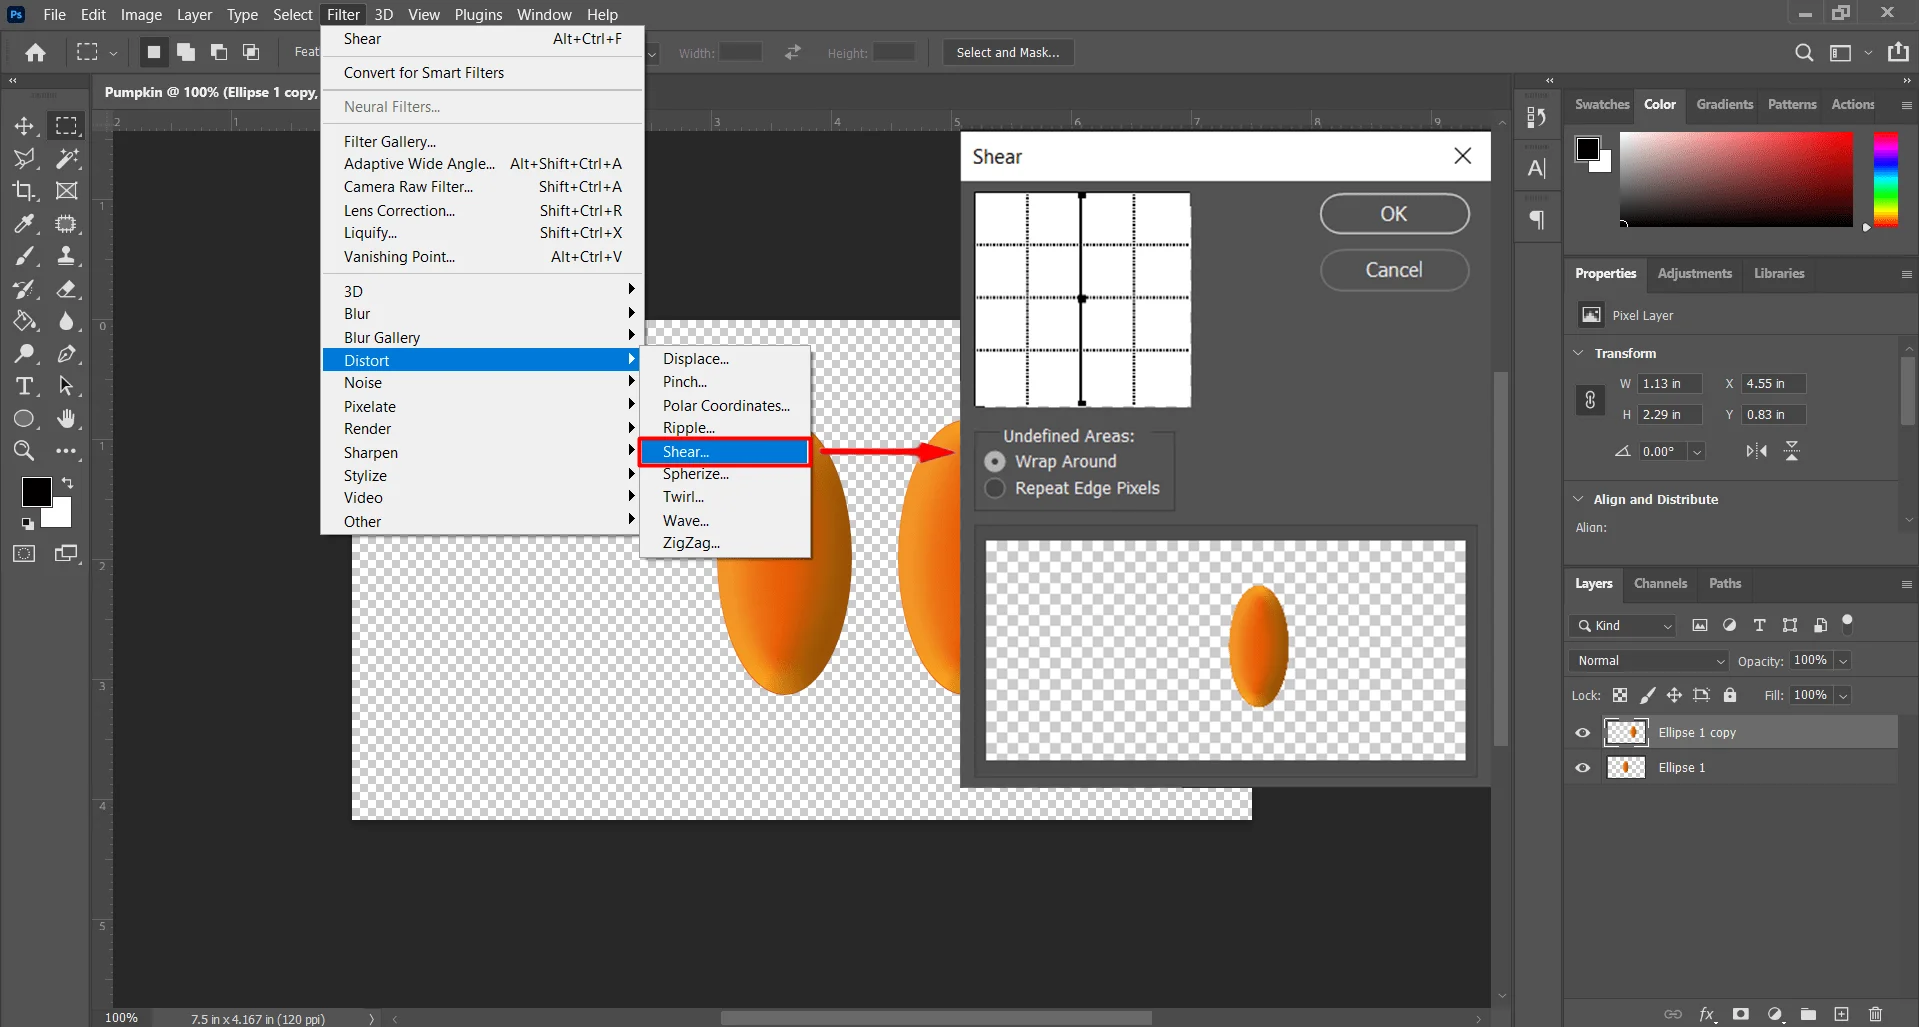
Menubar > Filter > Distor > Shear
You can skew one element of your Photoshop document by using the “Distor’s Shear” filter tool. If you use the CSS6 version or less yourdocuments should have 8-bit images. Otherwise will won’t be able to use the Distor filter in the pumpkin drawing. ‘Shear’ is a Tool of the ‘Distor’ filter.
First Select the layer then go to the main menu and select ‘Filter’. A drop-down menu will appear. From the Drop-down menu click on ‘Distor’ a sub-menu will appear with the list of tools. From the sub-menu click on the ‘Shear’ option. Select Shear and continue your pumpkin drawing.
Shear Dialog Box
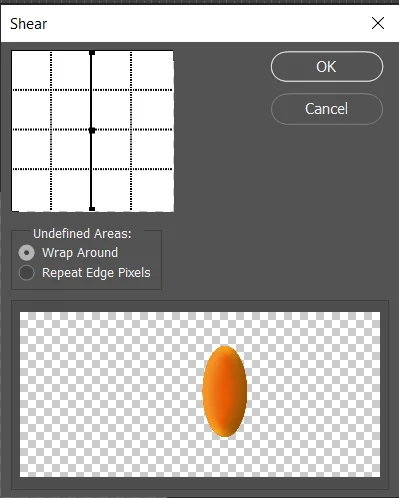
In the bottom shear Dialog Box, you can see the Preview of the element. The skew of the element will be previewed in this preview section. Above the preview section, the Undefined Areas exist with two options.
Warp Around: Fills new Voids in the image with content from the opposite side of the image.
Repeat Edge Pixels: Extends the colors of pixels. Banding may result if the edge pixels are different colors.
On the Top left side, a square Edit workspace is available. On the workspace, by default, the element’s position is linear shown on the graph by a straight line. Click anywhere on the line and drag the mouse to make a curve.
The element will skewed and a preview will be shown in the preview section. you can add as many points on the curve as you want just click on the curve and a new point will appear.
Step 8: Skew the Eclipse and make a slice of Pumpkin
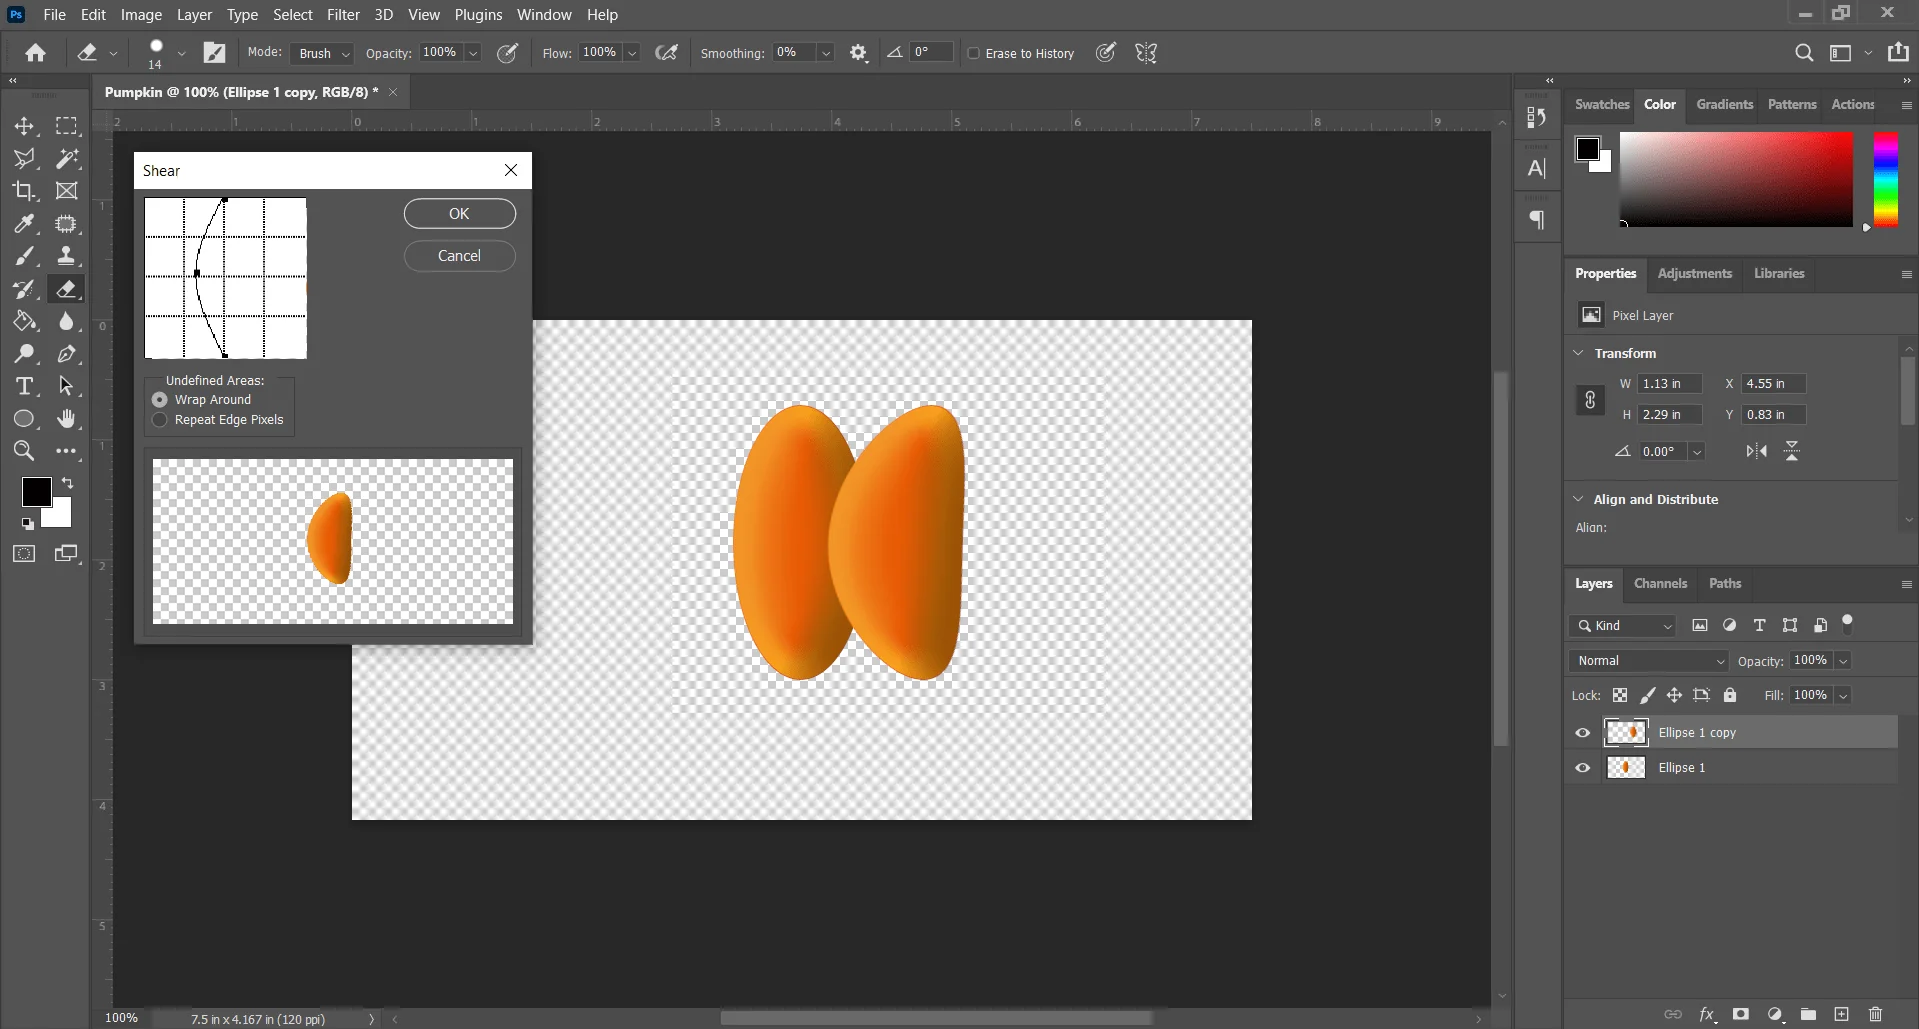
Now give a shape as a slice of pumpkin to the new layer that you duplicate from the Eclipse To draw a pumpkin. To skew the eclipse click on the line in the middle of the workspace at ‘Shear Dialog Box’. A point will appear and add to the line. Now click and hold on that point and drag to the left to make a curve.
Look at the preview section. If your eclipse shape appears alike a slice of a pumpkin then press the ‘OK’ button on the top right corner. This is an important task in pumpkin drawing. You can practice this several times.
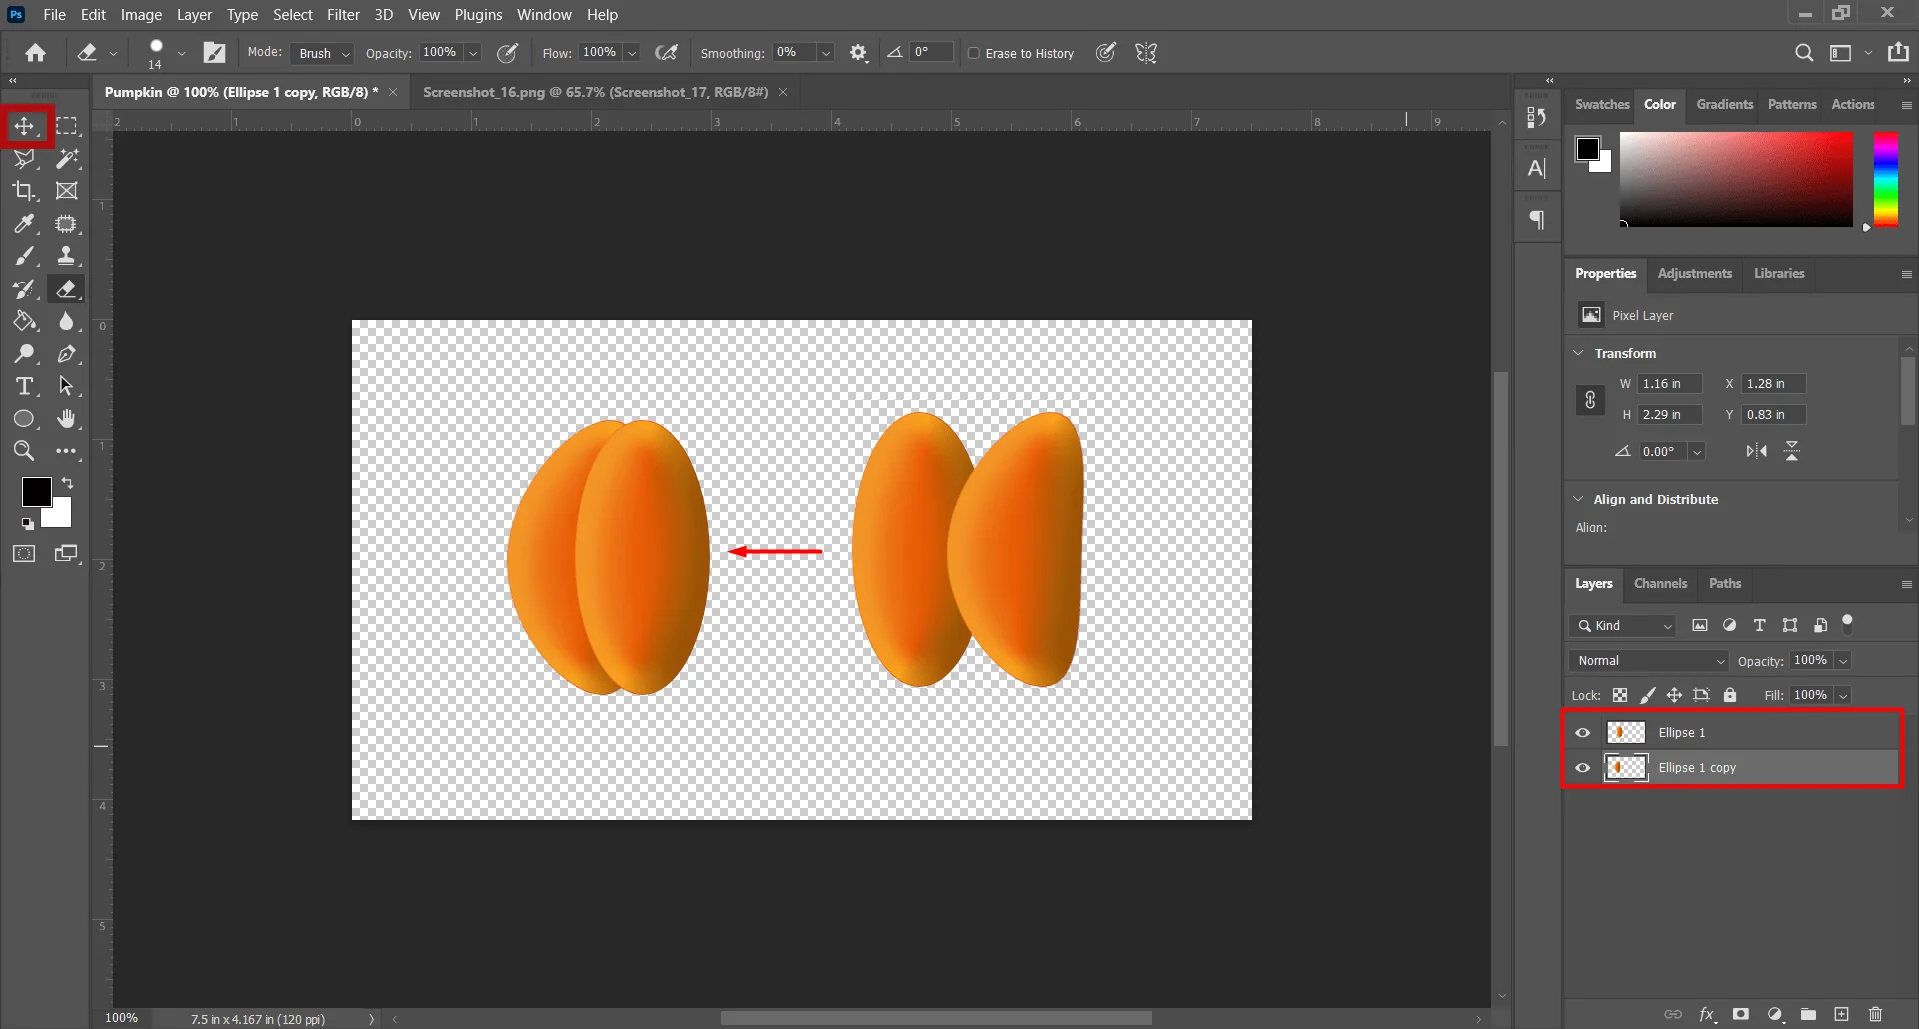
The eclipse was dear for the pumpkin drawing will be the middle slice of pumpkin and the skew eclipse will be the left and right slices respectively. To arrange the slices go to the layer panel click and drag down and birth the new layer to the bottom of the first Eclipse’s layer.
Select the move tool for the toolbar and move and arrange the left slice of pumpkin at its position. To move the Pumpkin slice click and hold on the eclipse on the active window then drag to the left of the middle slice of pumpkin. Place the Eclipse under the first eclipse as it looks like a left-side slice of pumpkin.
Step 9: A right side Slice of Pumpkin
Now make the right-side slice of pumpkin. The procedure is the same as we do at Step 7. First, we have to make a new duplicate of the Eclipse from layer 1. Don’t flip the left side slice for the right, and then you will lose the drak effect of the right side of your pumpkin drawing.
Now click on the new layer and select the filter for the menu bar. Go to the distort and click. from the sub-menu click on ‘Shaer’. The shear dialog box will appear.
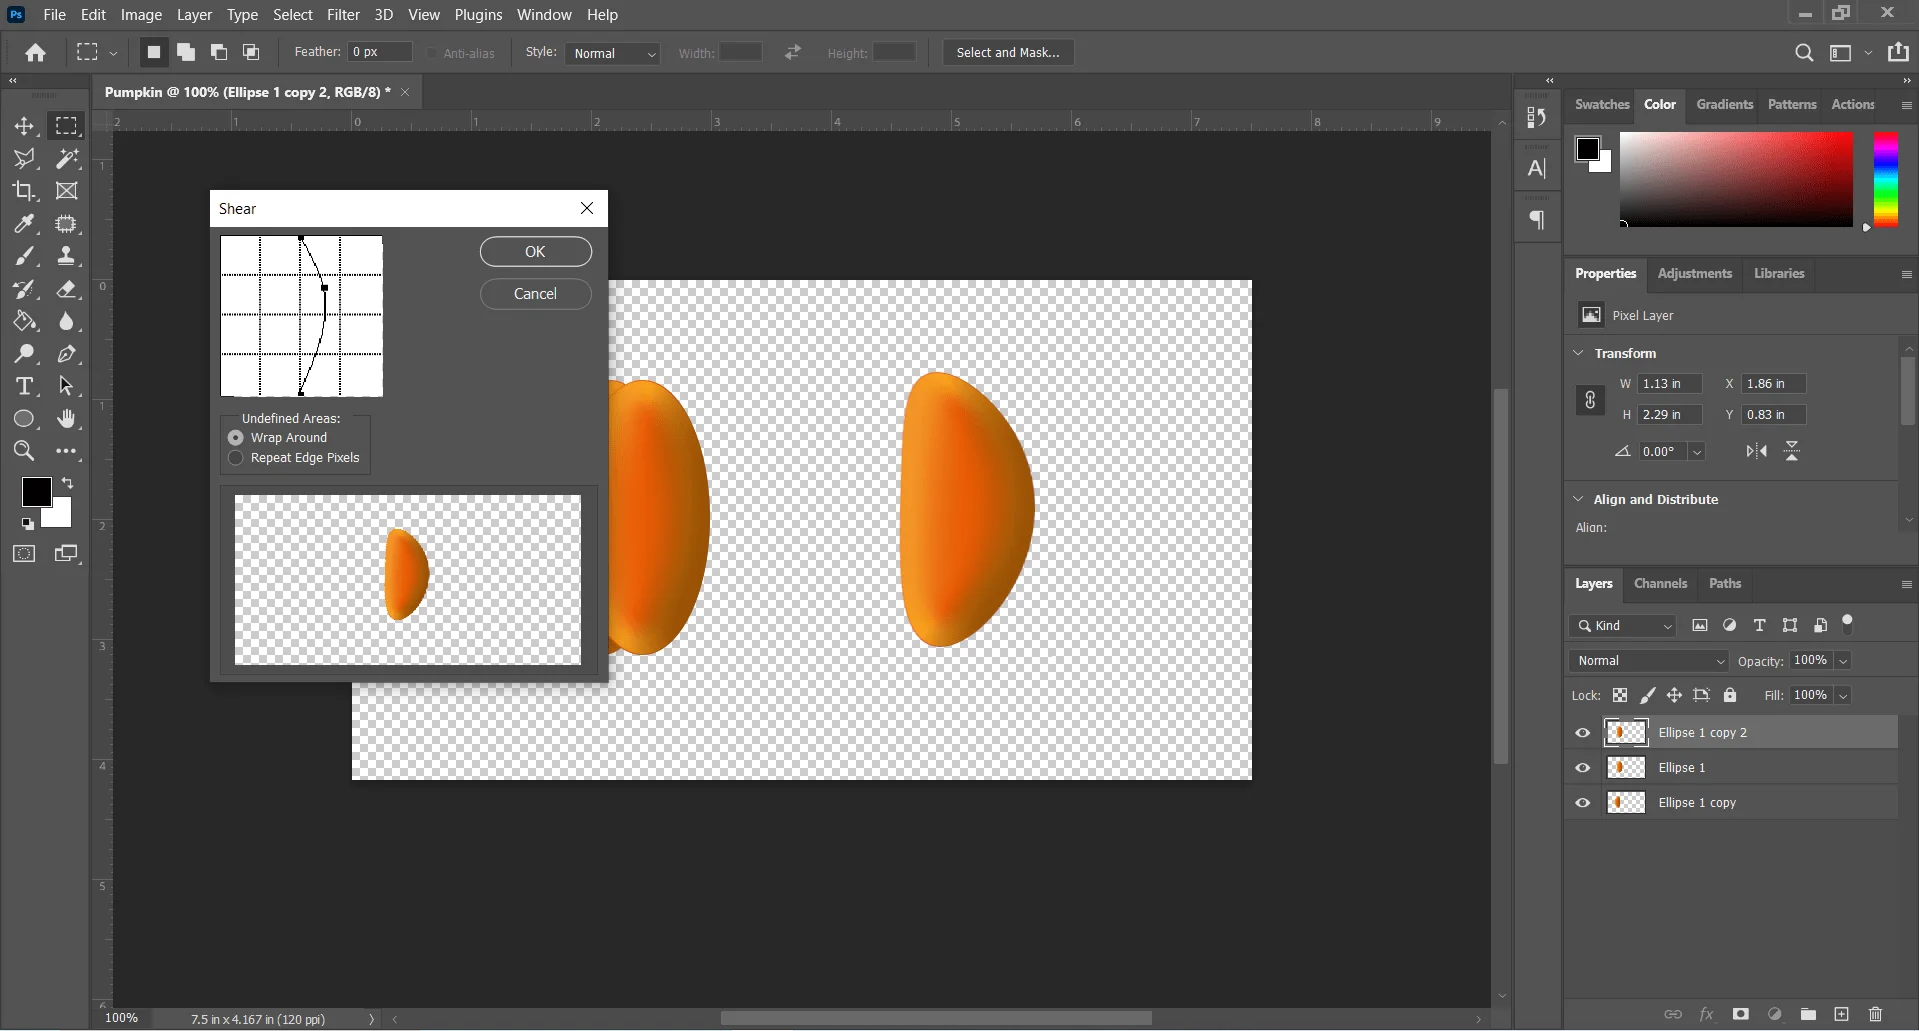
Now click and drag the middle line on the workspace at the top left side of the Shear dialog box. Make a curve and give a prover shape to the eclipse alike a slice of pumpkin. If you are satisfied with the shape of the eclipse in the preview section press the ‘OK’ button.
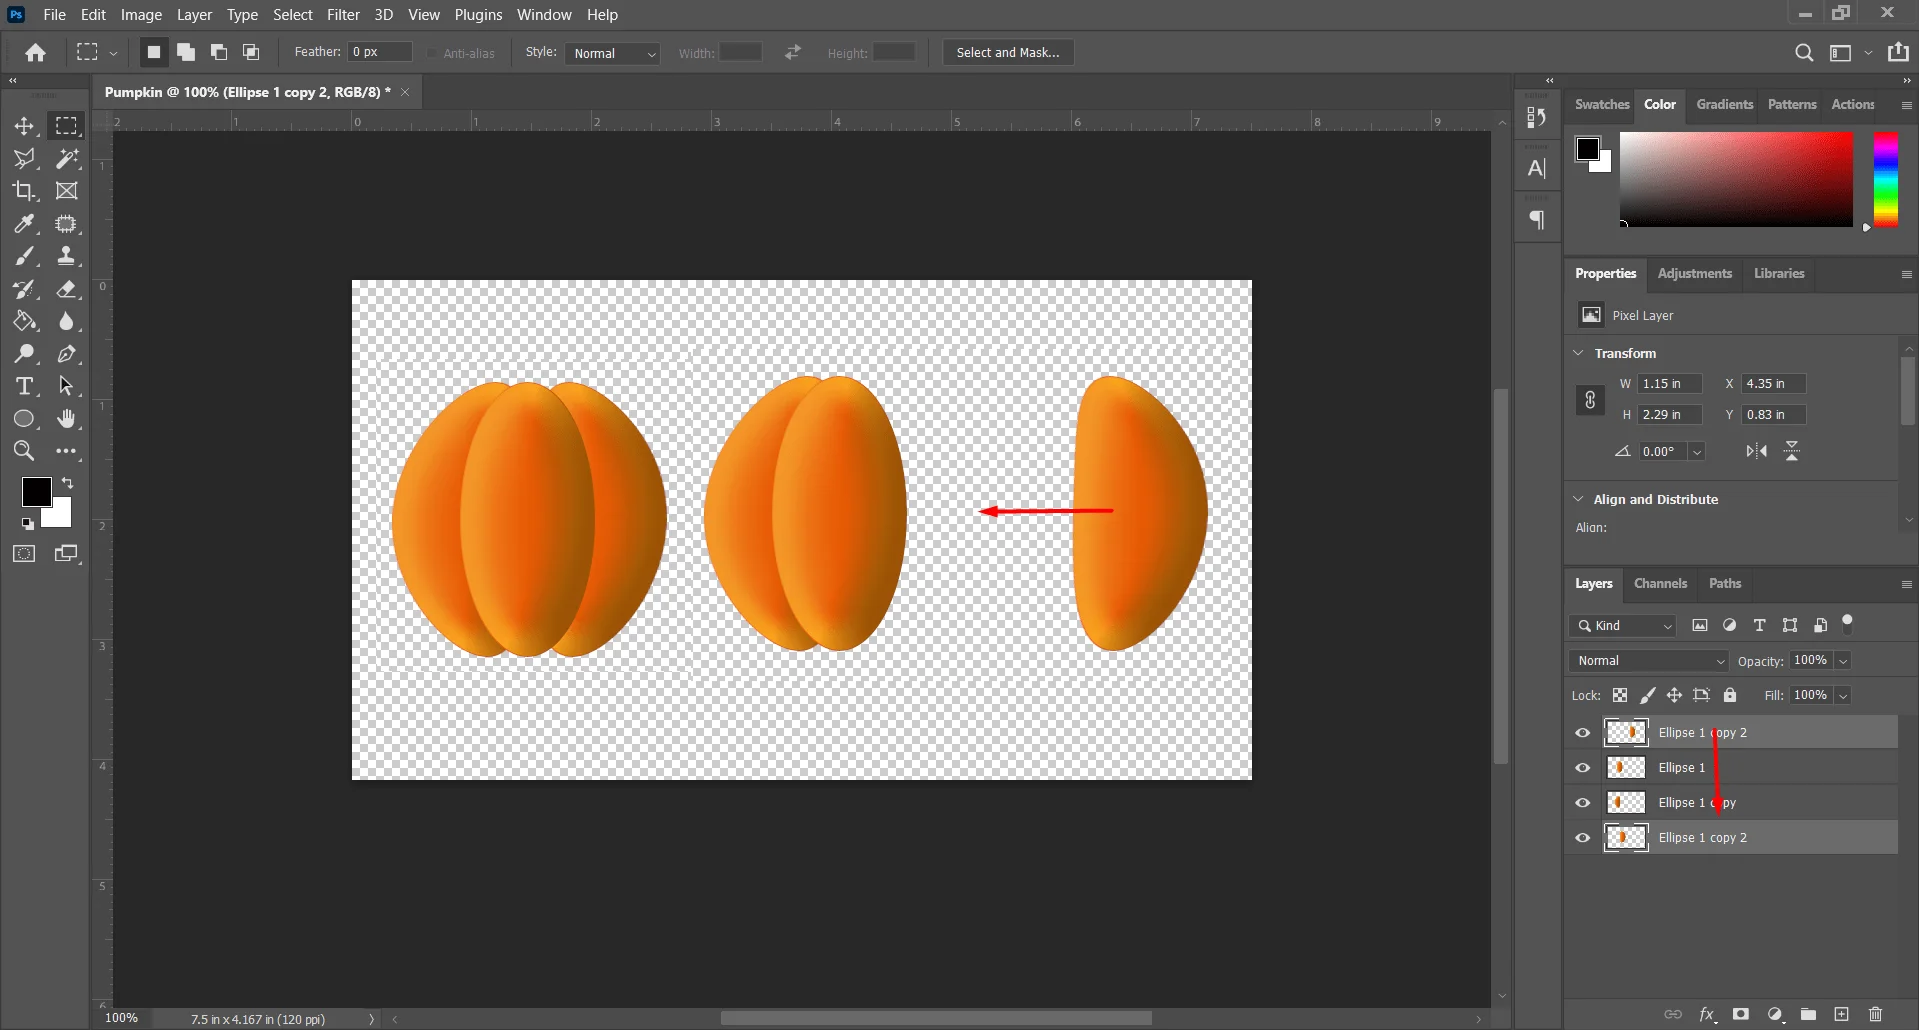
As we do in step 7 arrange the layer. Click on the layer on the layer panel and drag it to the bottom of the layers. Then select the ‘Move’ tool move the eclipse and place it under the first layer so it looks like the right slice of pumpkin drawing.
Step 10: Make the rest of the slices of Pumpkin
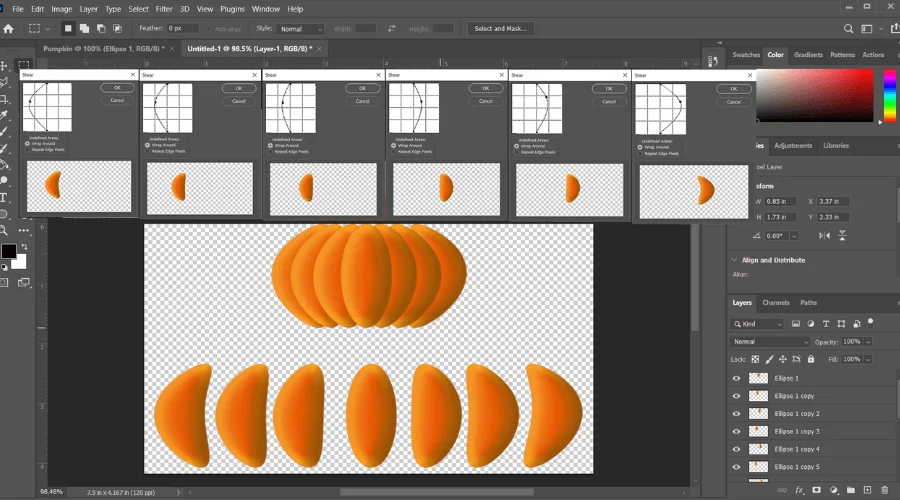
Now make more 4 slices for the pumpkin drawing 2 for the left and 2 for the right. Give every slice of the pumpkin a proper shape from the ‘Shear Dialog Box’. And arrange them according to the older to newer slices of pumpkin. Make individual duplicates from layer 1 for every slice of pumpkin.
Don’t get confused repeat Step 7 and Step 8, 2 items each. Take help from the picture given above for further clearance. The result of this Step will look something alike the image above.
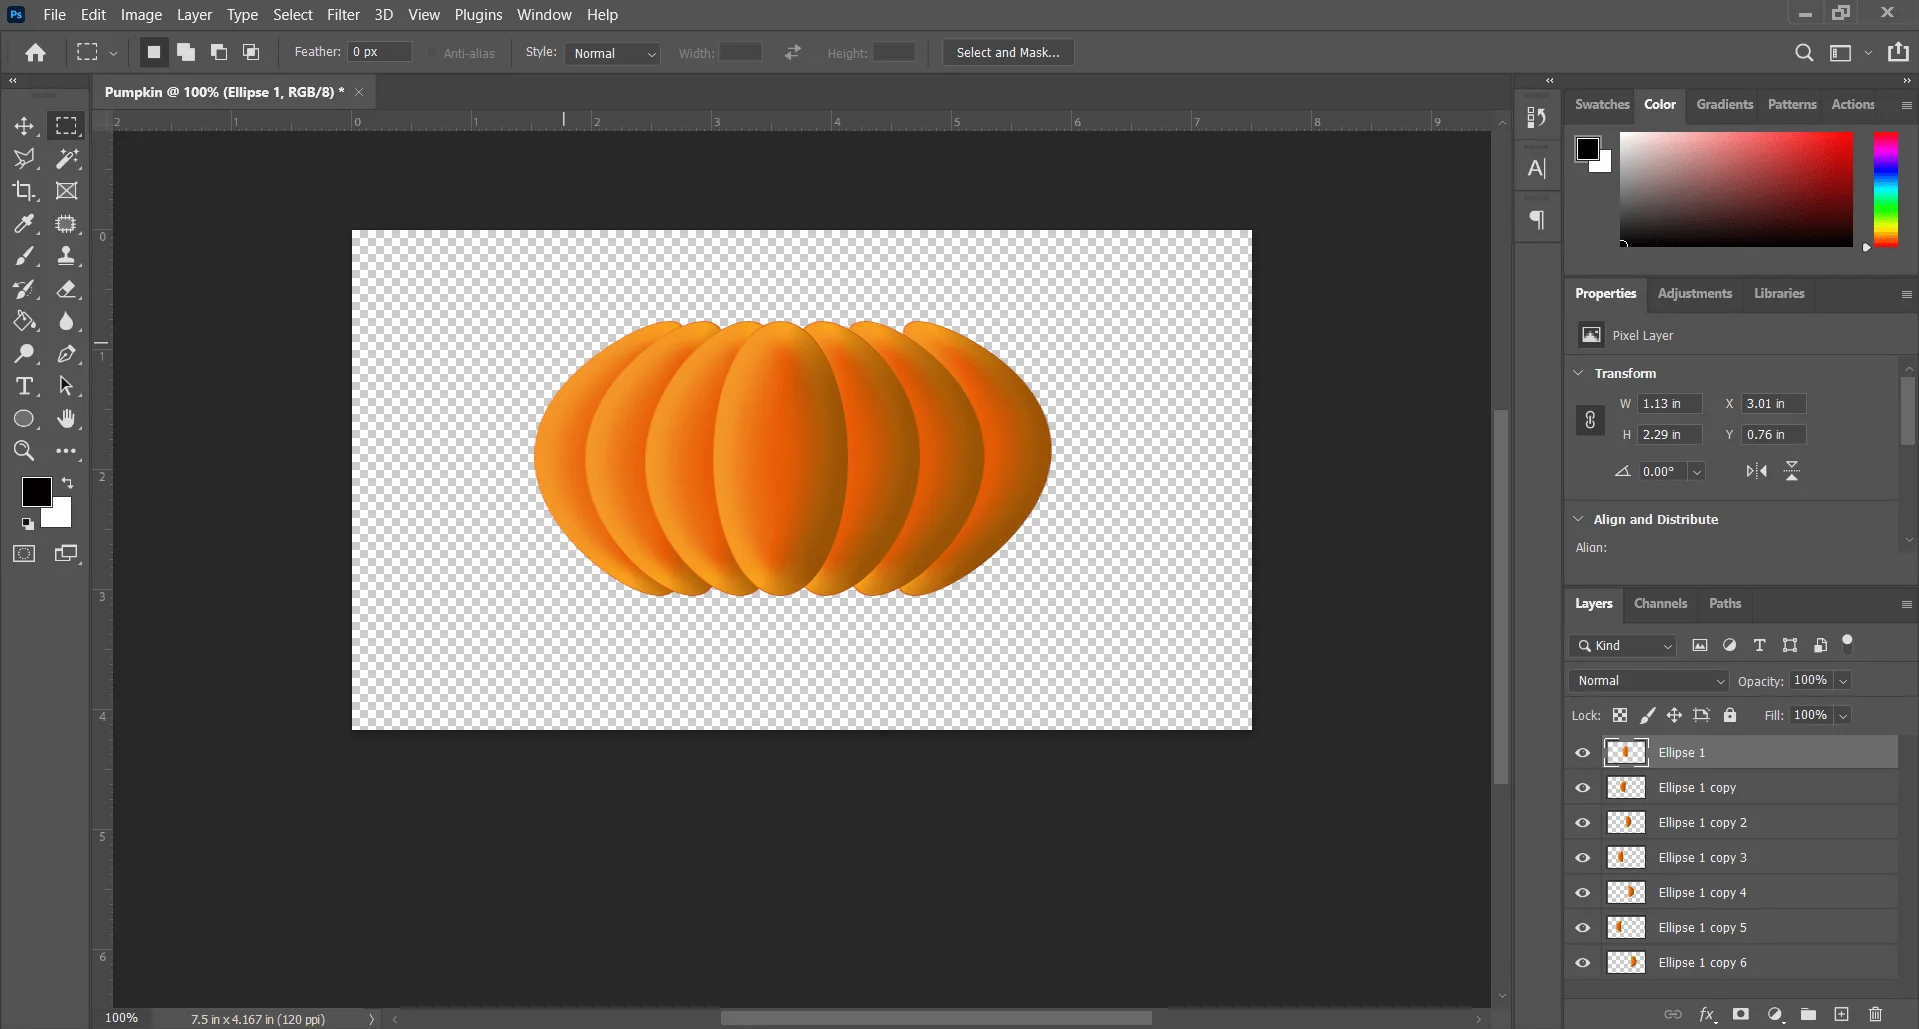
Step 11: Merging All Layers
Merging layers in Photoshop means converting all layers into one layer of pumpkin. Layers in Photoshop are like transparent sheets of paper that lie on top of one another and allow you to make precise edits to certain areas of the image. When you merge layers you combine two or more layers into a single layer.
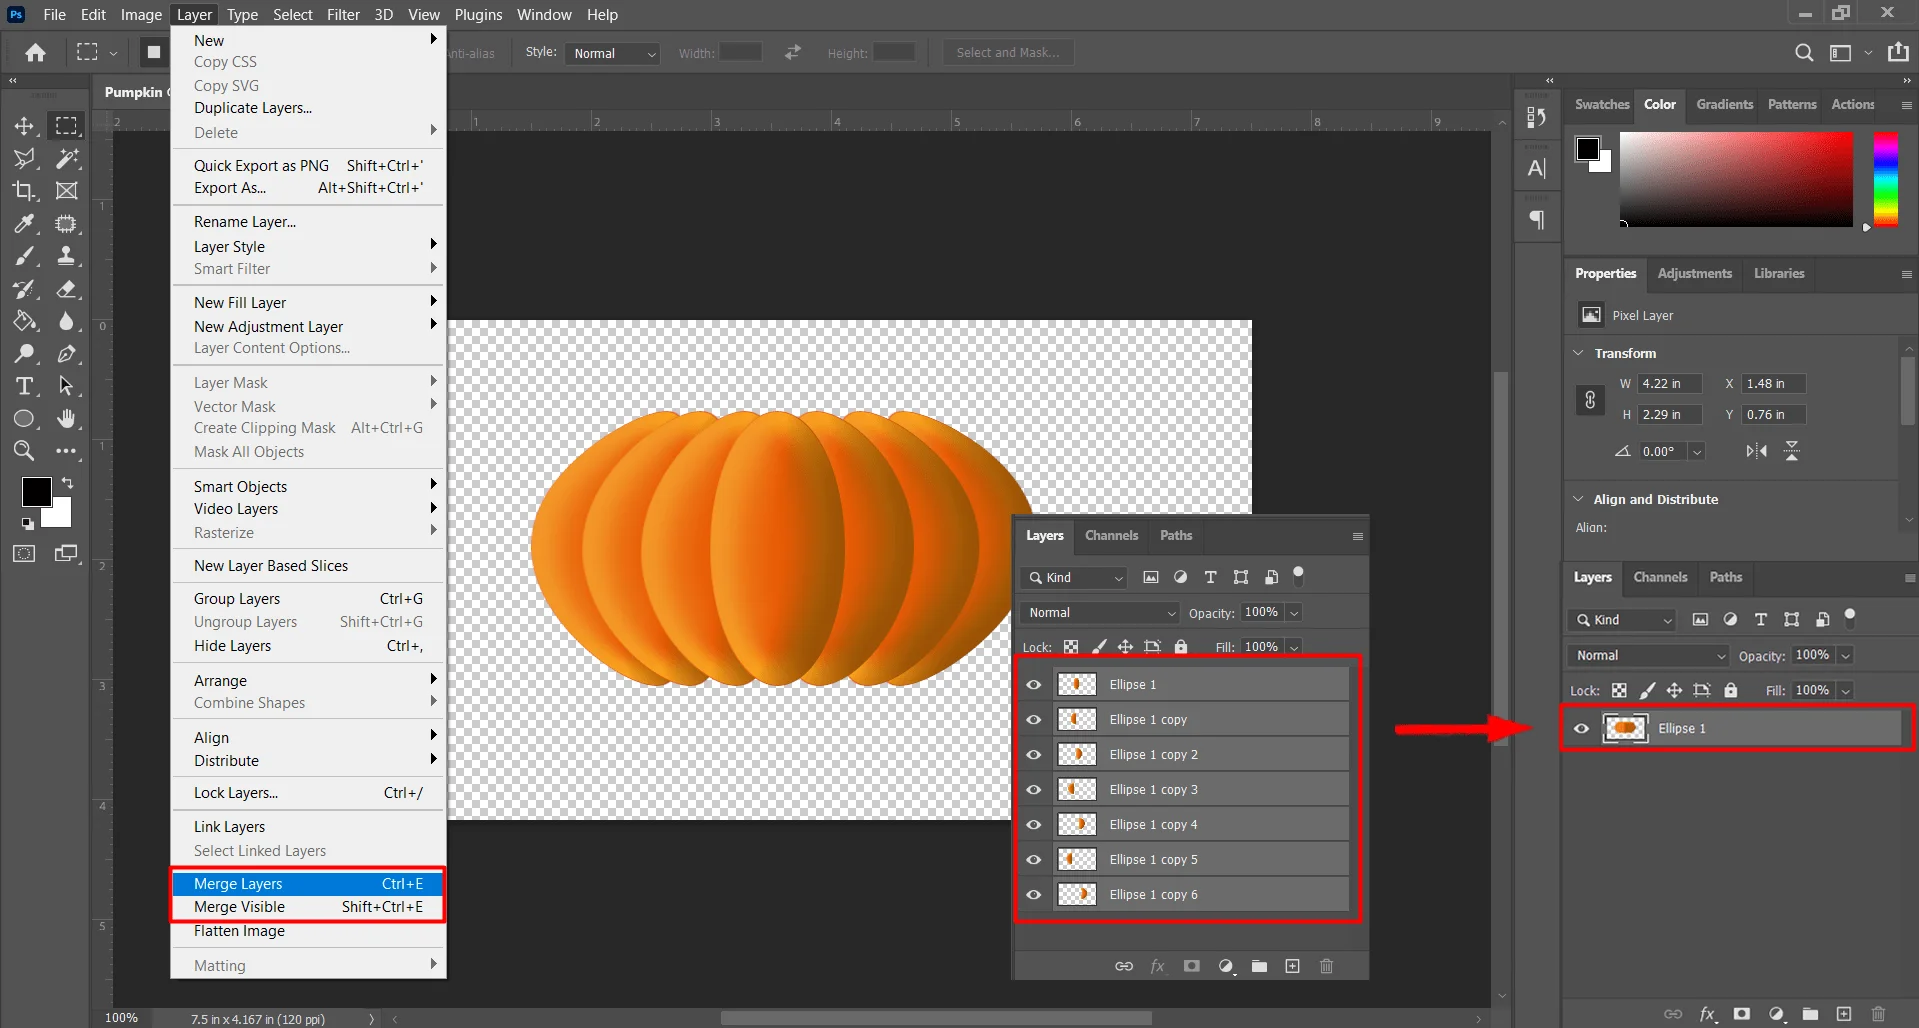
Menubar > layer > Merge Visible
Shortcut: Ctrl + Shift + E
To merge all layers into one layer, go to Menubar and click on the ‘Layer’. A drop-down menu will appear. From the drop-down menu select the ‘Merge Visible’ option. This option will keep the image the same as visible as the pumpkin drawing in the active window. You can also do it with a shortcut, press ‘Ctrl + Shift + E’ altogether.
Step 12: Change the shape to a Pumpkin shape with Liquify Filter
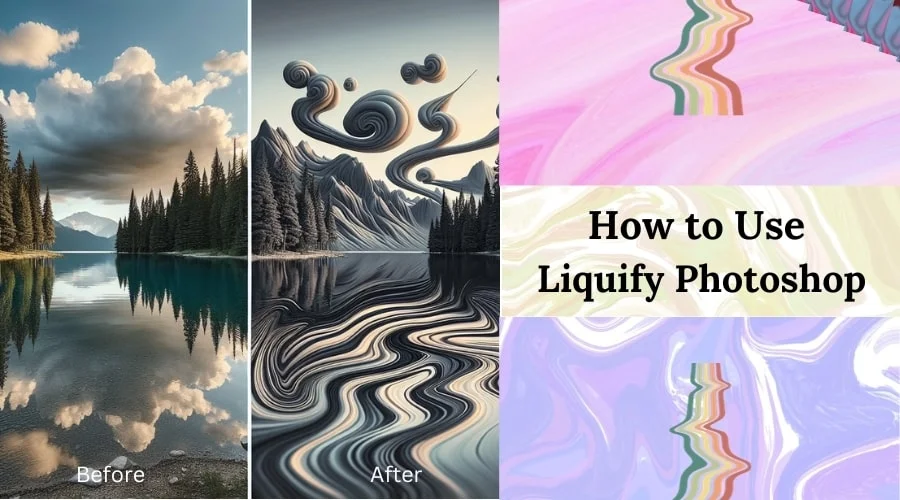
The liquify filter tools are used to push or pull, pucker pixels of your photos. You can give push or pull pixels of your image without losing quality. You can learn about the use of the liquify filter tools from our tutorial ‘How to Use Liquify Photoshop Filter Tool’.
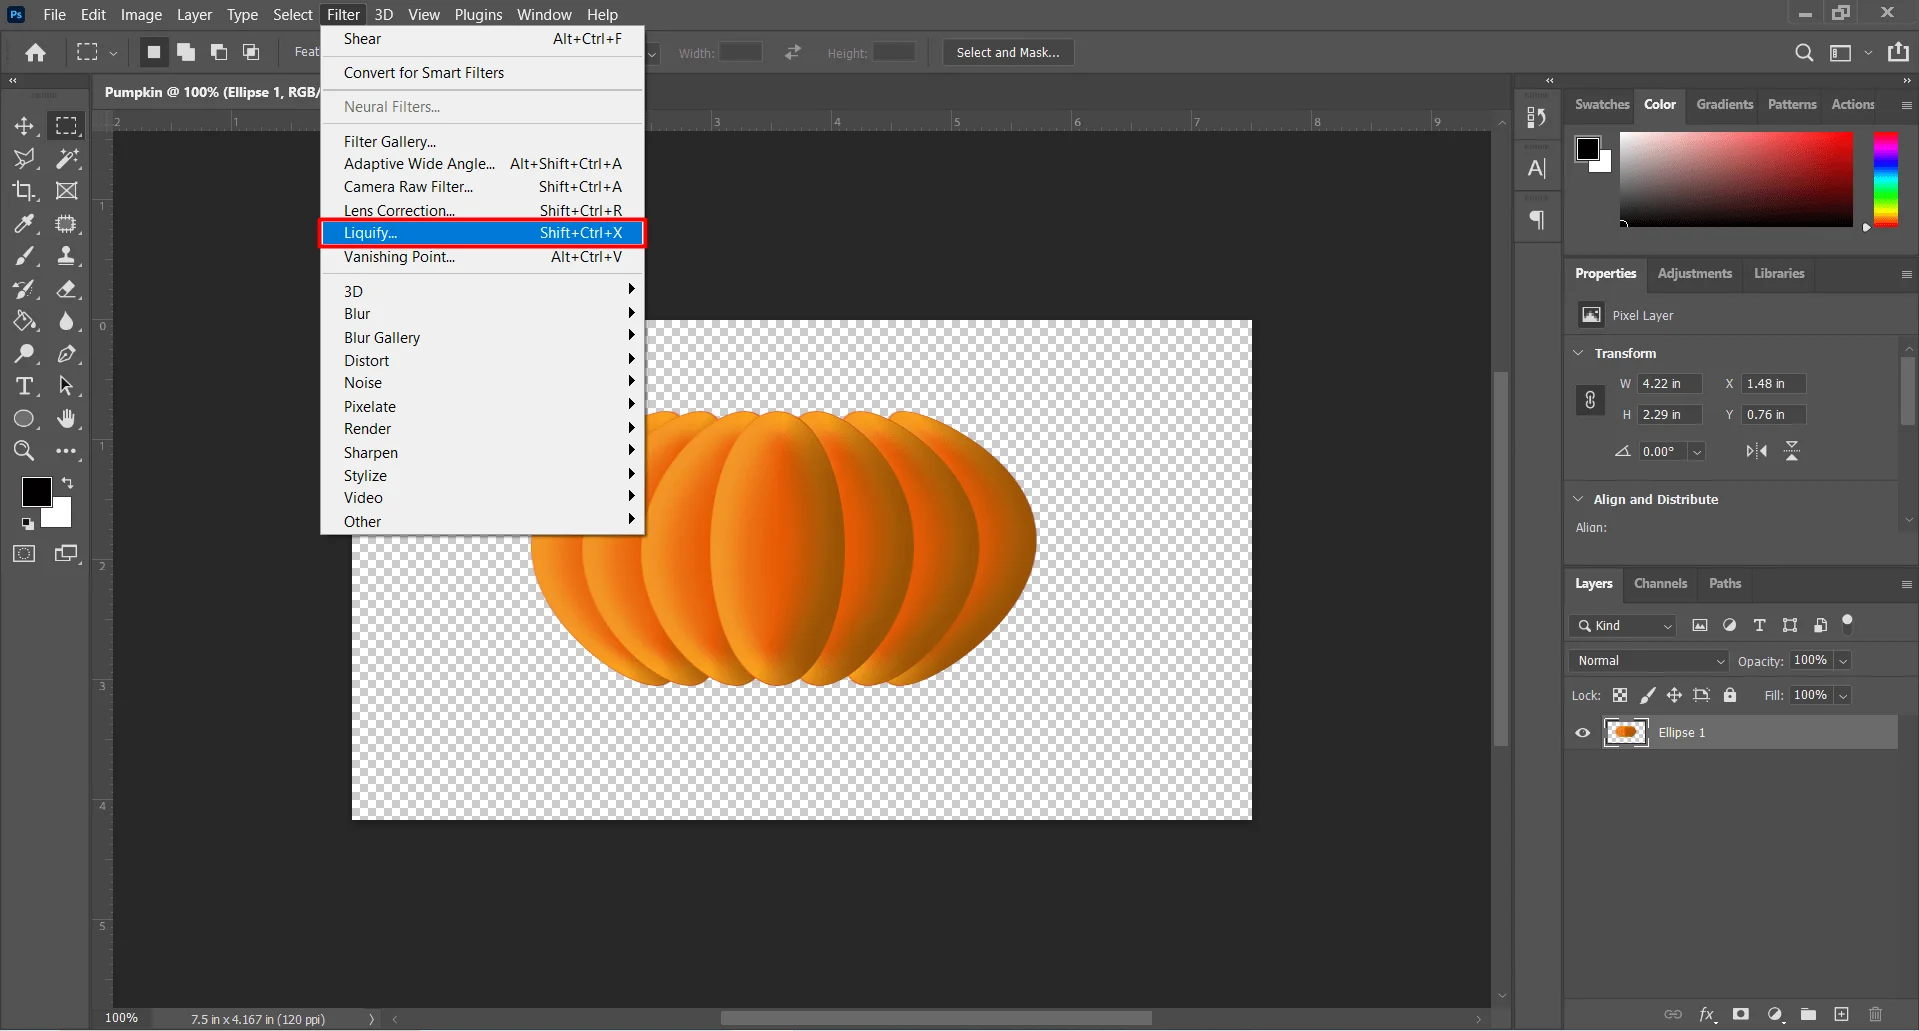
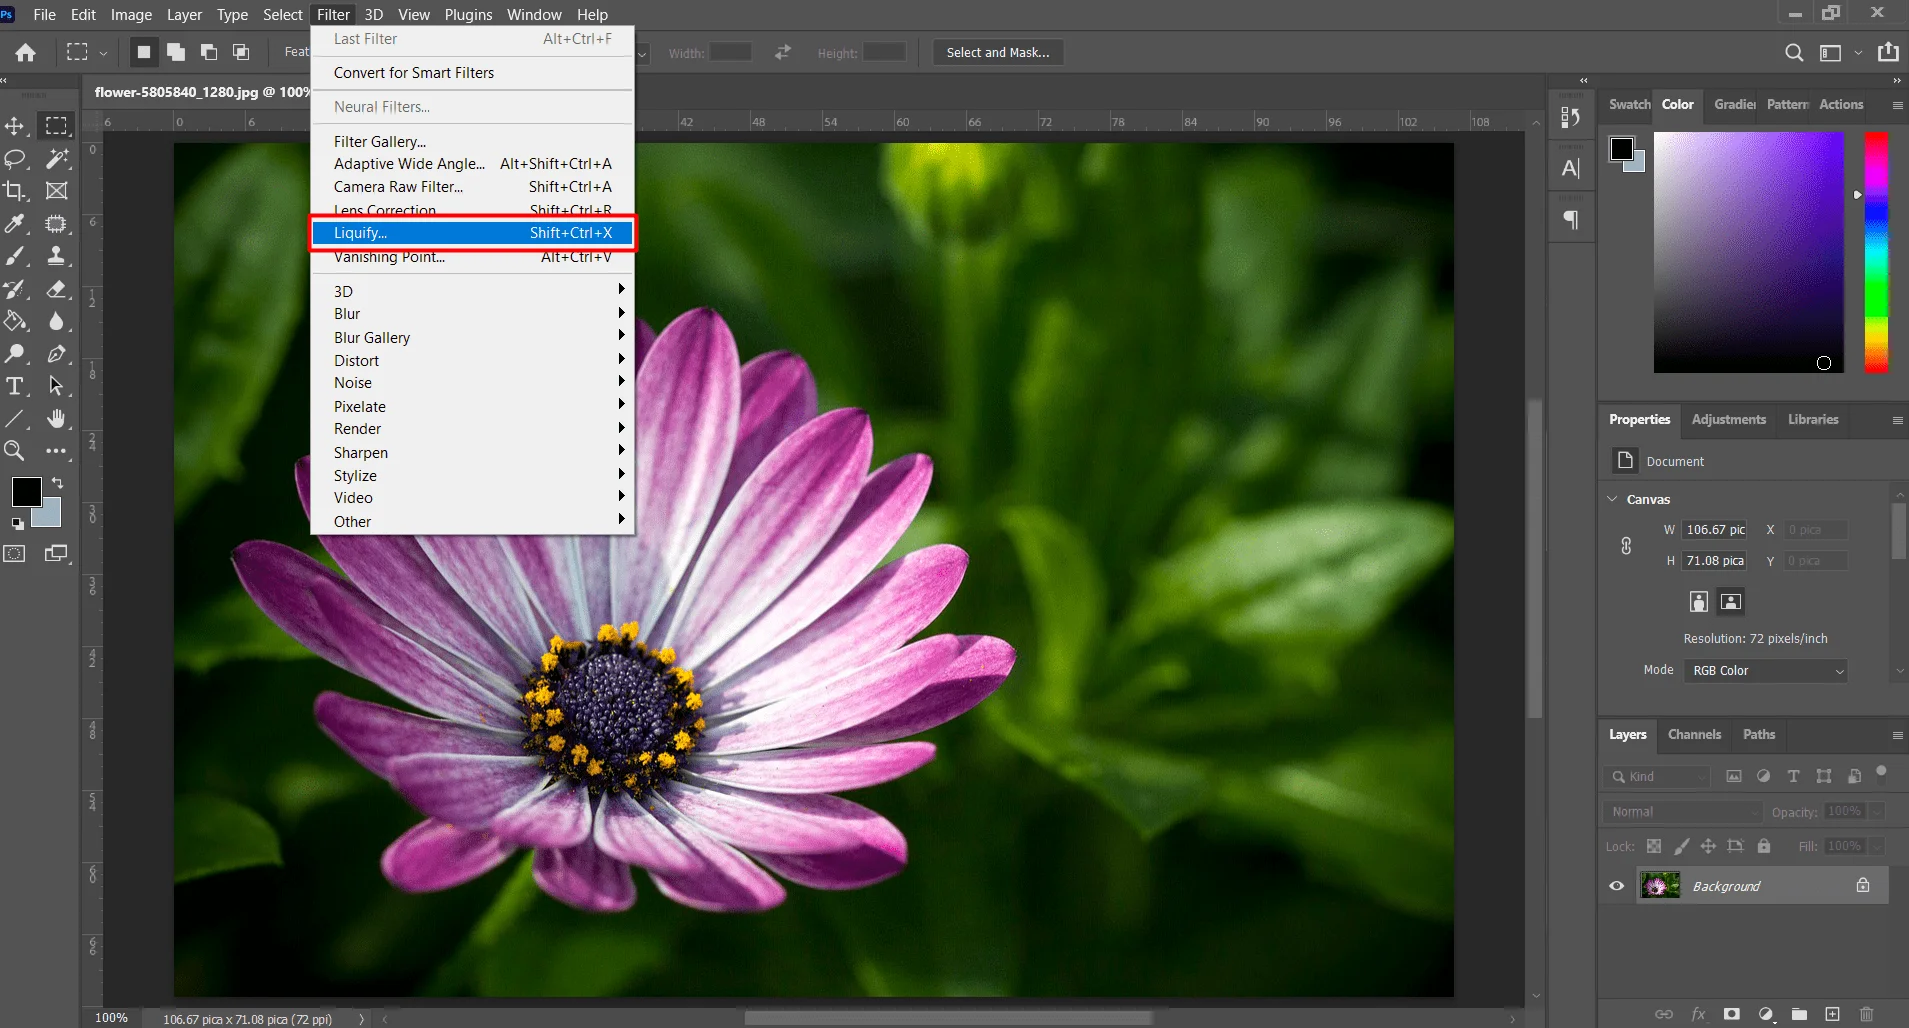
Menubar > Filter > Liquify
Shortcut: Ctrl + Shift + X
Click on Filter at the top of the screen at Menubar. A drop-down menu will appear. From the drop-down menu click on the ‘Liquify’ option. You can also open the liquify filters with a shortcut press ‘Ctrl + Shift + X’ together.
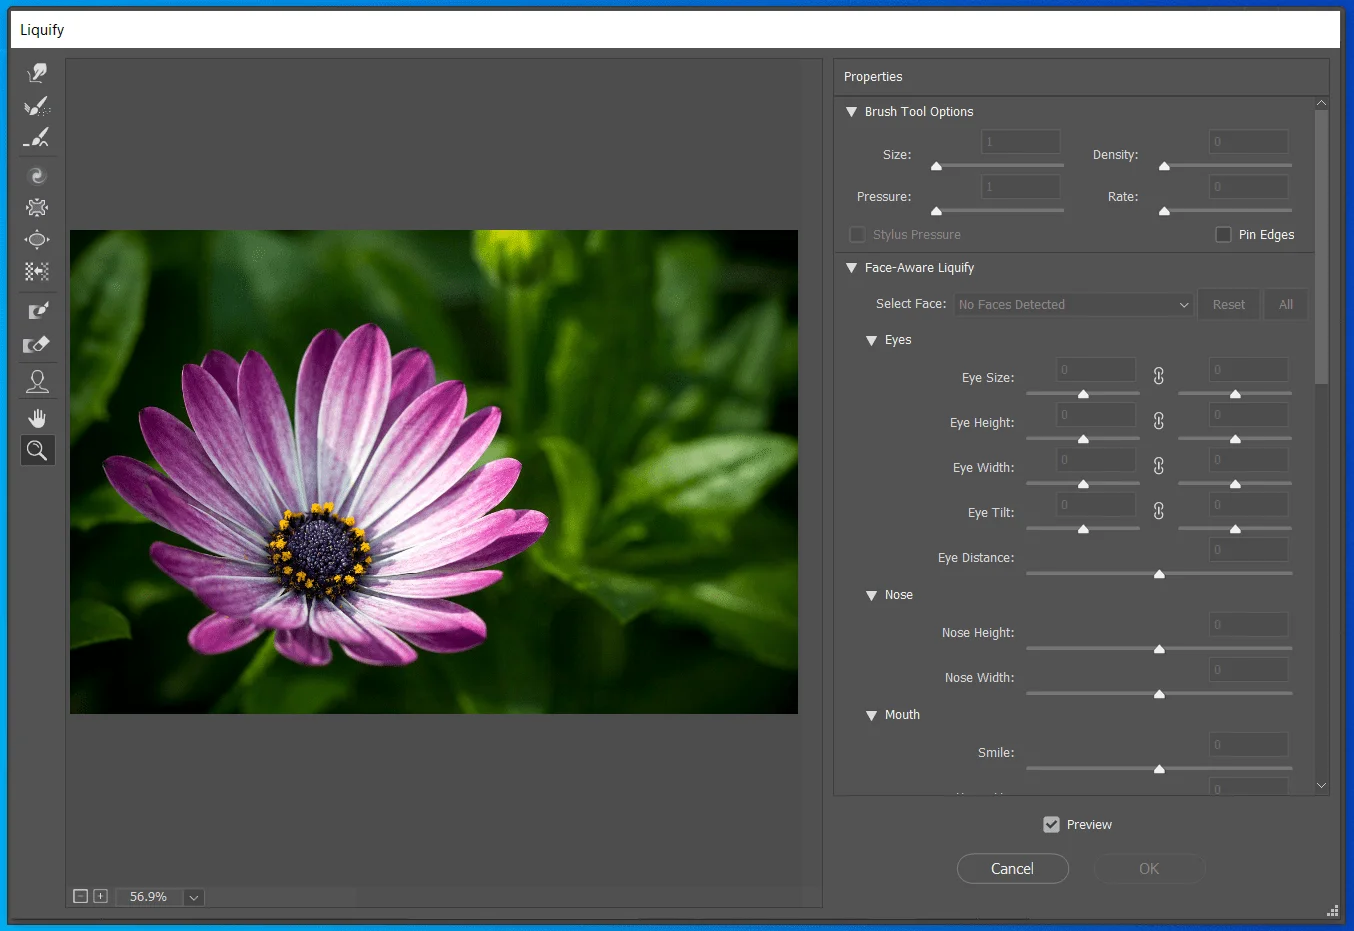
A new window of liquify filter will appear.
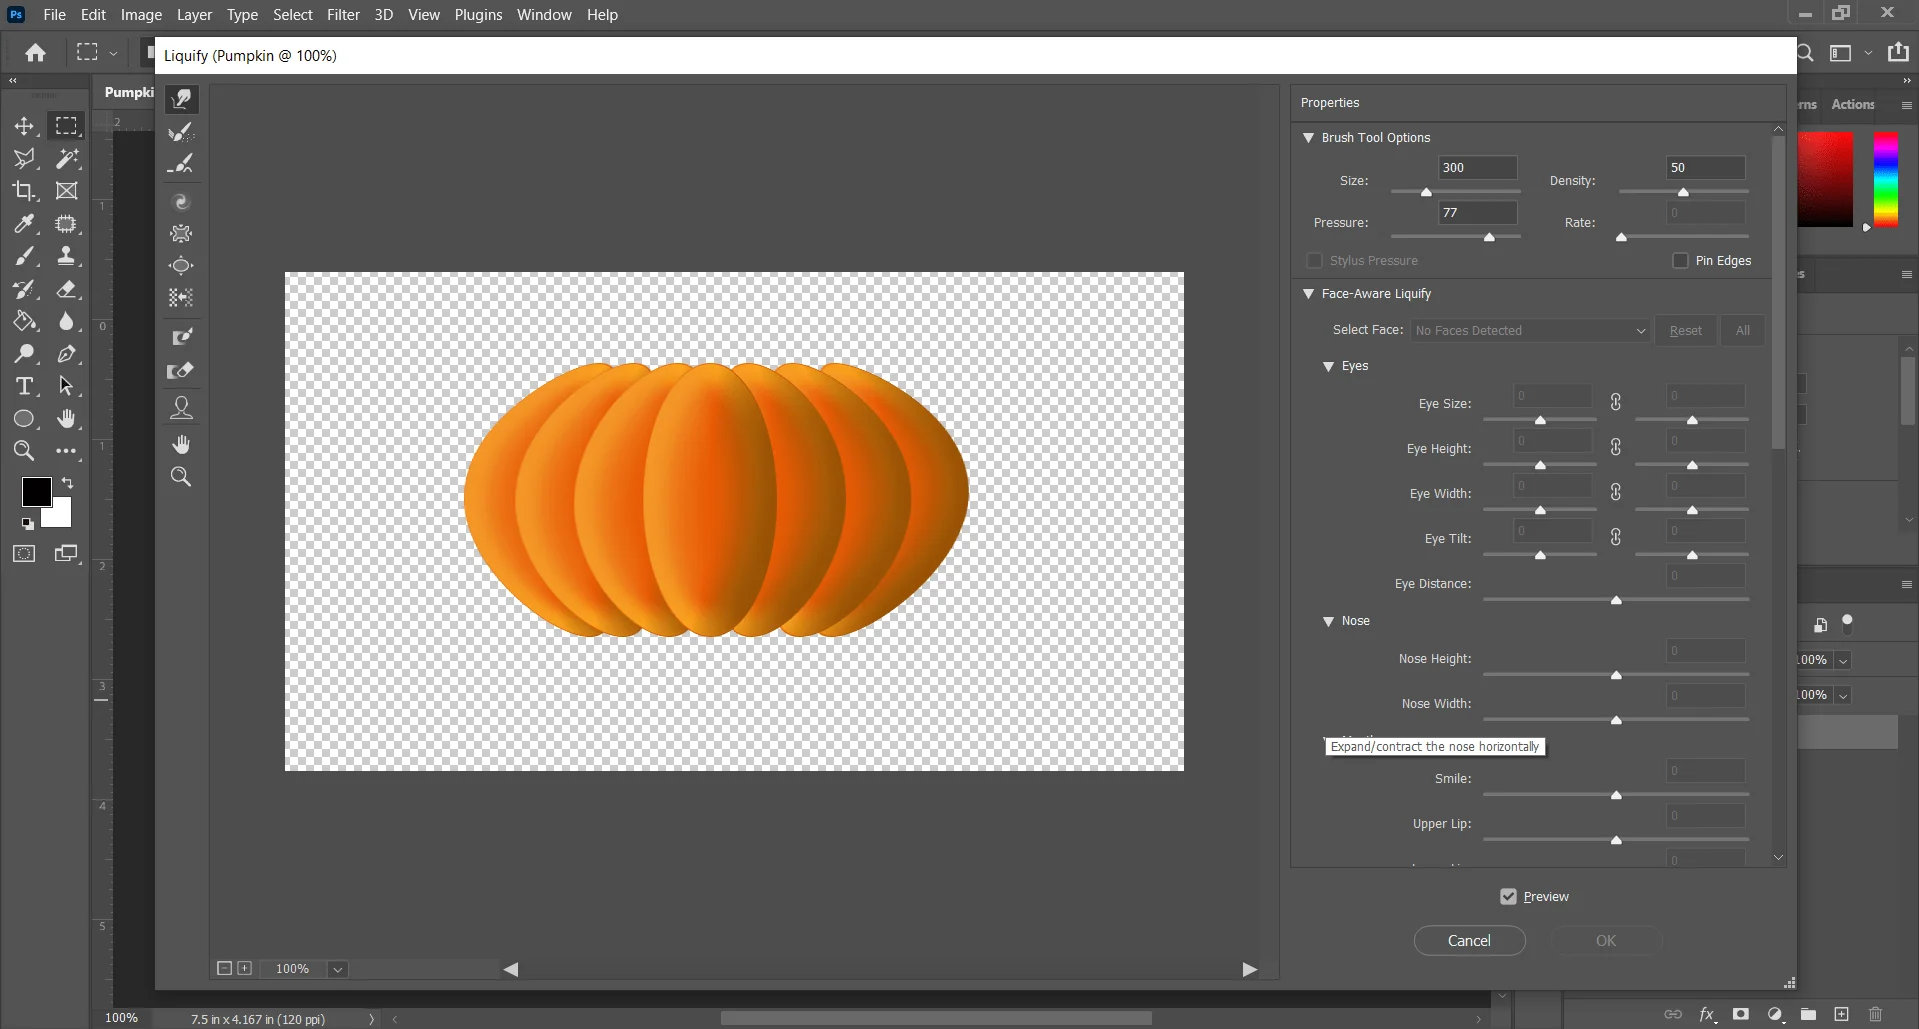
Which is the Liquify filter window. The liquify filter tools are on the right side of the liquify window. The Tool options and parameters are on the right side of the window and the preview section is in the middle where we will give liquify effect to the photo.
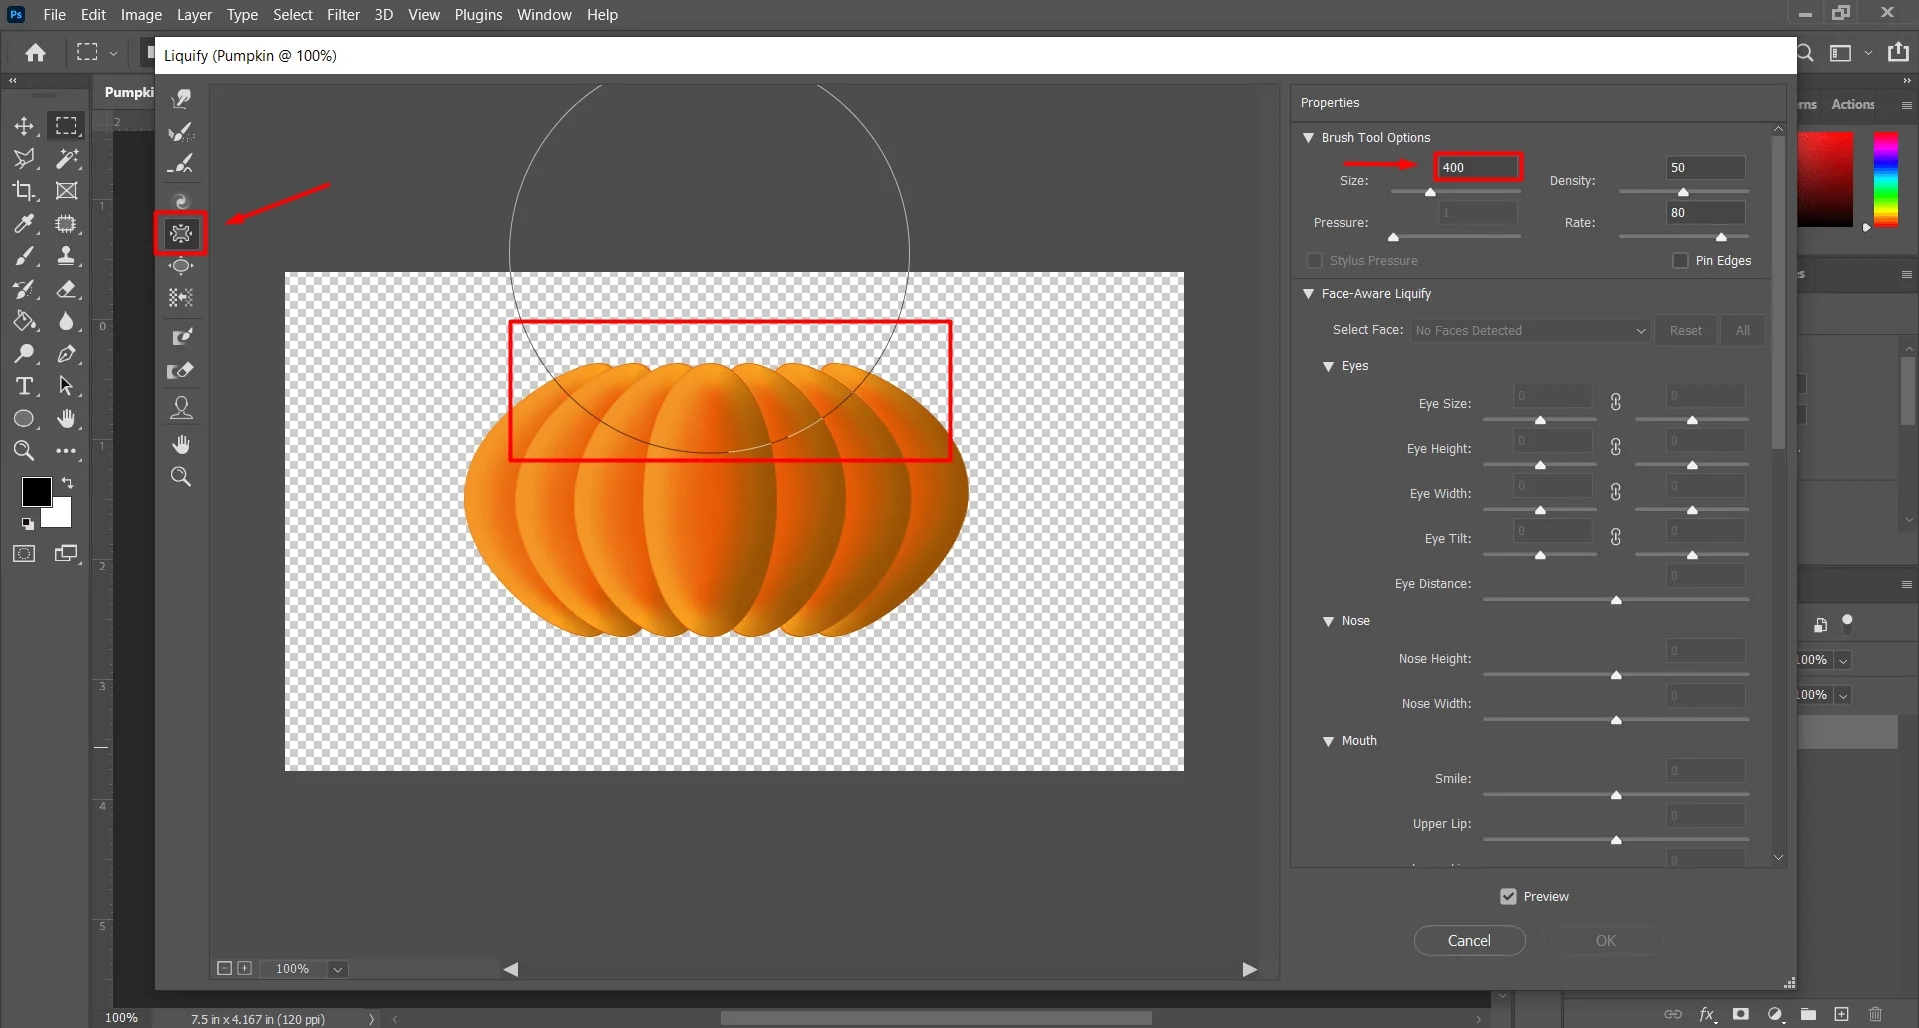
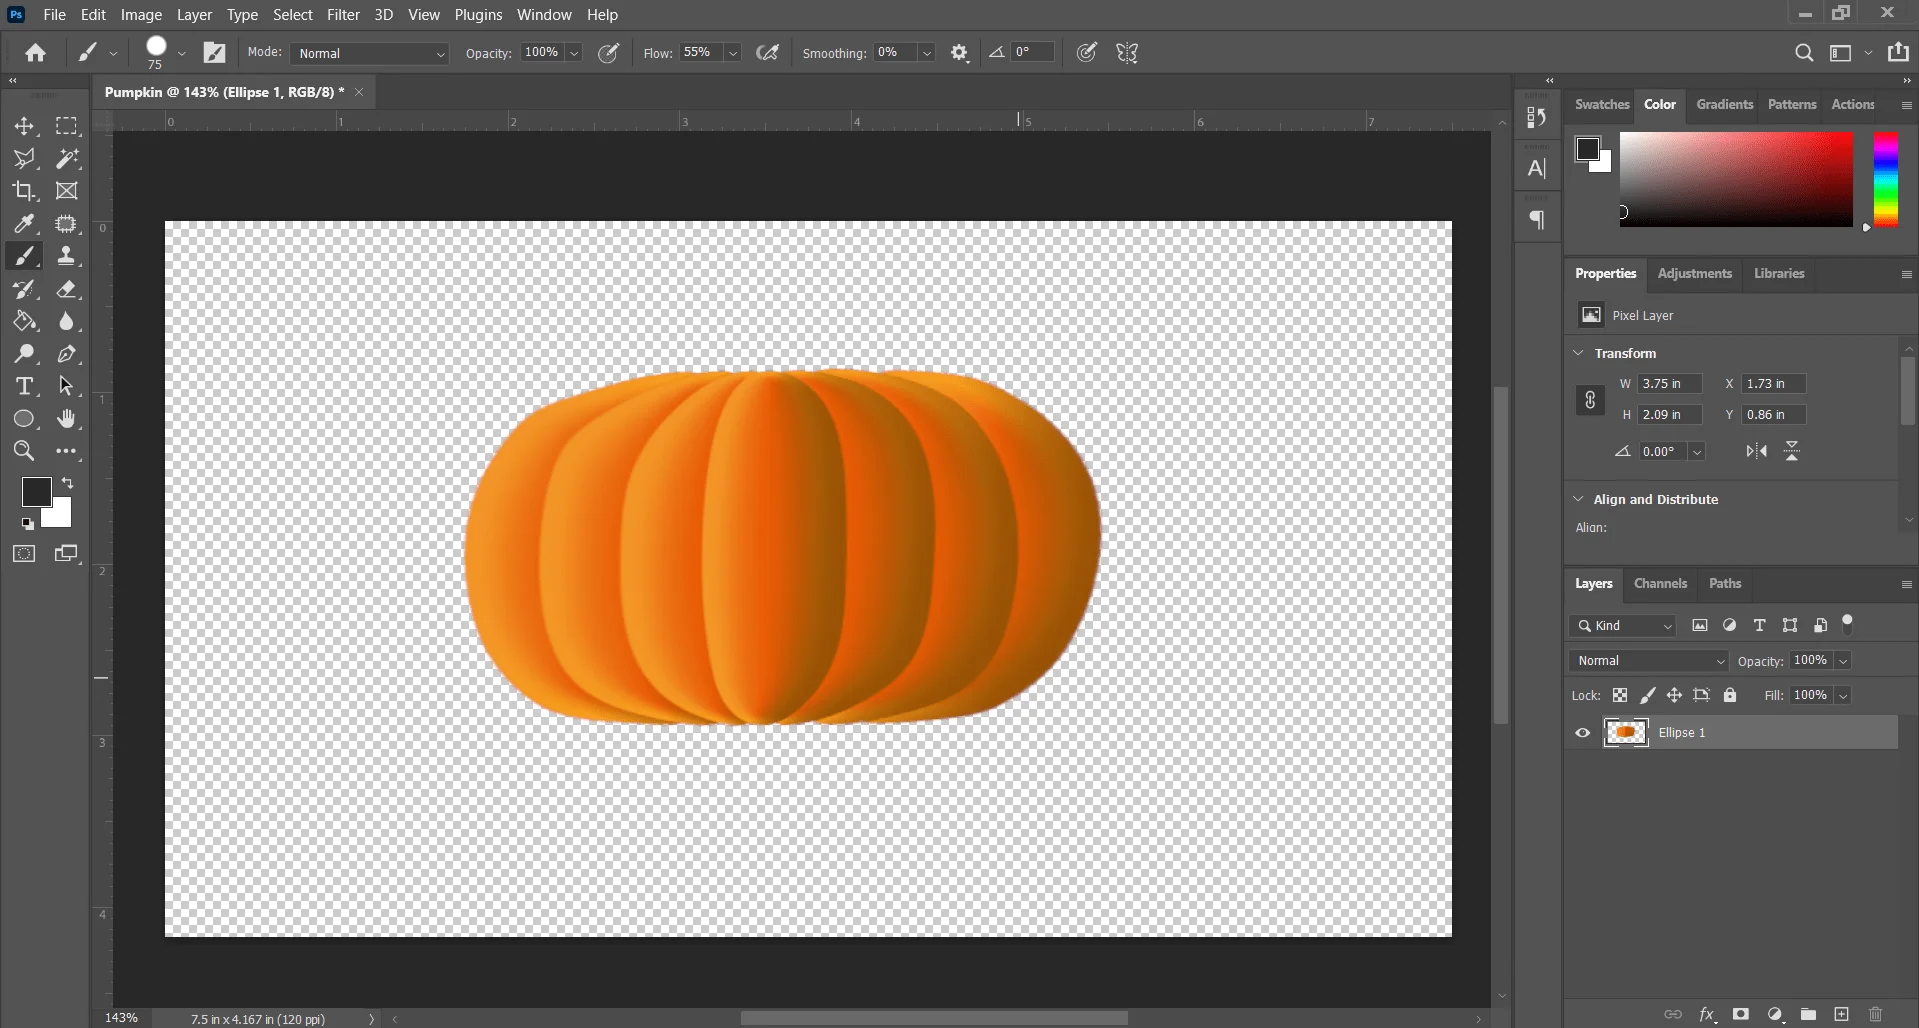
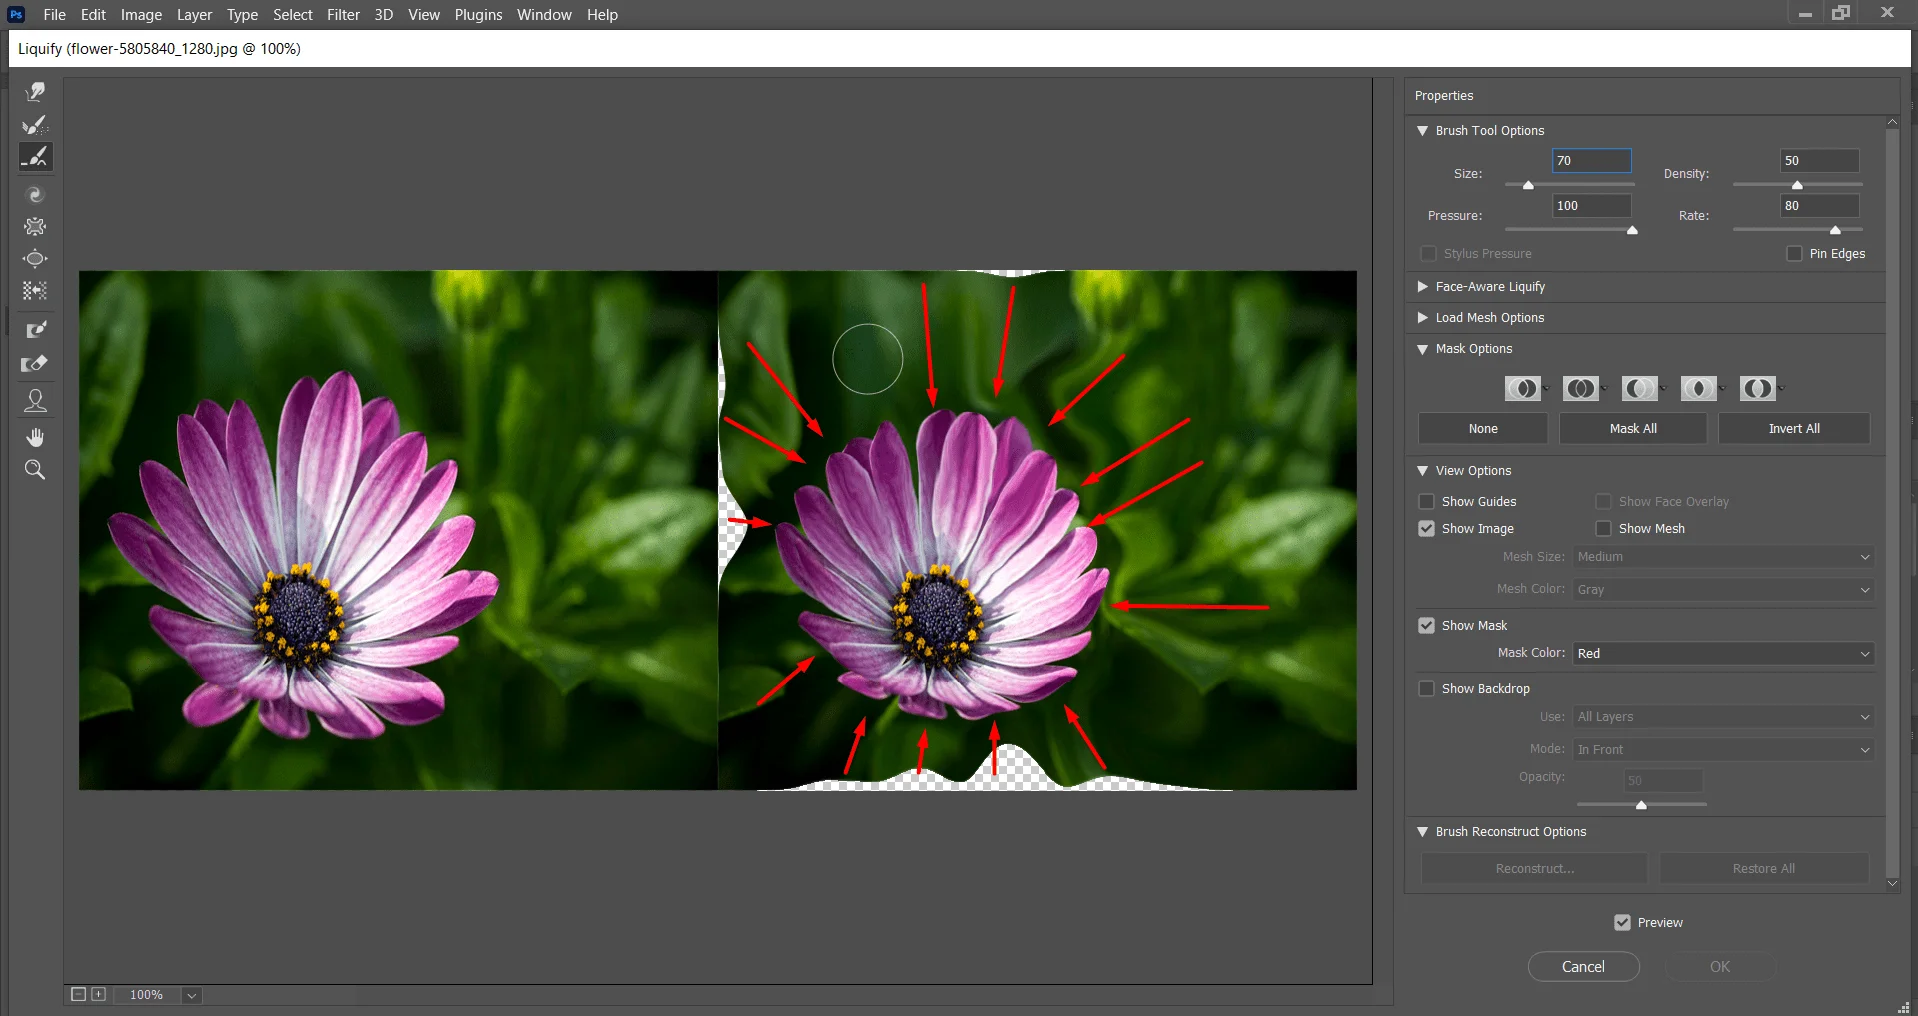
First, we will use the Pucker tool. Select the pucker tool for the toolbar. Then increase the size of the tool as all the upper edges of the merged Eclipses are covered.
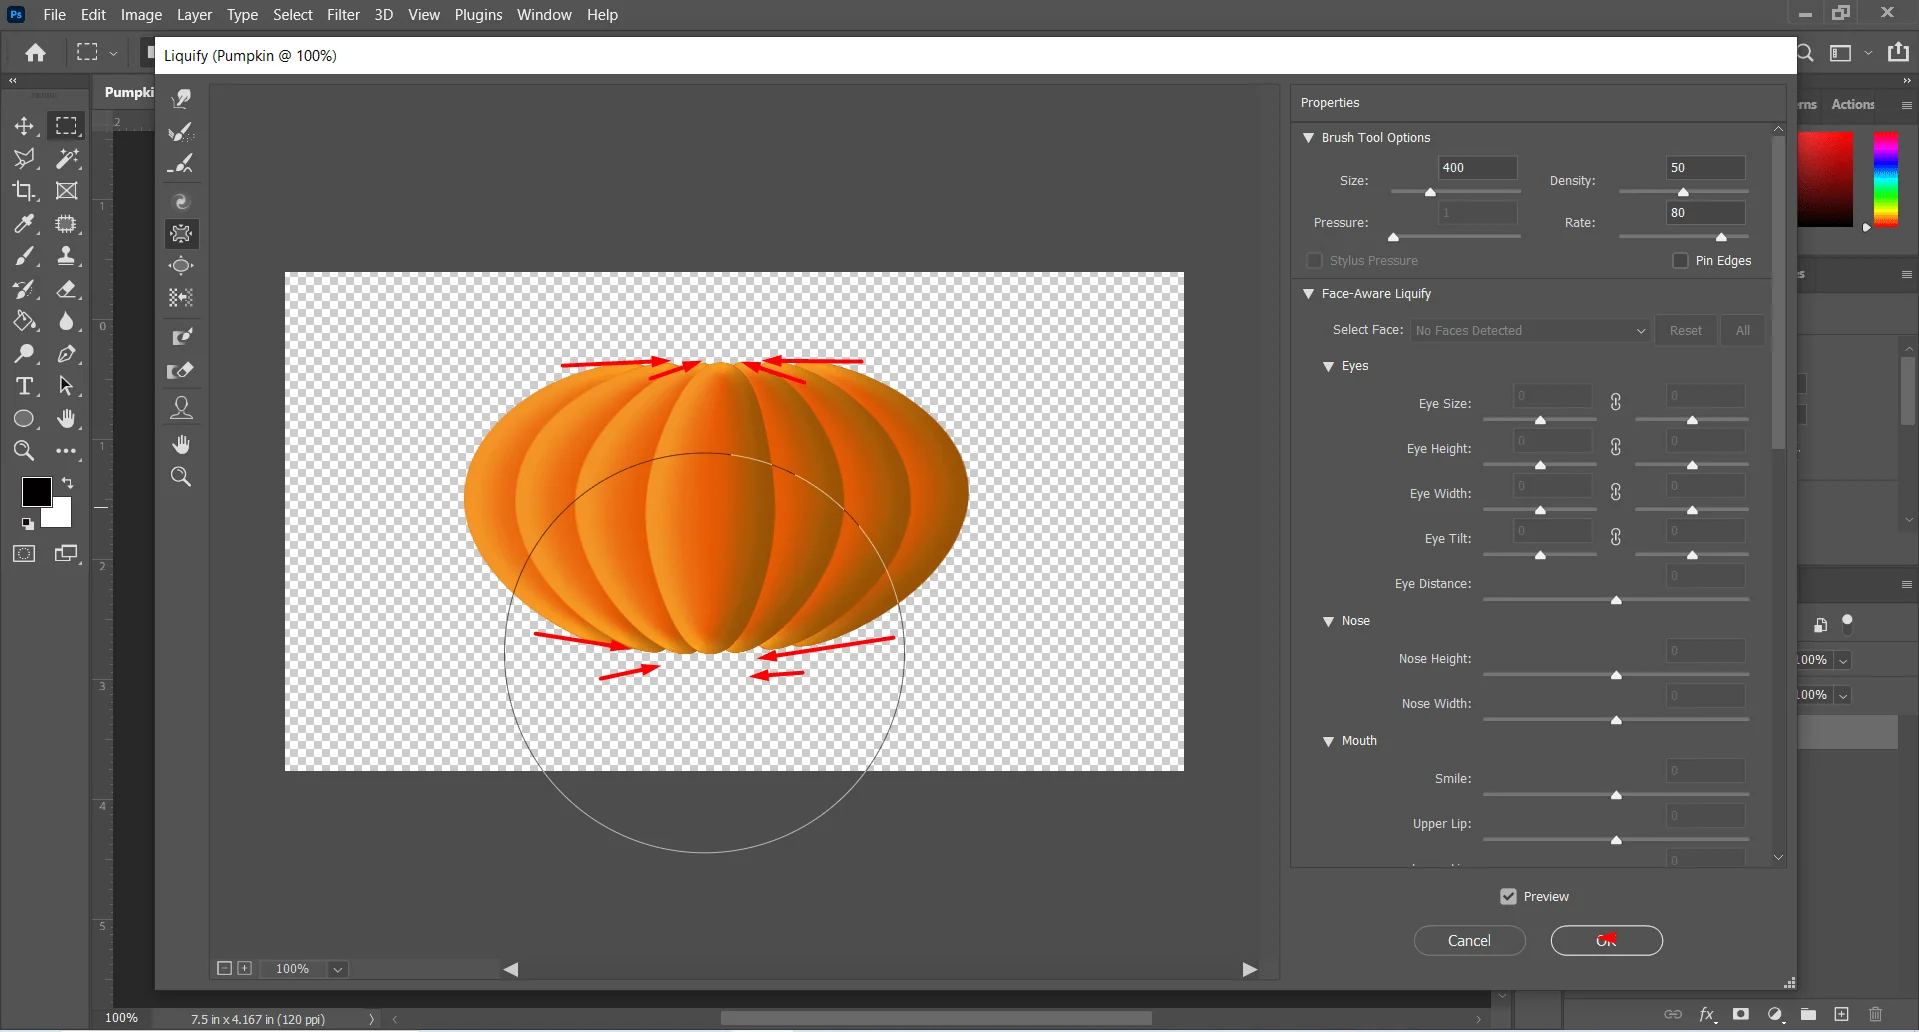
Now apply the pucker tool to the all edges at once. Don’t bring the tool to the middle of the pumpkin. Fit all the edges at the arc of the tool and apply. Apply the Pucker tool at all edge upper edges and bottom edges for pumpkin drawing. Make the shape alike the shape of the image above. Bring all the edges closer but not at one point.
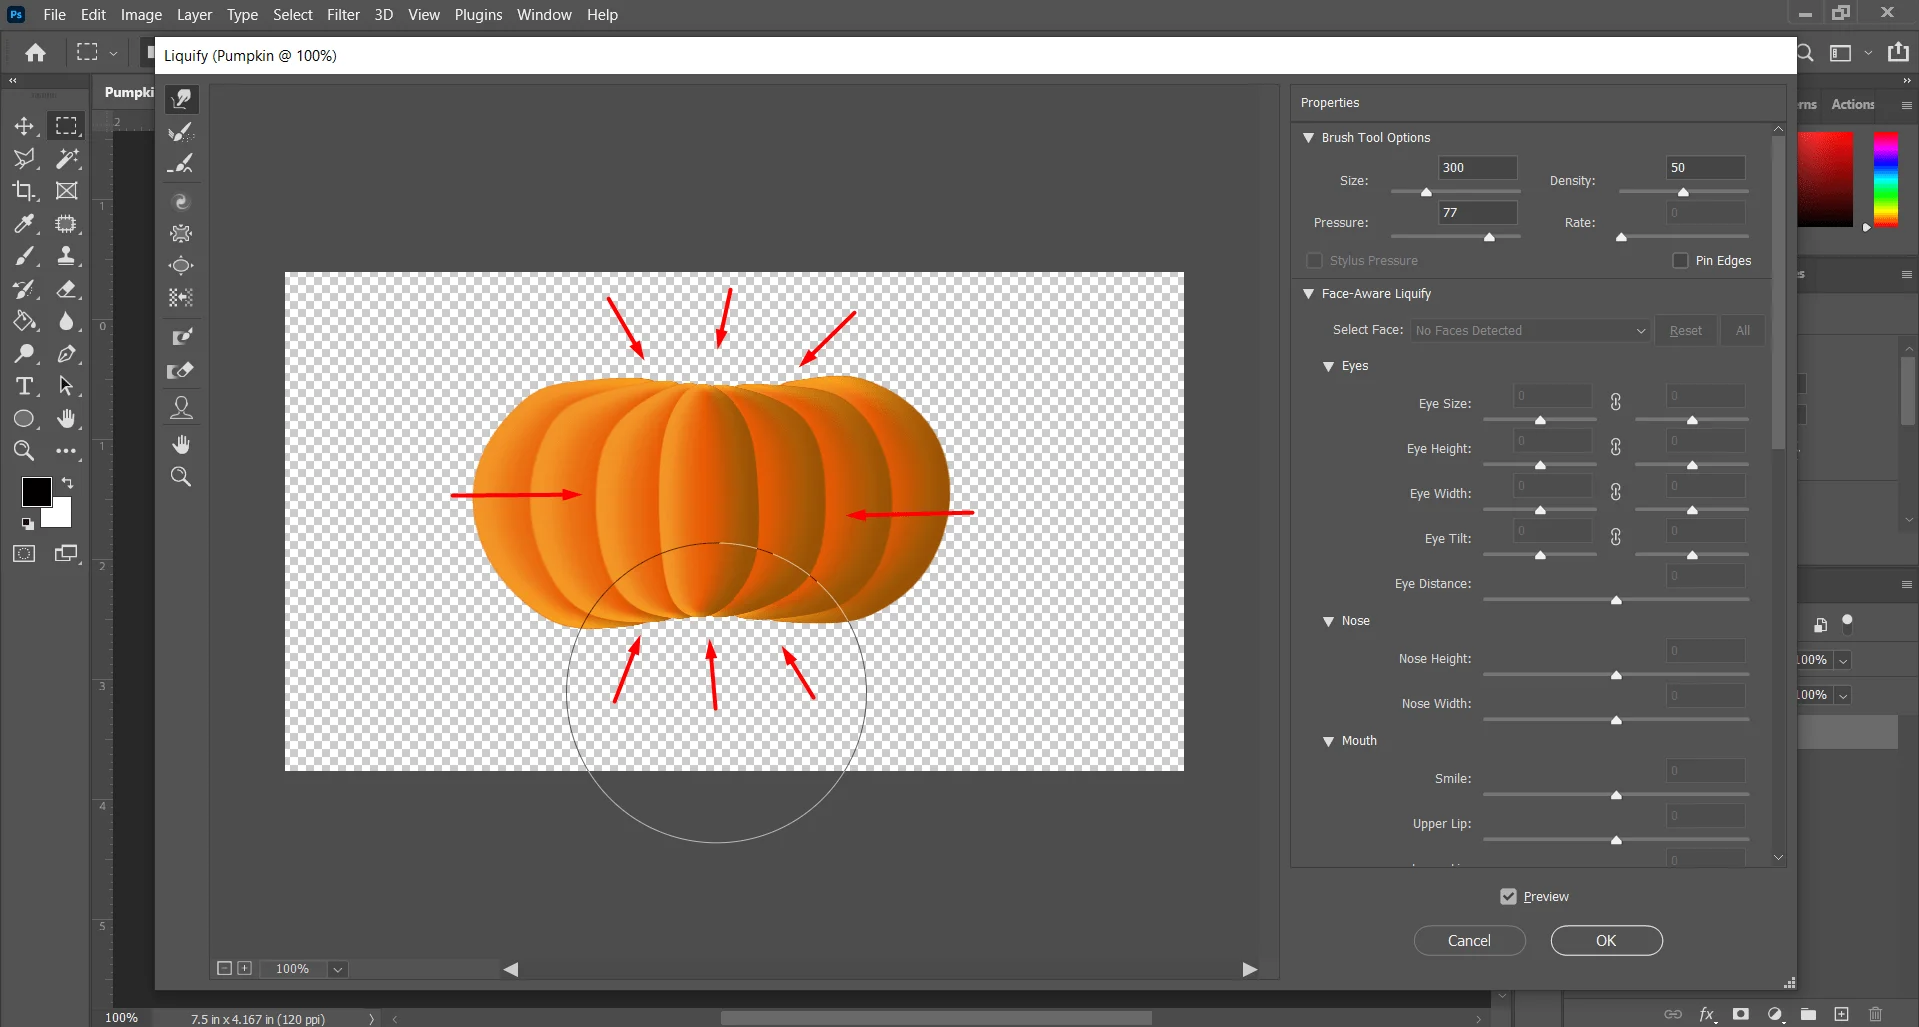
Now select the ‘Forward Wrap Tool’ from the liquify toolbar at the left of the liquify window. You can also select this tool with a shortcut by pressing the ‘W’ key on your keyboard.
Now increase the tool size as you can push all the edges of the Eclipses at once. Then click on the top of the document and pull downward. The edges which are increased by applying the pucker tool will pull down. Similarly, push the bottom edges toward the center of the pumpkin.
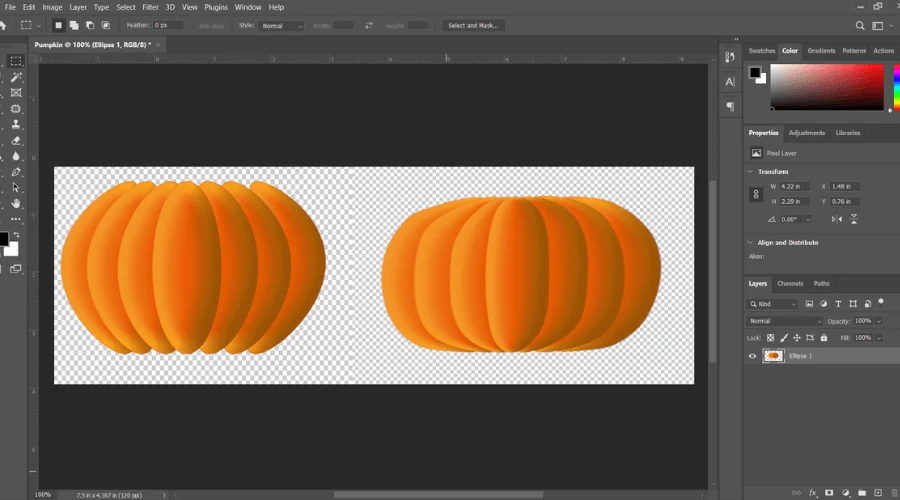
Use the ‘Forward warp tool’ and give a shape to your merged object like a pumpkin. Use the tools we used and the directions given in the picture. Use the tools as you wish. Use the directions just for the ideas, and make a Pumpkin. The result of using the liquify tool will be similar to the above picture.
Step 13: Drew the Stem of the Pumpkin
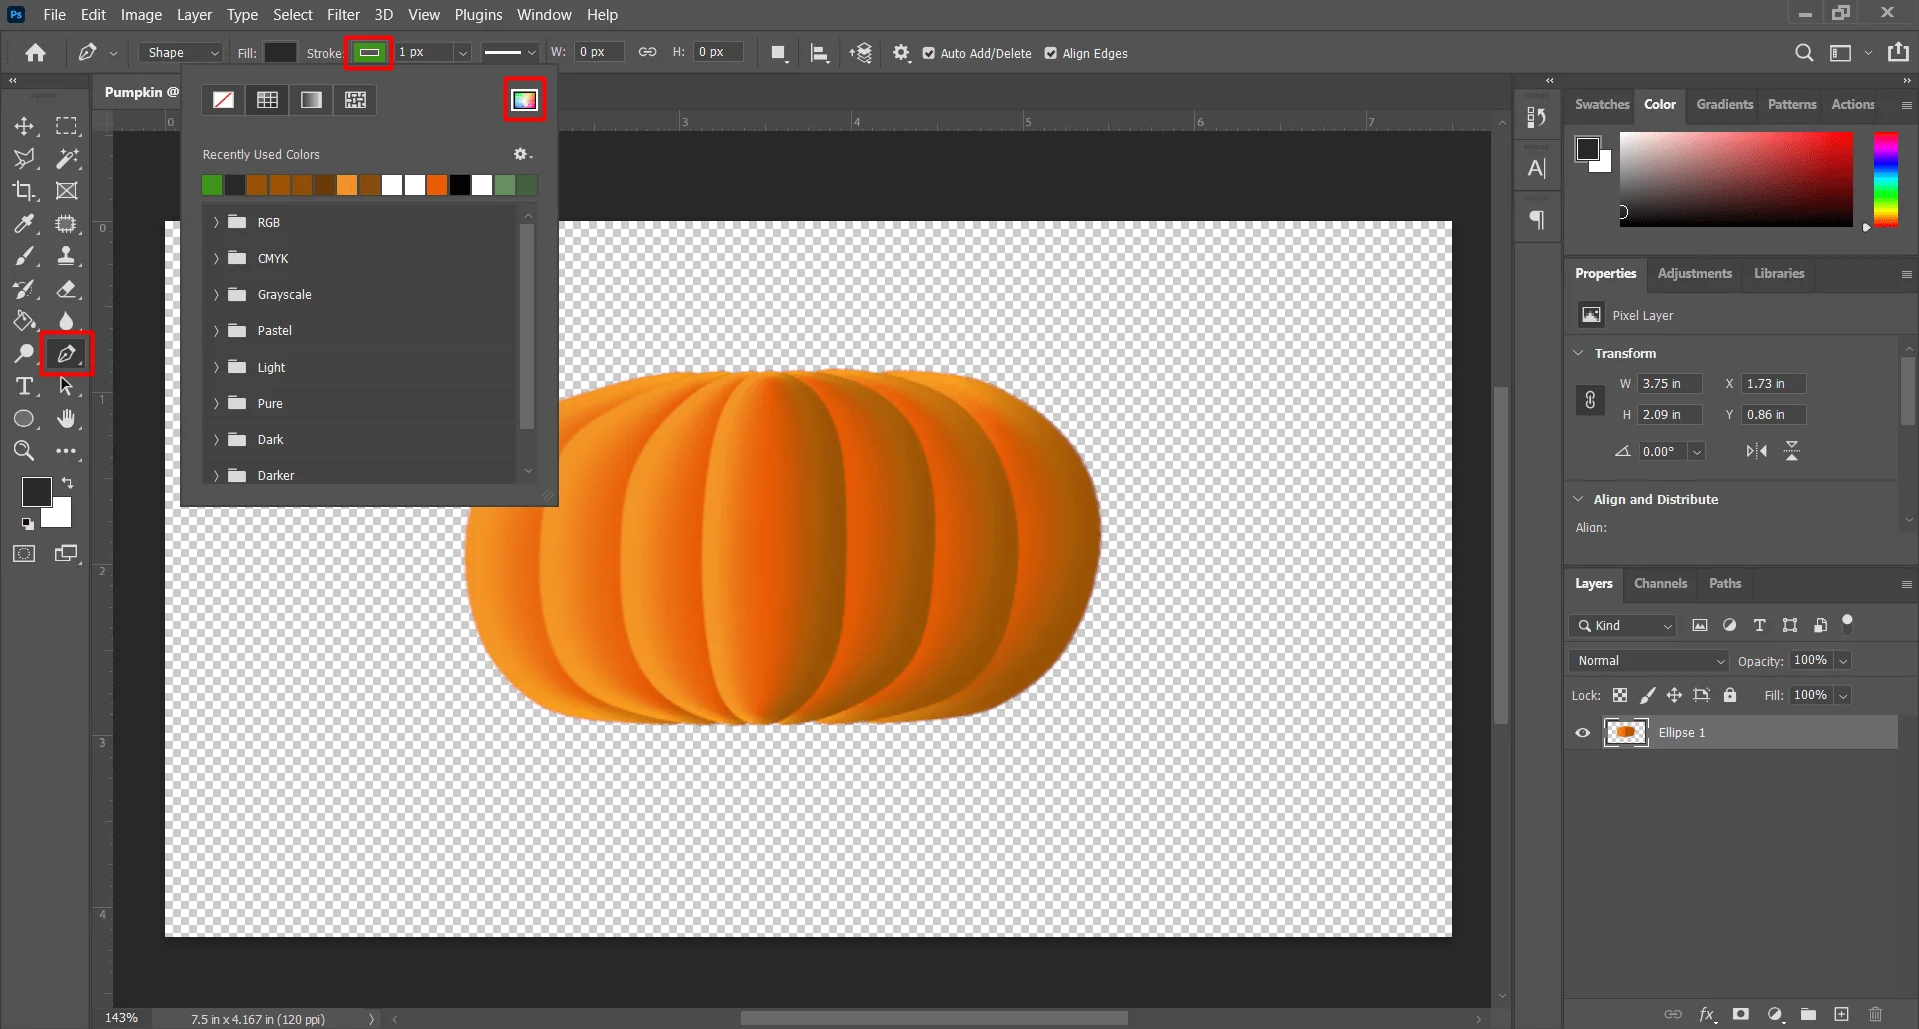
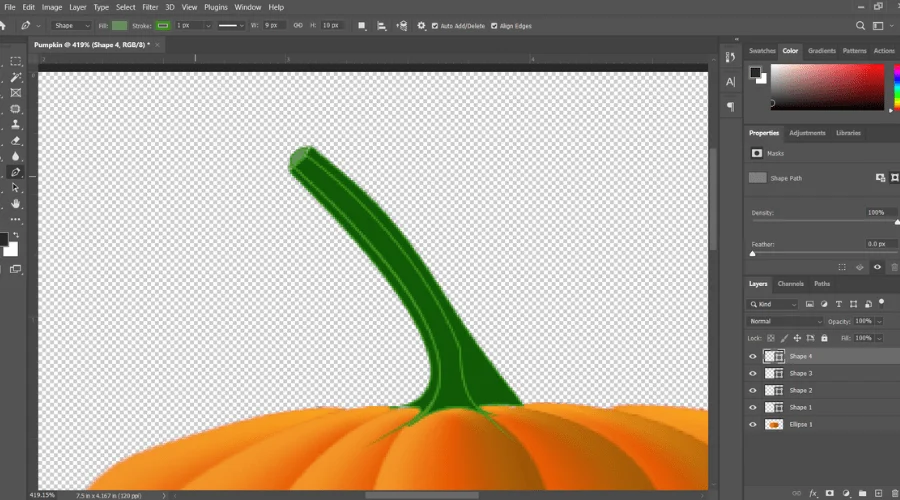
Now draw the stem of the pumpkin. We are going to use the pen tool to draw the Stem of the pumpkin. Select the ‘Pen Tool’ from the toolbar. You can also select the ‘Pen Tool’ by pressing the ‘P’ key on your keyboard.
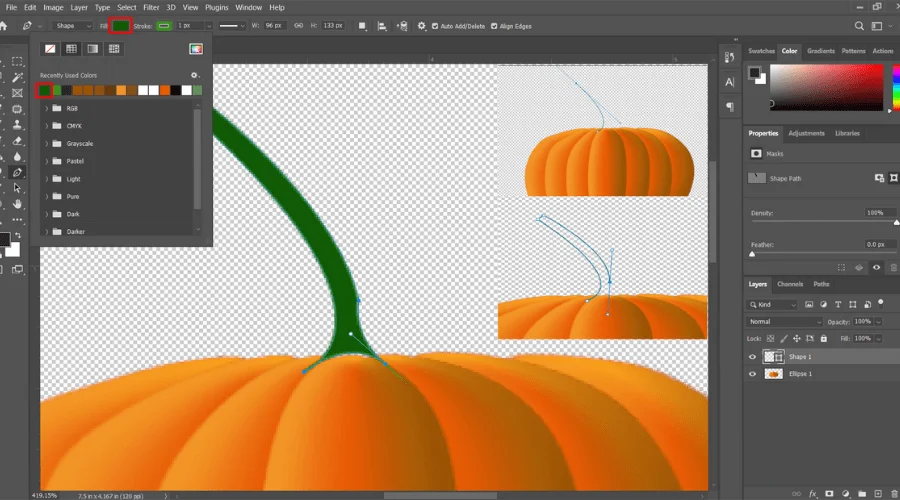
After selecting the pen tool set the ‘Tool Mode’ from the option bar above the active window. Set the Tool Mode to ‘Shape’ by default ‘Path’ is selected. Then set the stoke color to light green. we set the Stoke color as # 3d941a. Fill will get no color and the width will the 3 px.
Now draw the front part of the stem as shown in the direction. you can make nice curves by using the ‘Pen Tool. After drawing the front side of the stem click on the fill option on the option bar and fill it with a deep green color we use #1f6b0e to fill.
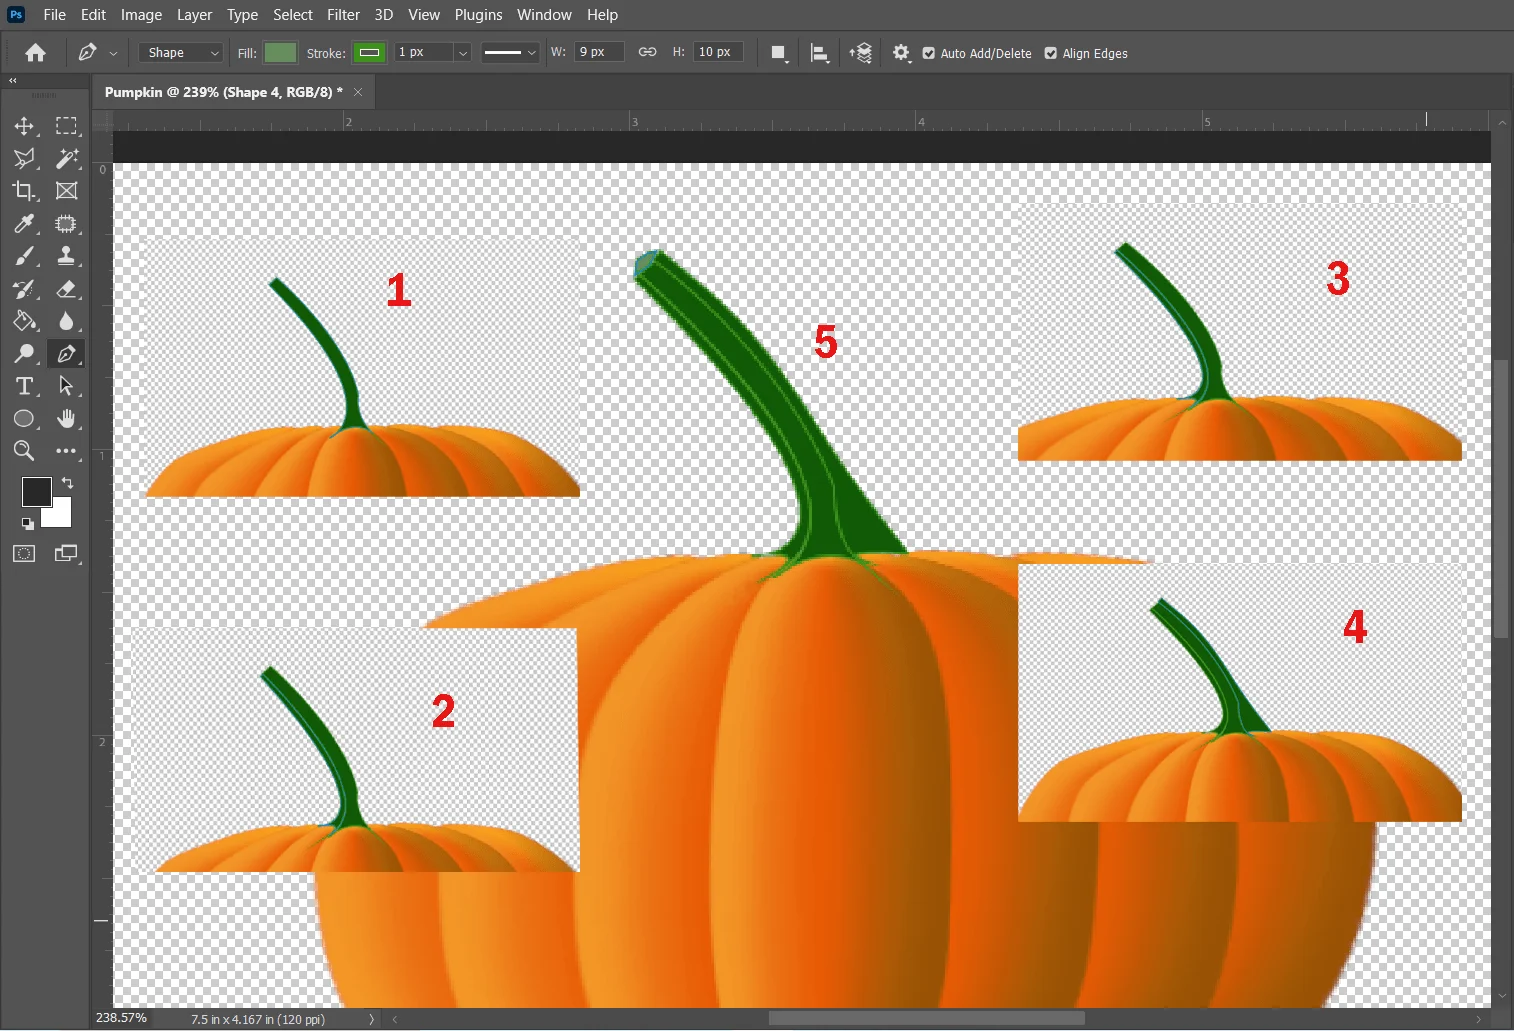
Now draw other parts of the stem as shown in the picture of the pumpkin drawing. Don’t forget to rearrange the shapes layer older to newer. Or arrange the shape for the similar result of number 5. Draw every part individually and fill it with color. First, set No color at the fill option. Then draw and then fill. It will help to bring the best result.
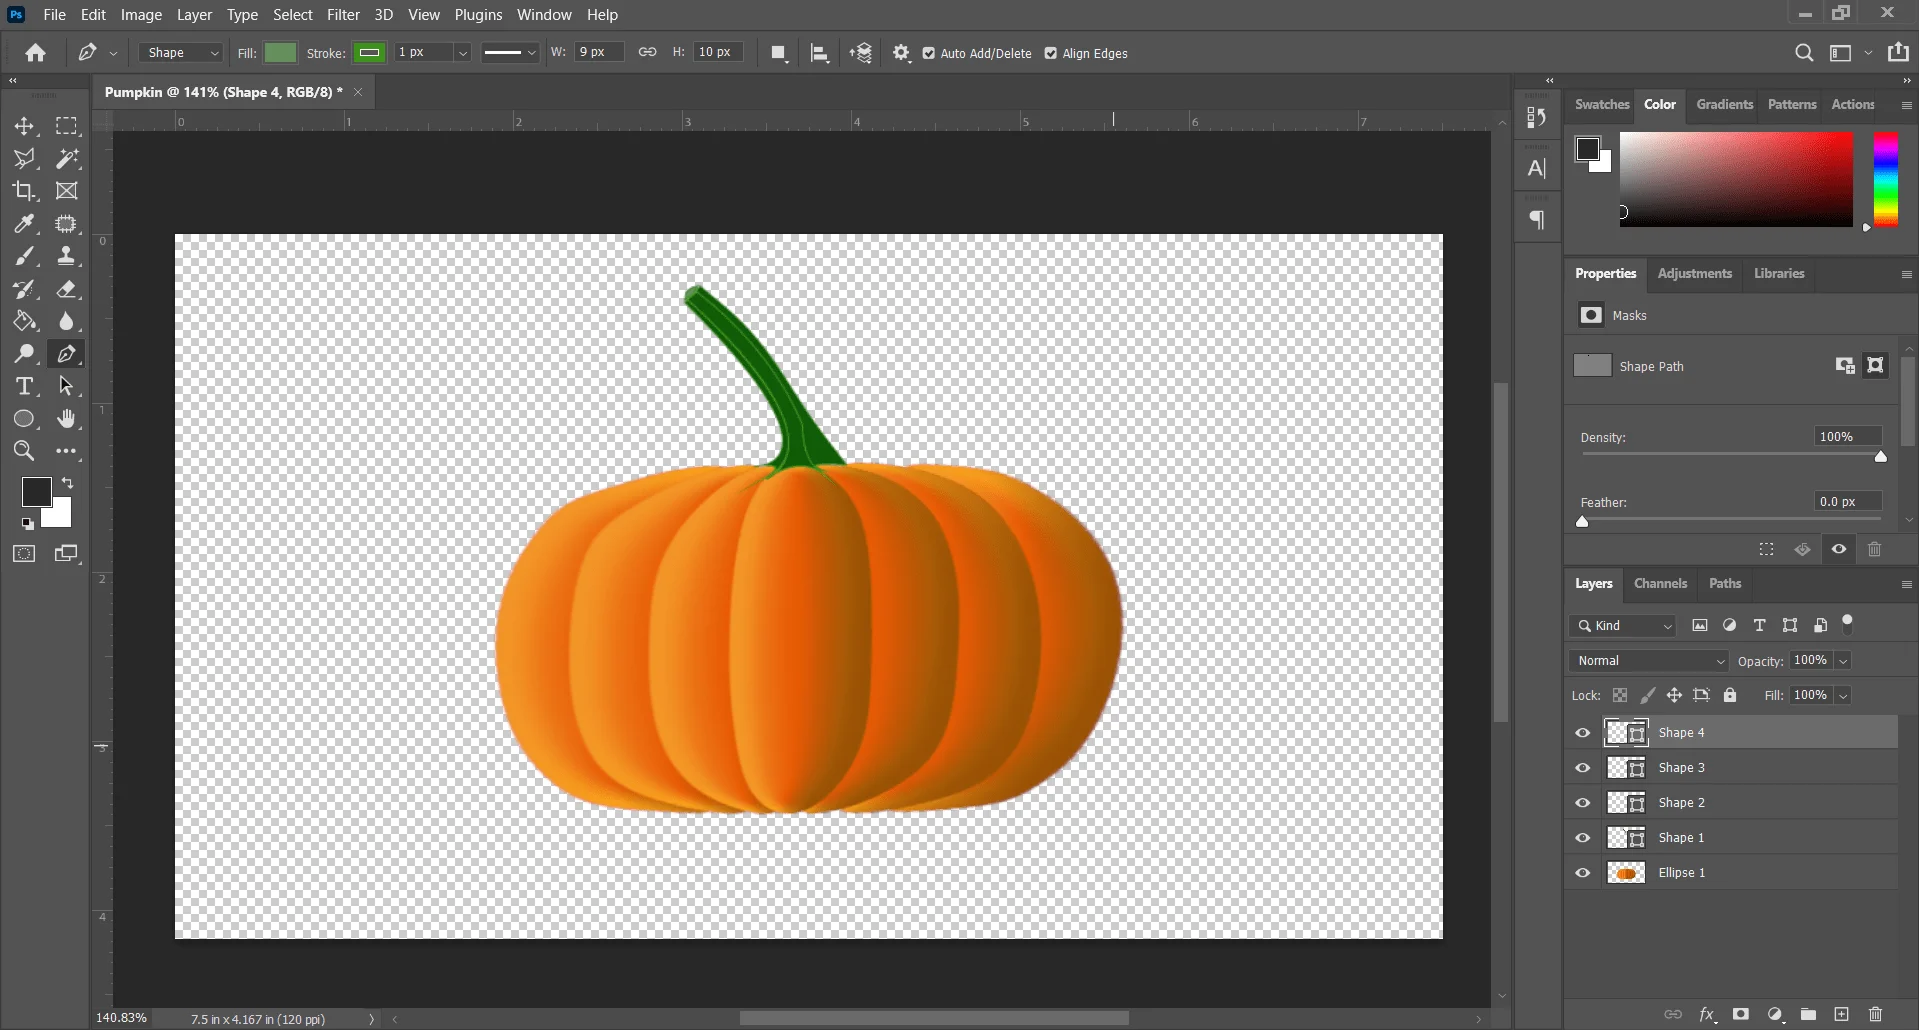
Step 14: Merge and Save
If you are satisfied with the result then merge all the layers of the pumpkin drawing. To merge all layers press ‘Ctrl + Shift + E’. It will merge all layers. If you want to save the document in a PSD format then skip Merging just save your photo.
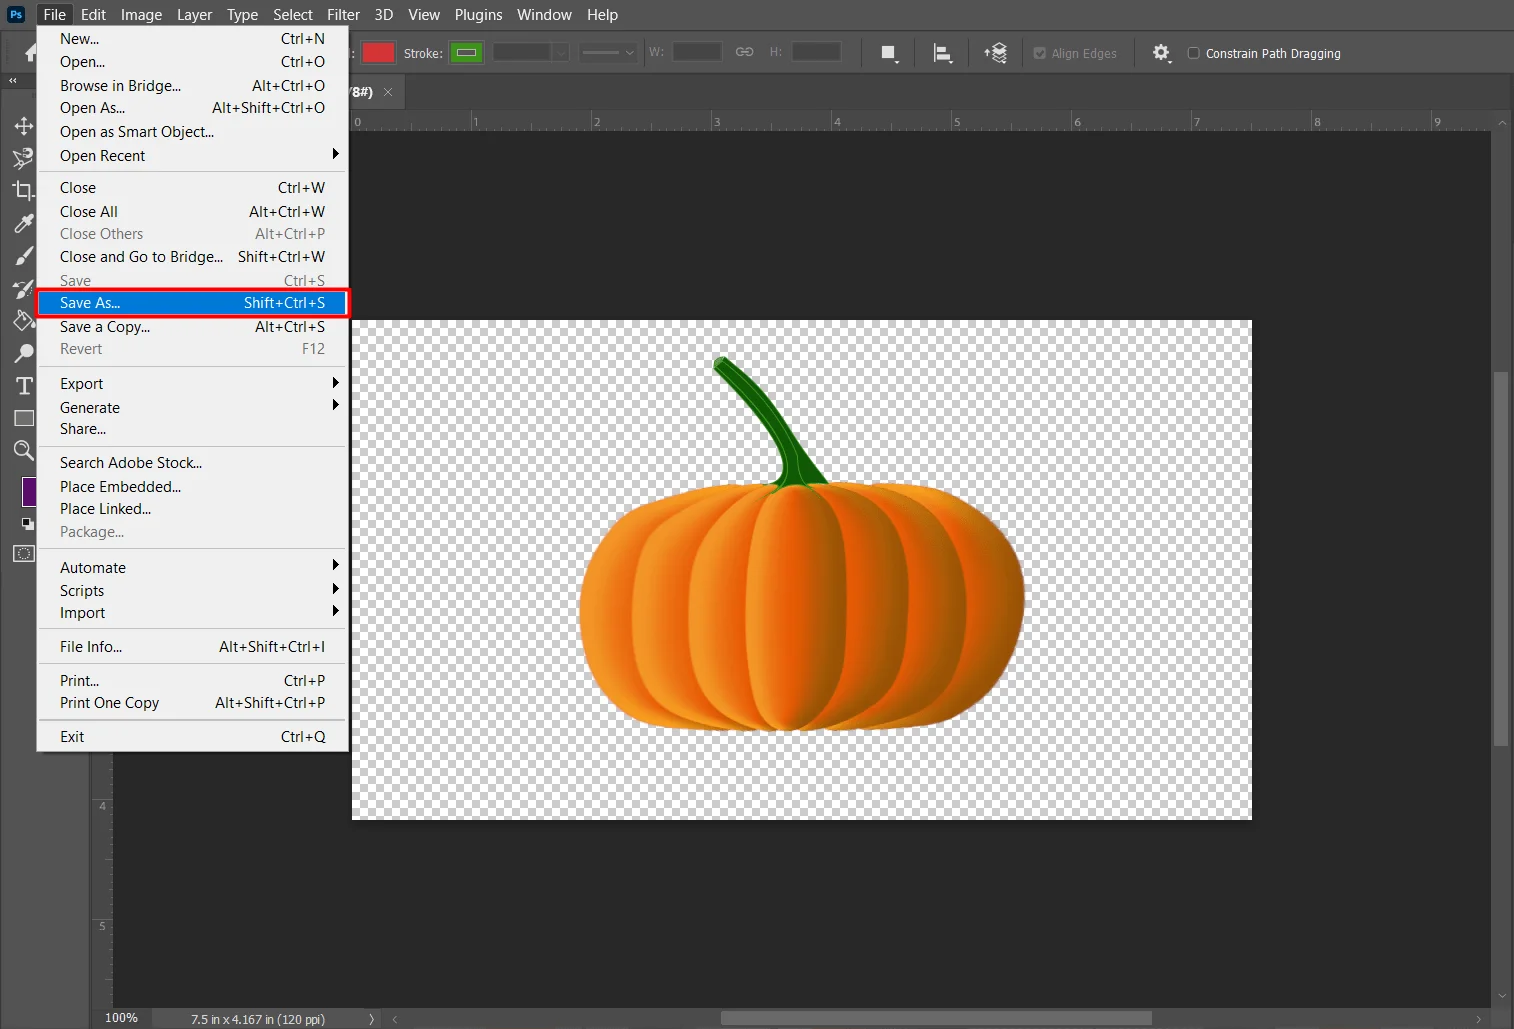
Menubar > File > Save as > Save
Shortcut: Ctrl + Shift + S > Save
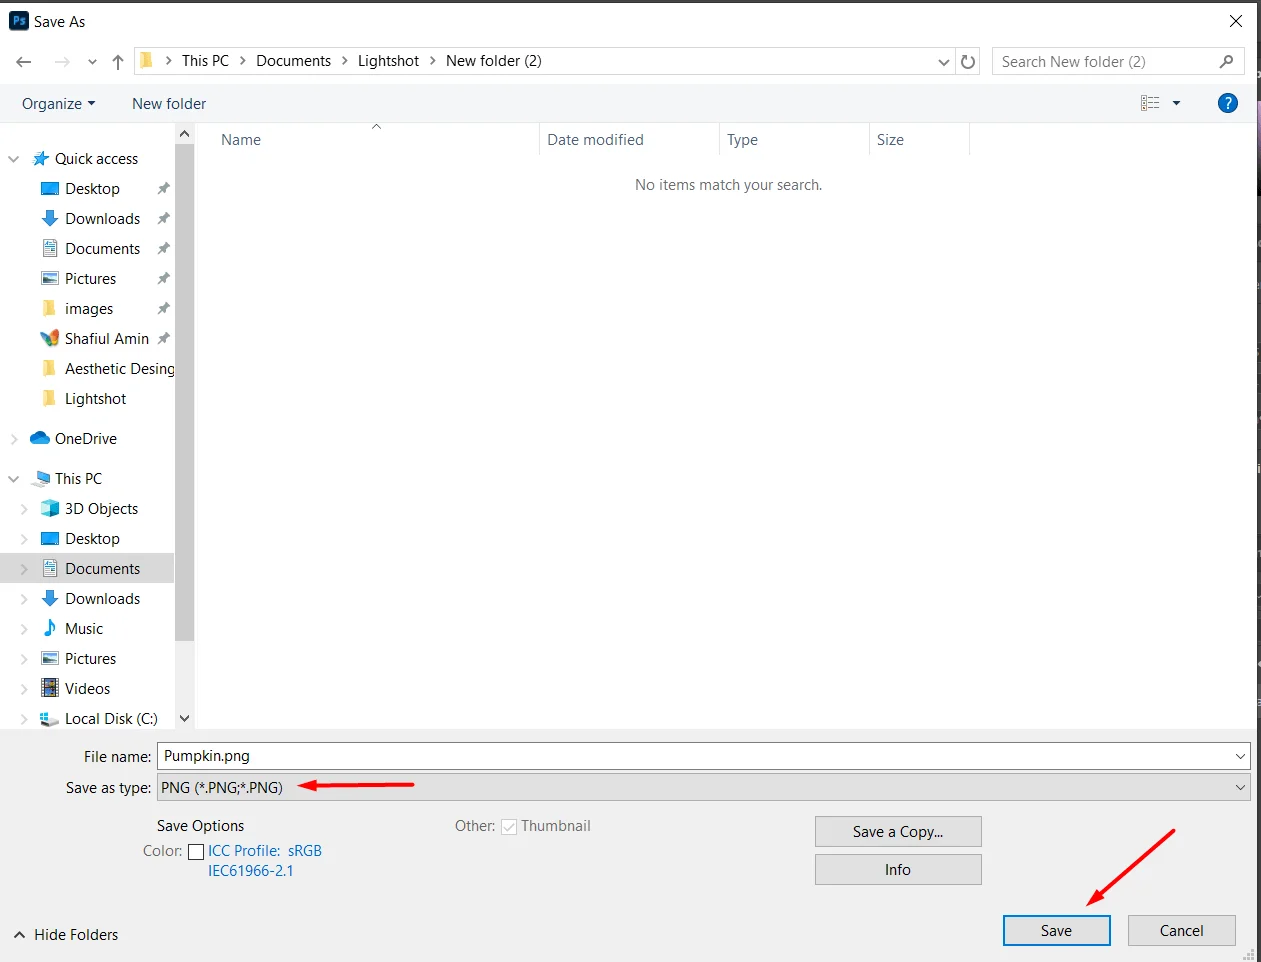
Save the photos from the menubar. Click on the ‘File option on the menubar and select ‘Save As’. A new window will appear. You can also over the ‘Save As’ window by pressing ‘Ctrl + Shift + S’. On the save as window set the name and the photo format. Then press the Save button at the bottom. Your photo will be saved.
Don’t try to get the same result as you saw in the picture with the parameters we use. Because the parameter and their result will depend on your graphics processor and the resolution of your display. So try to bring a similar or better result with a similar parameter.
We suggest you focus on the method we want to discuss how to draw pumpkins in Photoshop. And don’t worry if not get the same visible result with the same parameters. just modify and make better results.
This tutorial is for the beginner in Photoshop. Beginners can practice our tutorial to develop a good skill in Photoshop. We want to make this tutorial easier so that beginners can understand it easily. Beginners can also practice our methods and draw similar shapes. Remember imagination is a powerful weapon to develop skills in Photoshop. Download Summary
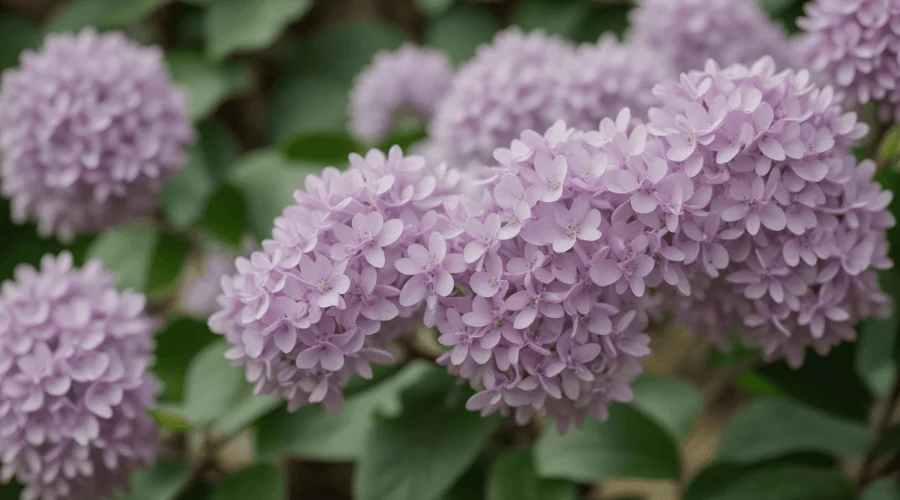
We see ‘Photoshop liquify’ filtered photos on the internet, in newspapers, social media, and various social media. The Liquify Photoshop filter is one of the most powerful tools of Photoshop. The Liquify Photoshop filter is used for very special editing of photos. A liquid Photoshop filter is used to change the shape of a subject in a photo.
You will find a very detailed tutorial on the Adobe Photoshop official website. Besides, if you are interested in how to use the Photoshop liquidity tool this article is for you. In this article, we will discuss how to use Photoshop liquify. And also you can learn how to use Liquify in Photoshop.
To make this tutorial easier to learn, we will learn how to use the liquify tool in Photoshop with suitable examples and demonstrations.
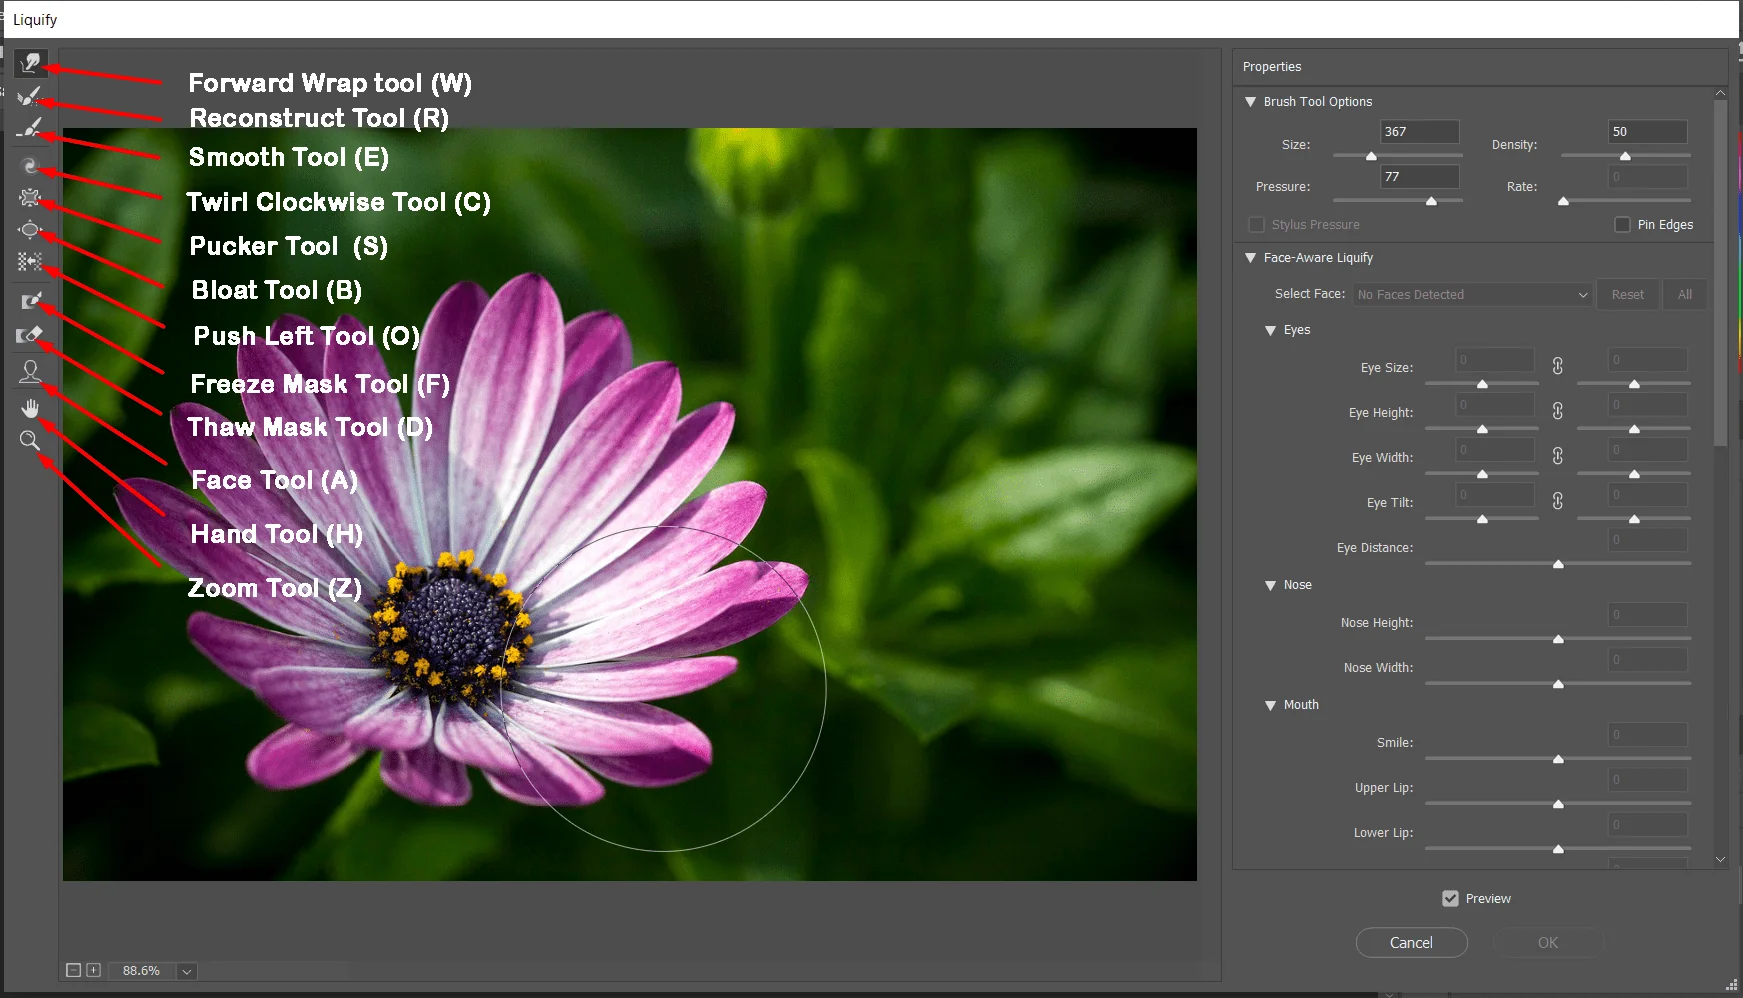
Liquify Photoshop Tool
Sl
Tool Image
Tool Name
Shortcut
Use
01
Forward Warp Tool
W
Push or Pull pixels Forward to the direction you brag your mouse.
02
Reconstruct Tool
R
ReConstruct the area currently edited.
03
Smooth Tool
E
Makes Smooth the Edges of the targeted object, which is currently edited.
04
Twirl Clockwise tool
C
Twirl the pixels of the area where clicked Clockwise and Clockwise too.
05
Pucker Tool
S
Pull the pixels toward the center point of the brush.
06
Bloat Tool
B
Push the pixels toward the outside of the brush area or expen.
07
Push Left Tool
O
When click and drag down push the pixels left. When drag moues Upward pull the pixels right.
08
Freeze Mask Tool
F
Freeze the area by marking. The frozen area will not be editable. no brush can be used in frozen areas.
09
Thaw Mask tool
D
Thaw the frozen area to edit.
10
Face Tool
A
Edit the face’s expression shapes and sizes.
11
Hand Tool
H
Hold the image and move to focus on the target area.
12
Zoom Tool
Z
To Zoom in/out photos for a better preview of the photos.
What is a liquified filter?
The liquify Photoshop filter is a powerful feather of Photoshop. With the liquify filter you can push, pull, rotate, reflect, pucker, and bloat any area of an image. The distortions can be subtle or drastic which you will create.
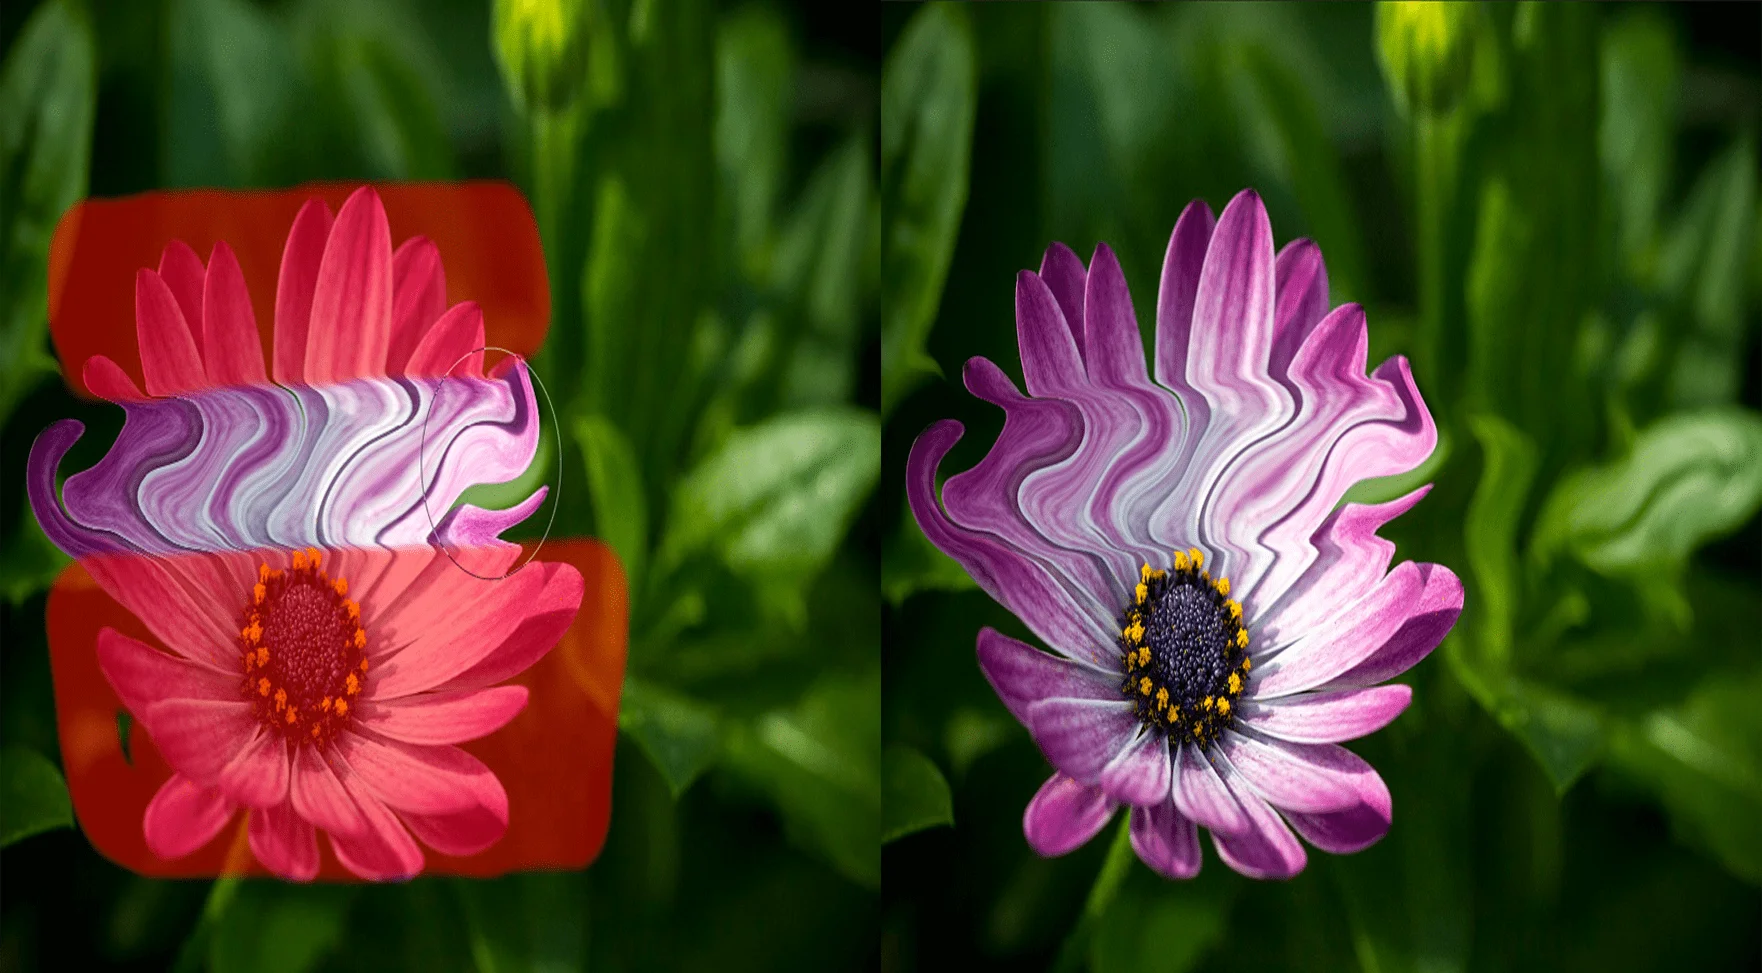
The liquified Photoshop filter in Photoshop is very useful for the artistic effects on the background or the creation of artistic design. A bust use of Photoshop liquify filter brush is demonstrated in the photos above.
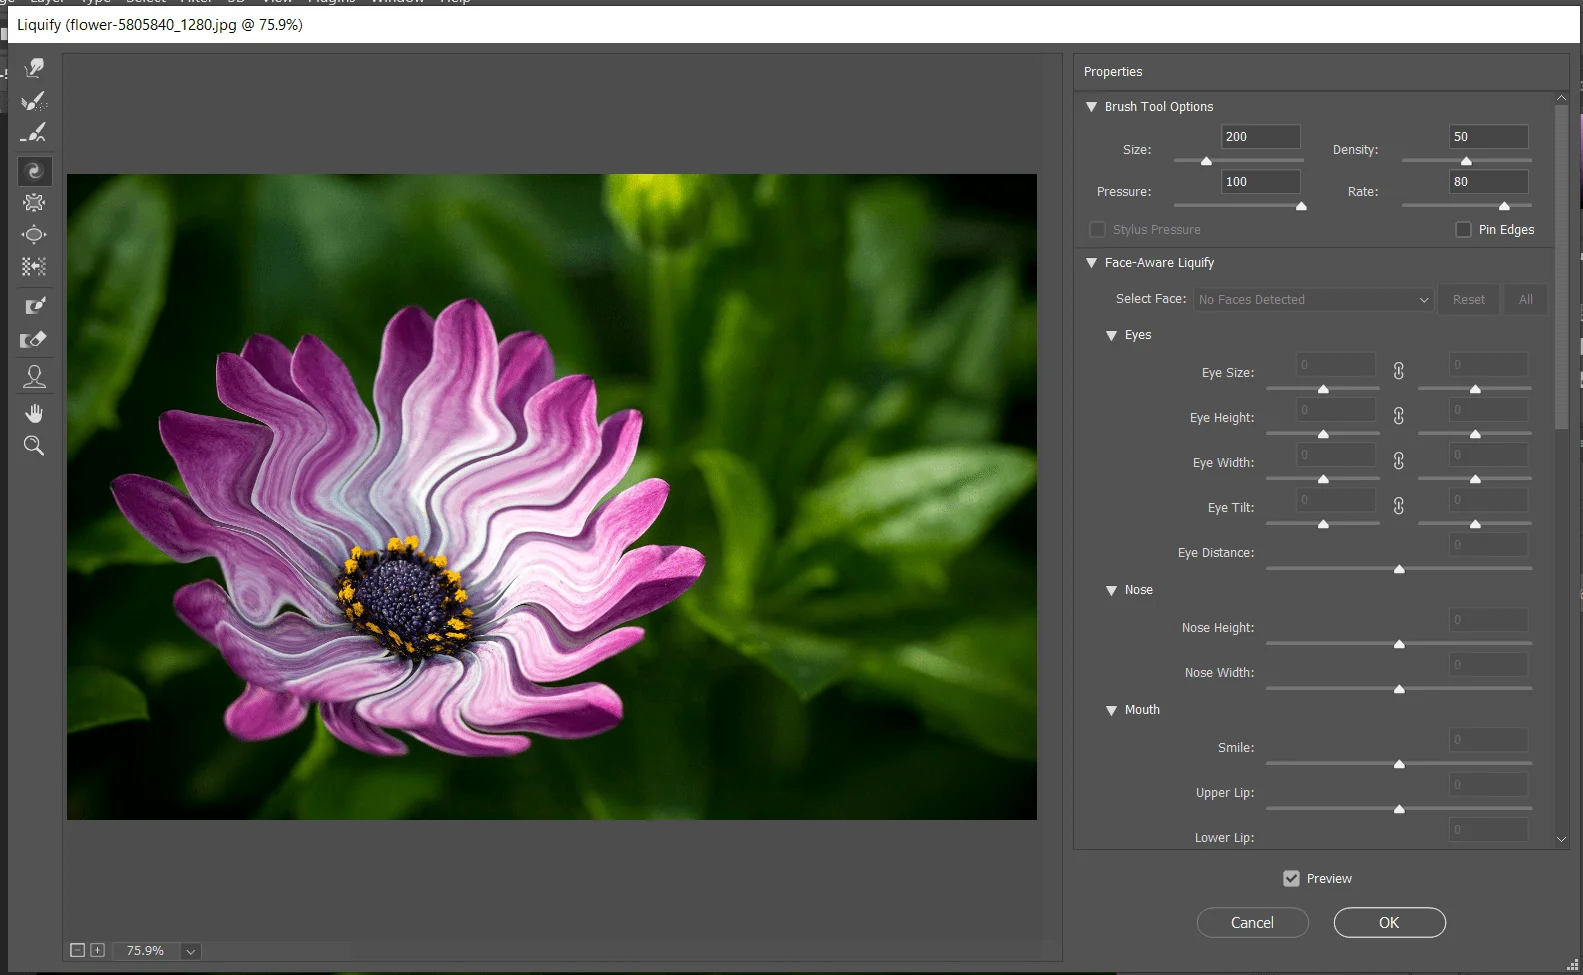
You will find the ‘Liquify Photoshop filter’ in the Main menu, go to ‘Filter’ and click on ‘Liquify’ A new window will open with the ‘Liquify brushes’ and options. The liquify Photoshop filter can be applied to 8 bits per channel or 16 bits per channel images.
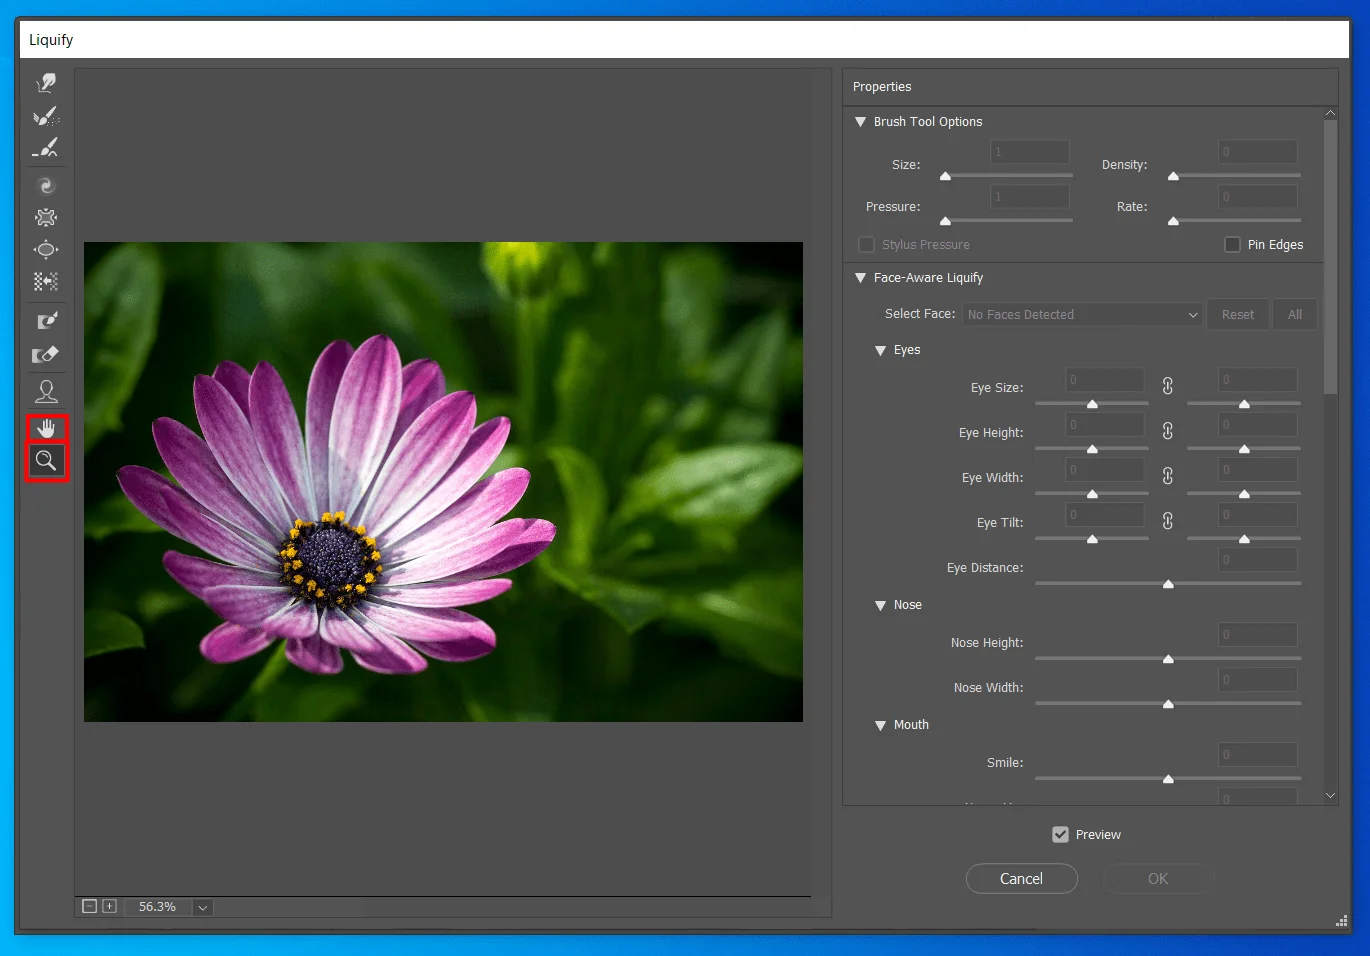
Magnify and Navigate in the preview image
The new window will open with a preview photo panel, which will show a live demonstration of your editing. After opening the preview window, the first thing you should do is magnify your images and navigate. Adjusting the photo subject to fit the preview window will help you to perfectly apply the Photoshop liquify filter.
Magnify
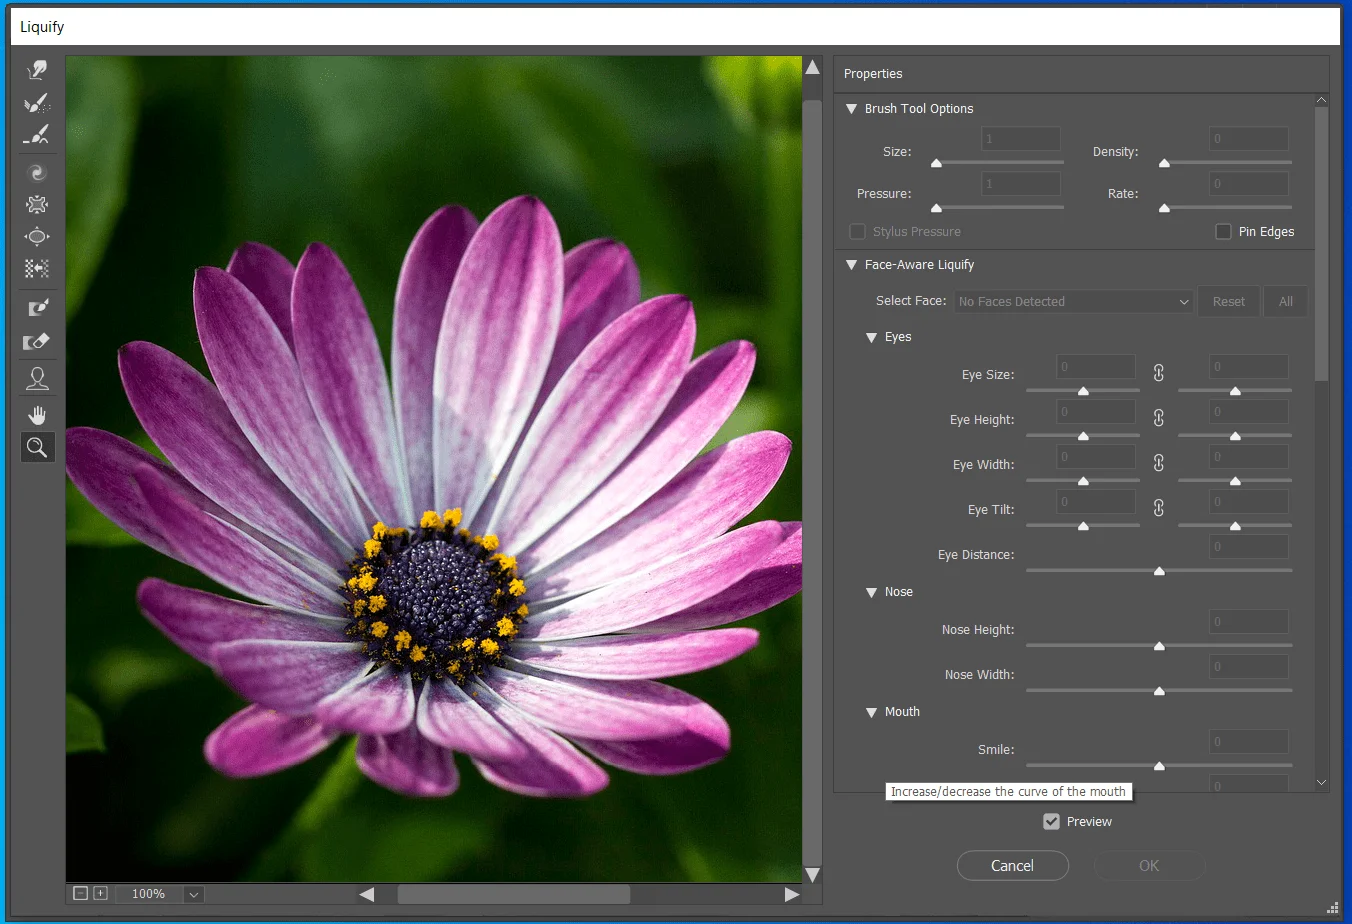
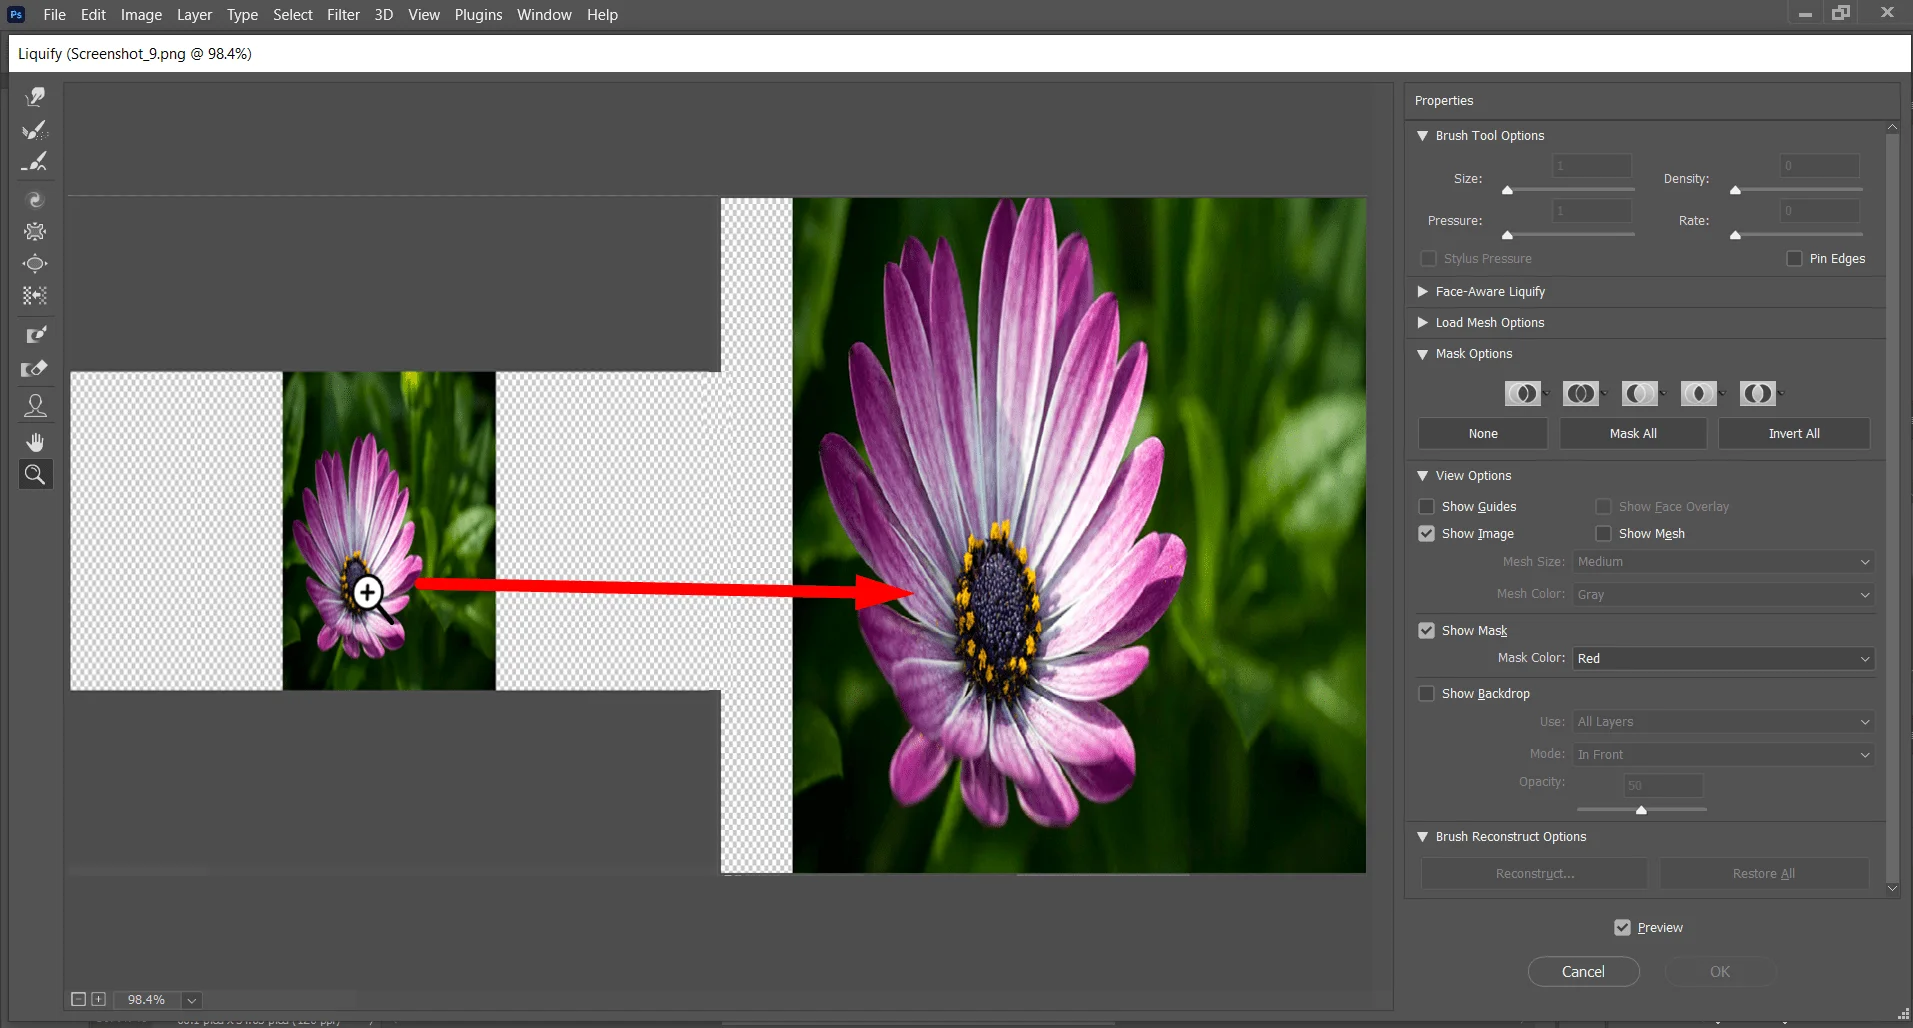
To magnify select the zoom tool in the Liquify dialog box, and click on the preview image to zoom in. You can also hold down ‘Alt’ (Windows) or Option (Mac), and click or drag in the preview image to zoom In/Out. Also, you can specify a magnification level in the Zoom text box at the bottom of the dialog box.
Navigate
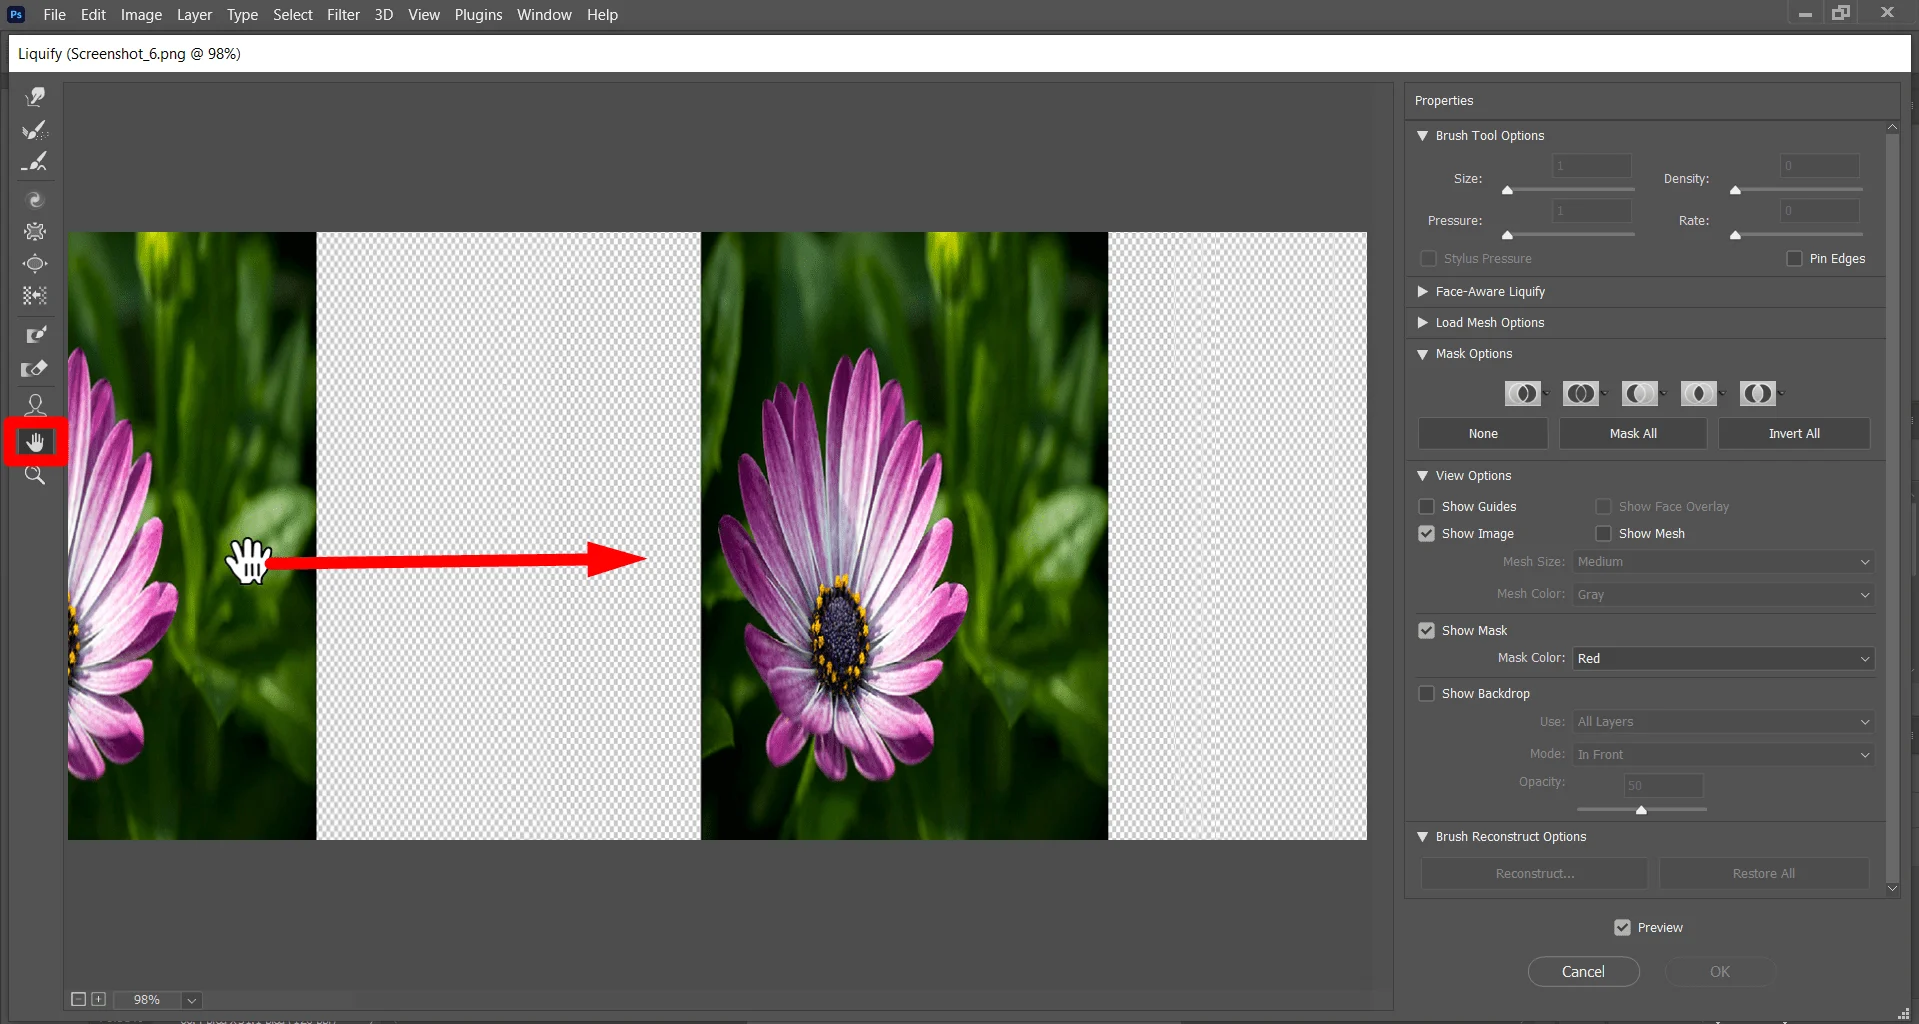
To navigate the photo select the hand tool in the Liquify dialog box, and drag in the preview image. Alternatively, hold down the spacebar with any tool selected, and drag in the preview image.
Liquify Photoshop Distortion Tools
‘Adobe Photoshop’ adds various tools and brushes to the toolbar of the liquify filter in Photoshop. You can perfectly edit your photo with these brushes. For giving a perfect look to the subject face, or making an artistic design Photoshop liquify filter’ brushes are used randomly.
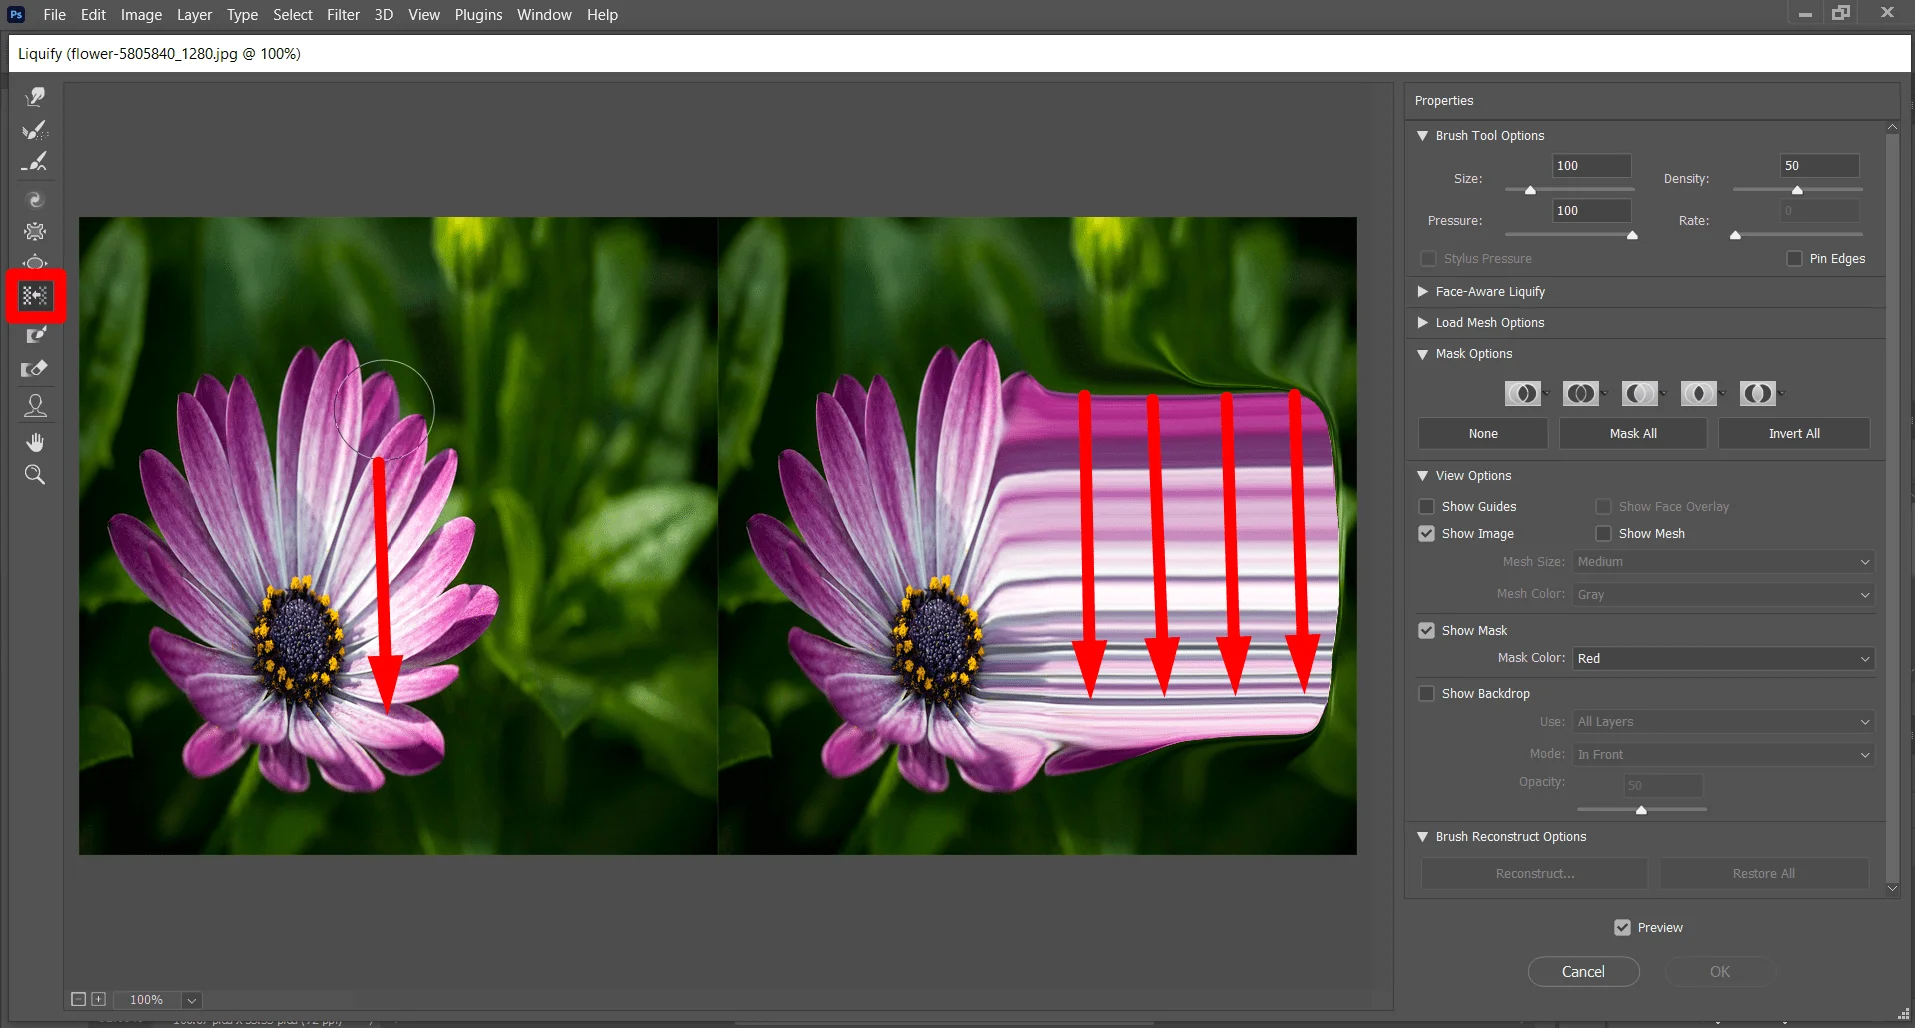
Forward Wrap tool (W)
This Brush of liquify filter in Photoshop is used to push pixels forward. Select the Forward warp tool from the Tool dialog box at the left side of the Liquify Photoshop filter window.
To destroy the texture of the pixels in a photo or pull, push, and drag the pixels of the photos. You can select this brush from the toolbar or also can select this brush by hotkey. Simply press the ‘W’ key on your keyboard and drag it to the desired areas.
Reconstruct Tool (R)
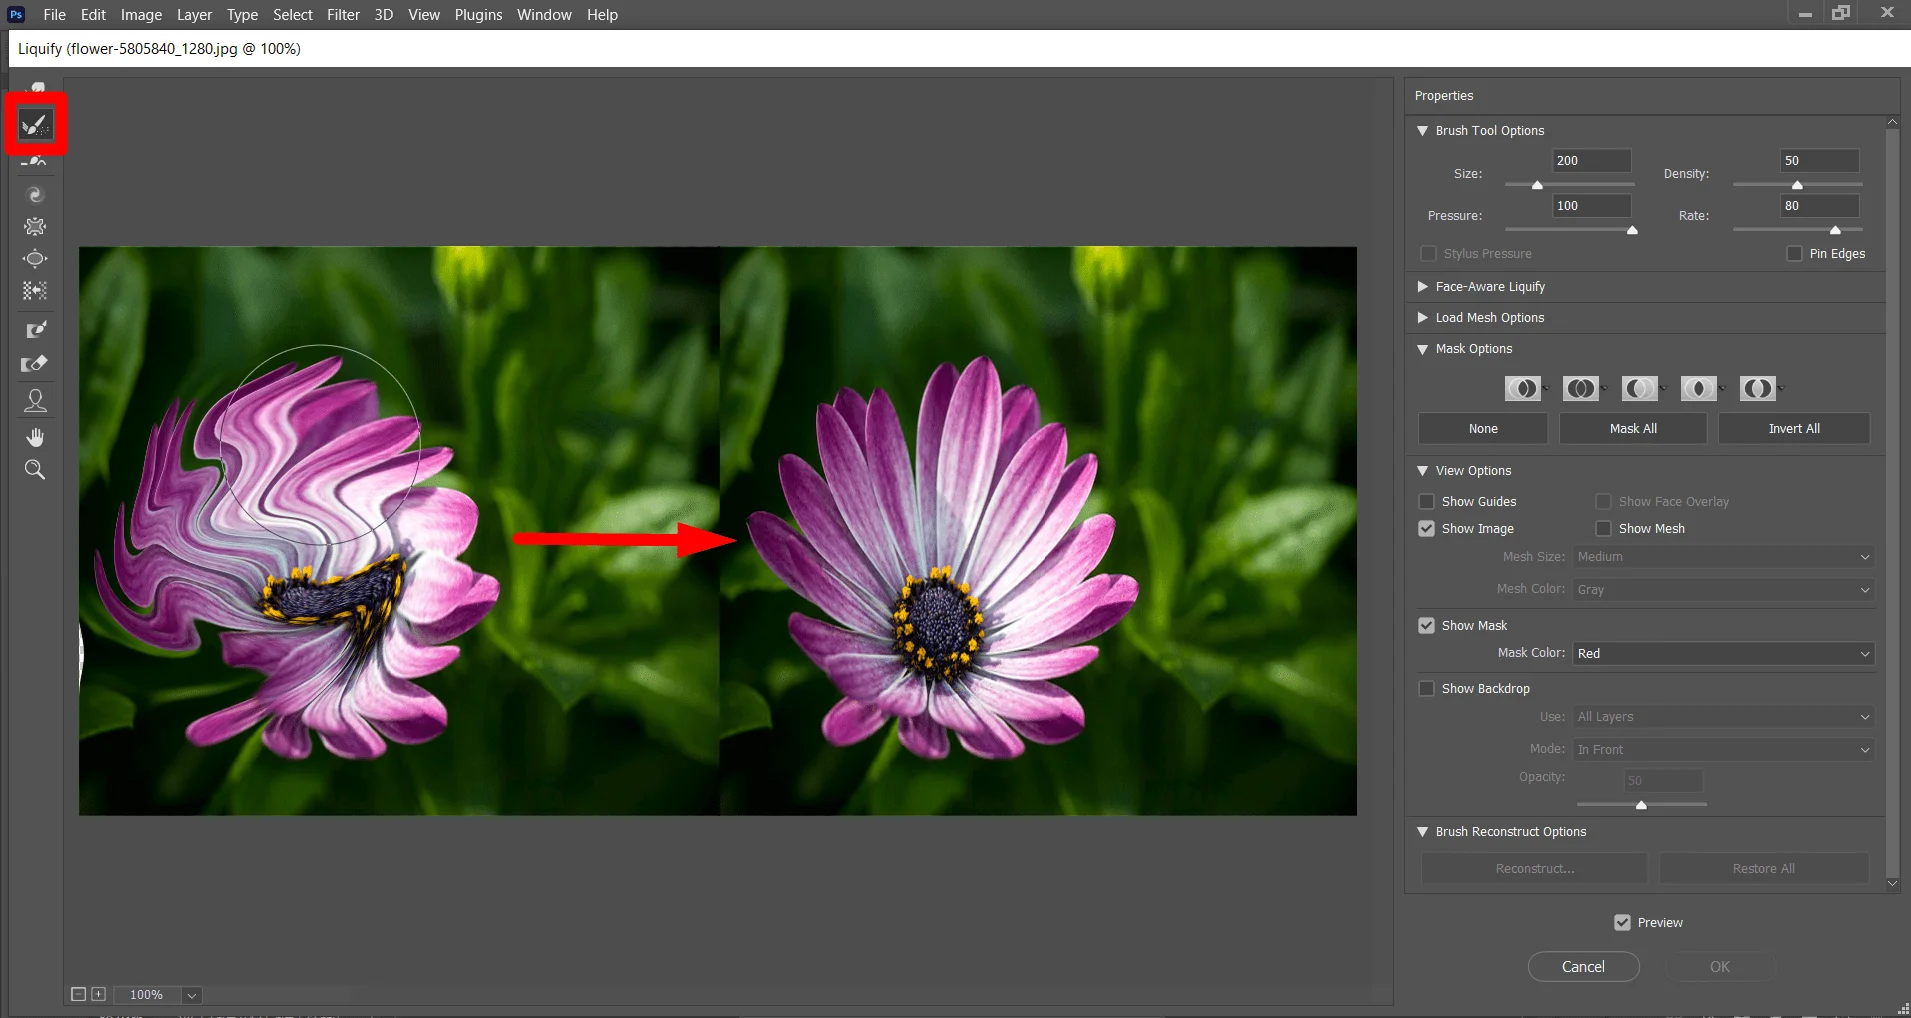
The Reconstruct Tool of ‘liquify photoshop filter’ is used to reverse the distortion that has already been added to the photos. Select the reconstruct tool hold down the mouse button and drag to reconstruct the pixels that were distorted. You can also select the Reconstruct tool by pressing the ‘R’ key on your keyboard.
Smooth Tool (E)
The ‘liquify photoshop filter’s Smooth tool’ is for Soomth the texture of the pixels. You can use this ‘liquify Photoshop filter in Photoshop to smooth tool to remove any rough area like blemishes on the skin. Sometimes this tool does to give good results for the original photos.
You will find an effective result when you use this tool in an area where you used another brush or filter before the use of this tool.
Twirl Clockwise Tool (C)
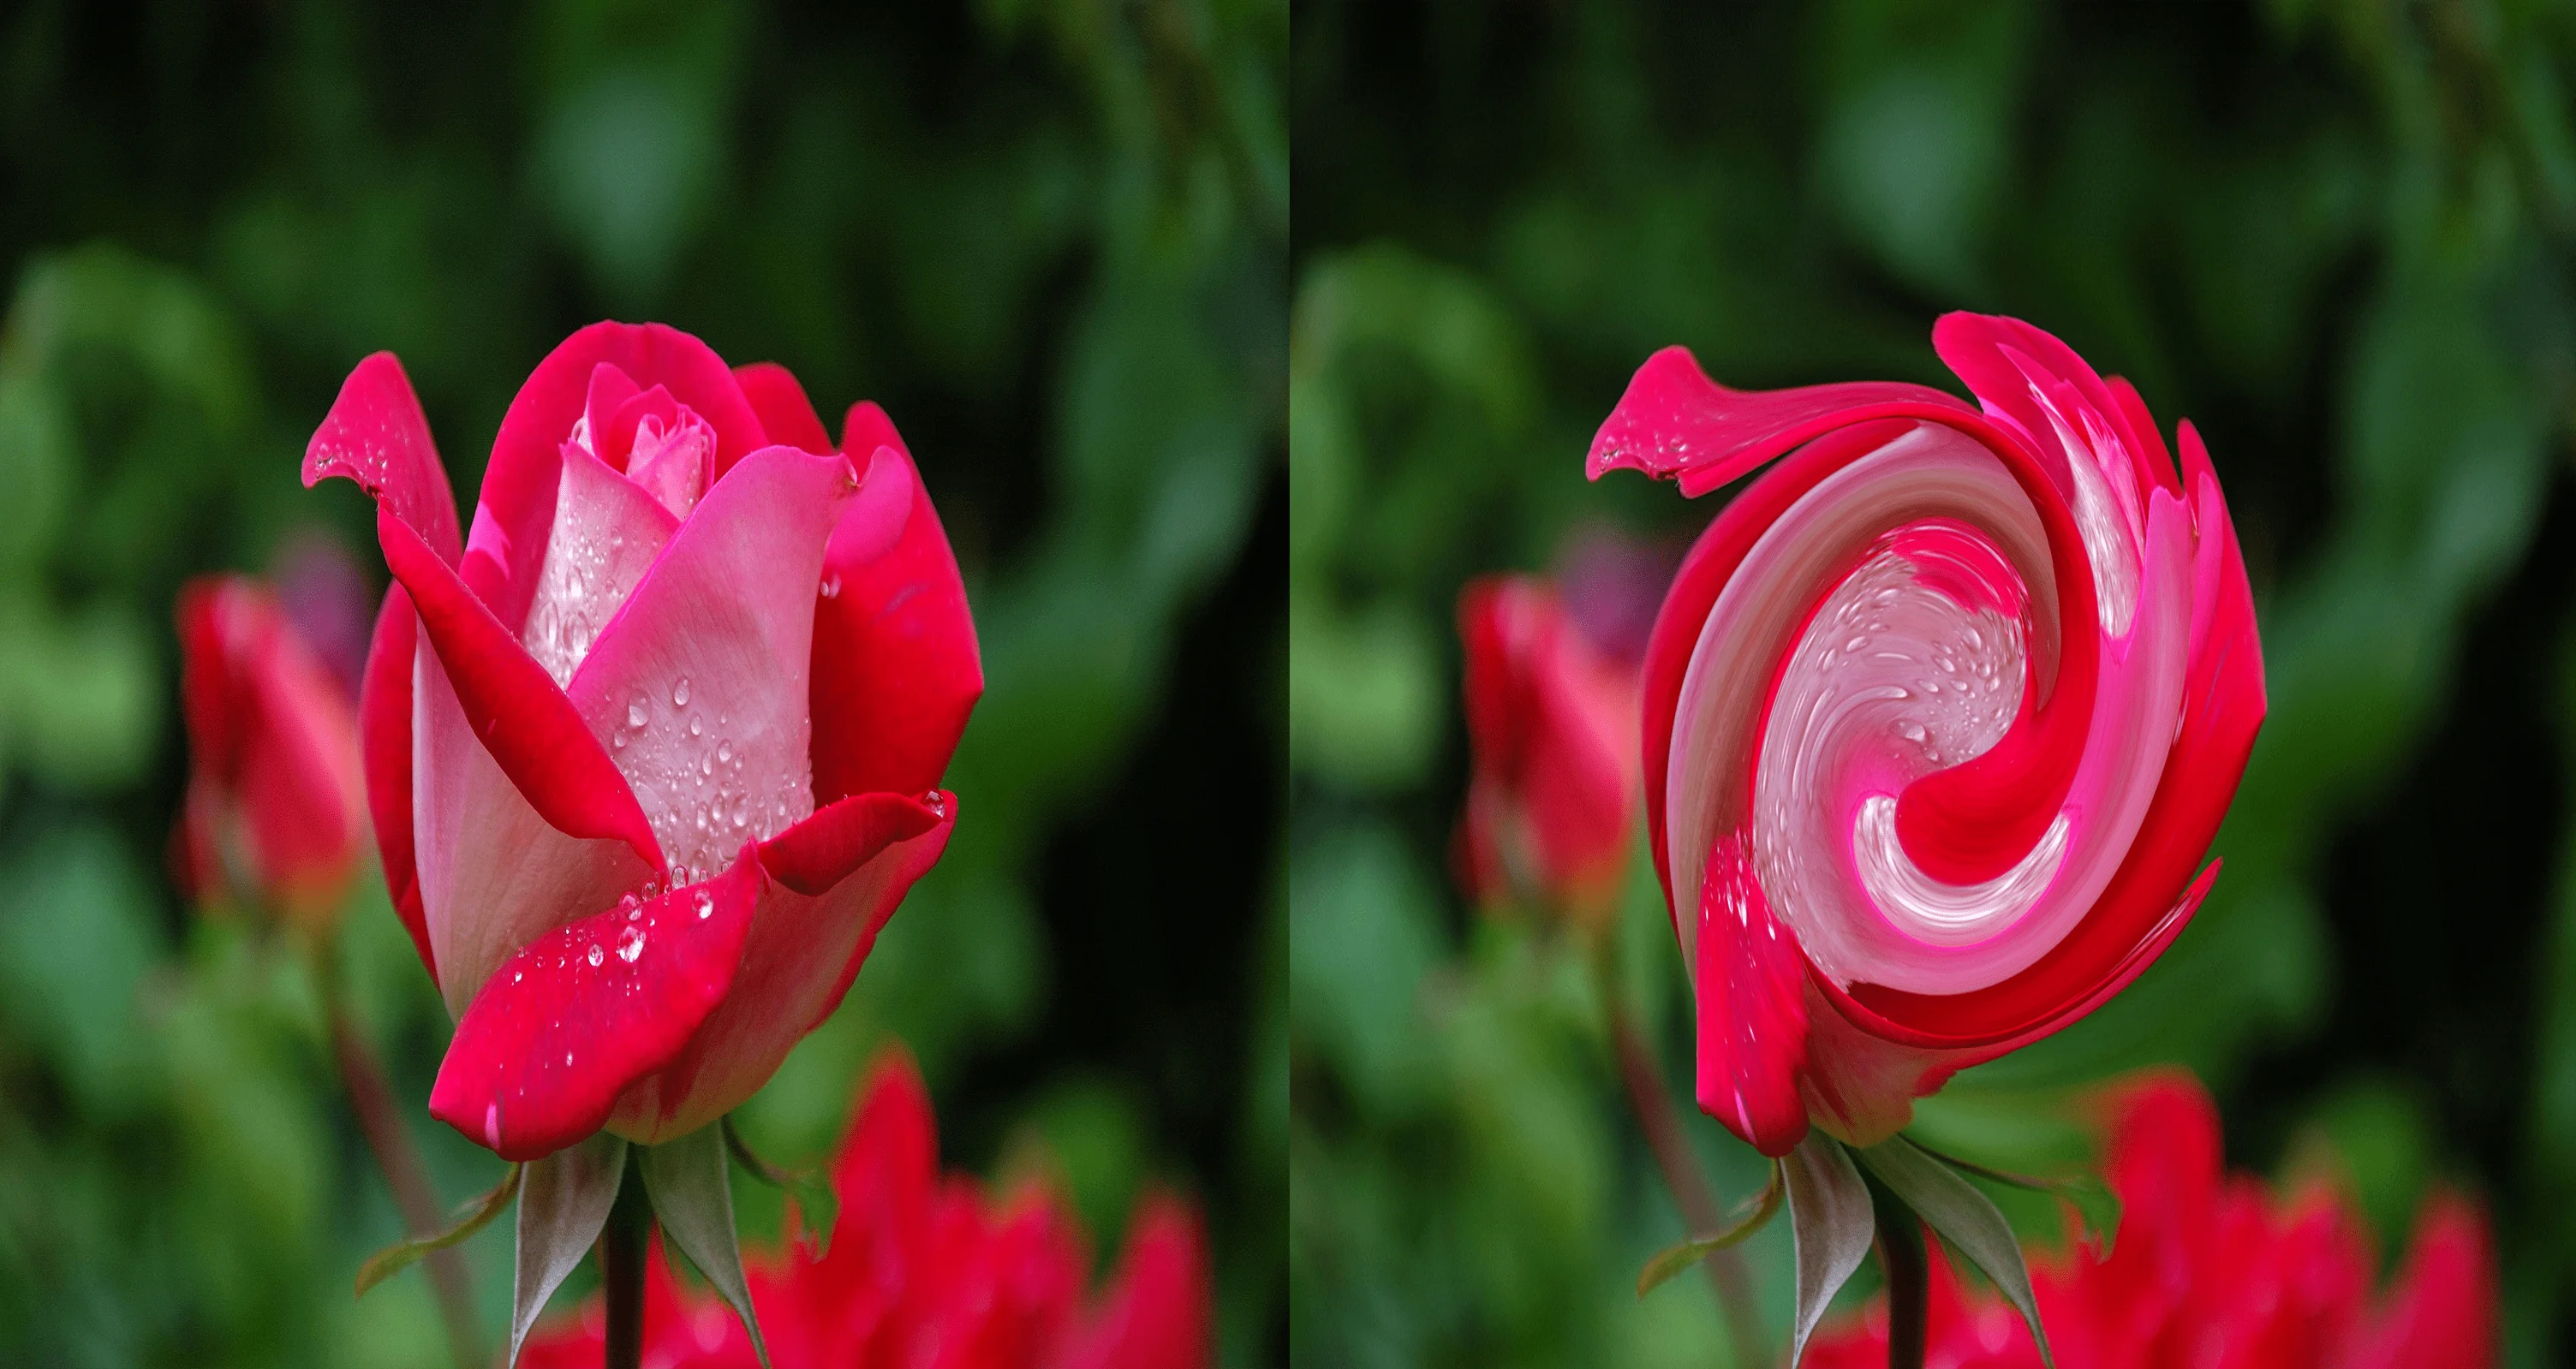
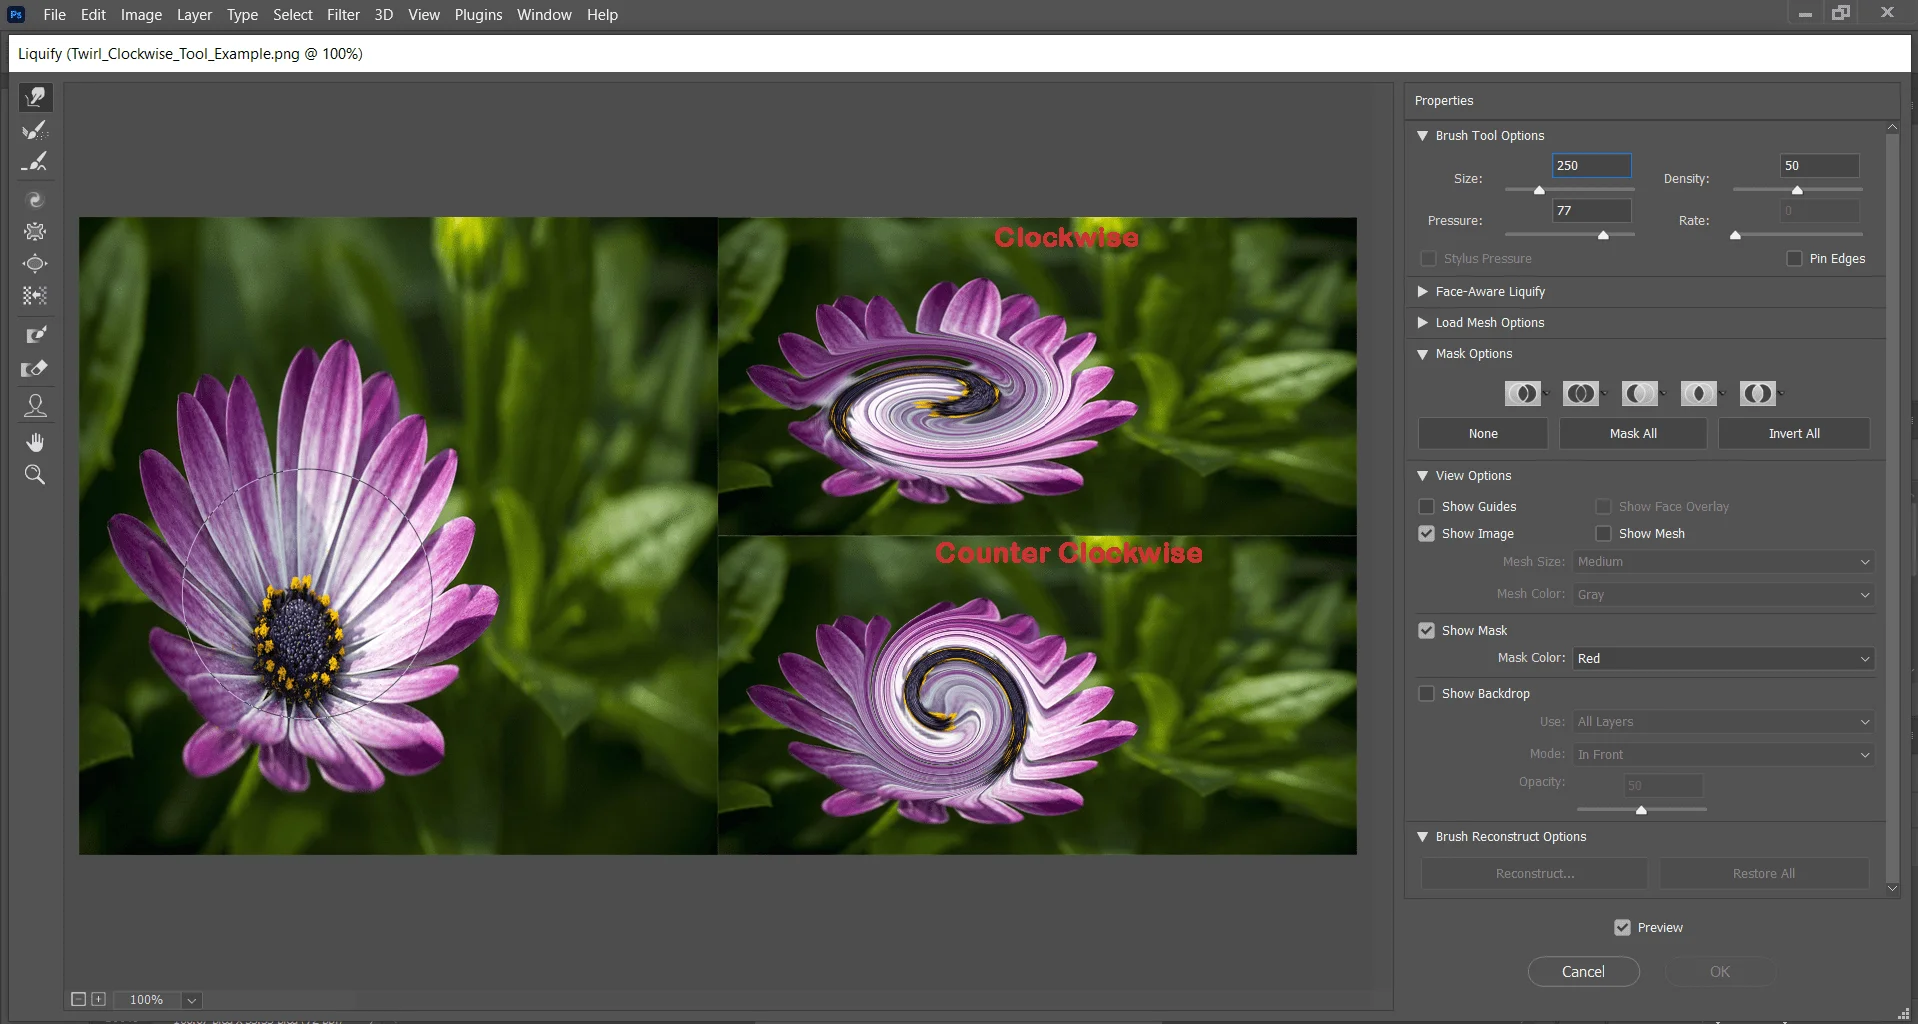
At the beginning of the article photos of roses are shown are distorted by using the Twirl clockwise tools. You should see various like these photos on the internet. These edits are done by using this ‘Lisuify filter’ brush. You also can make various artistic designs by using this liquified filter brush.
To twirl pixels clockwise adjust the size of the Twirl Clockwise tool brush then click and hold or drag. You can also twirl pixels counterclockwise by holding down ‘Alt’ (window) or ‘Option’ (Mac OS) by holding down the mouse button or dragging. The hotkey for selecting the ‘Twirl Clockwise Tool’ is ‘C’ on the keyboard.
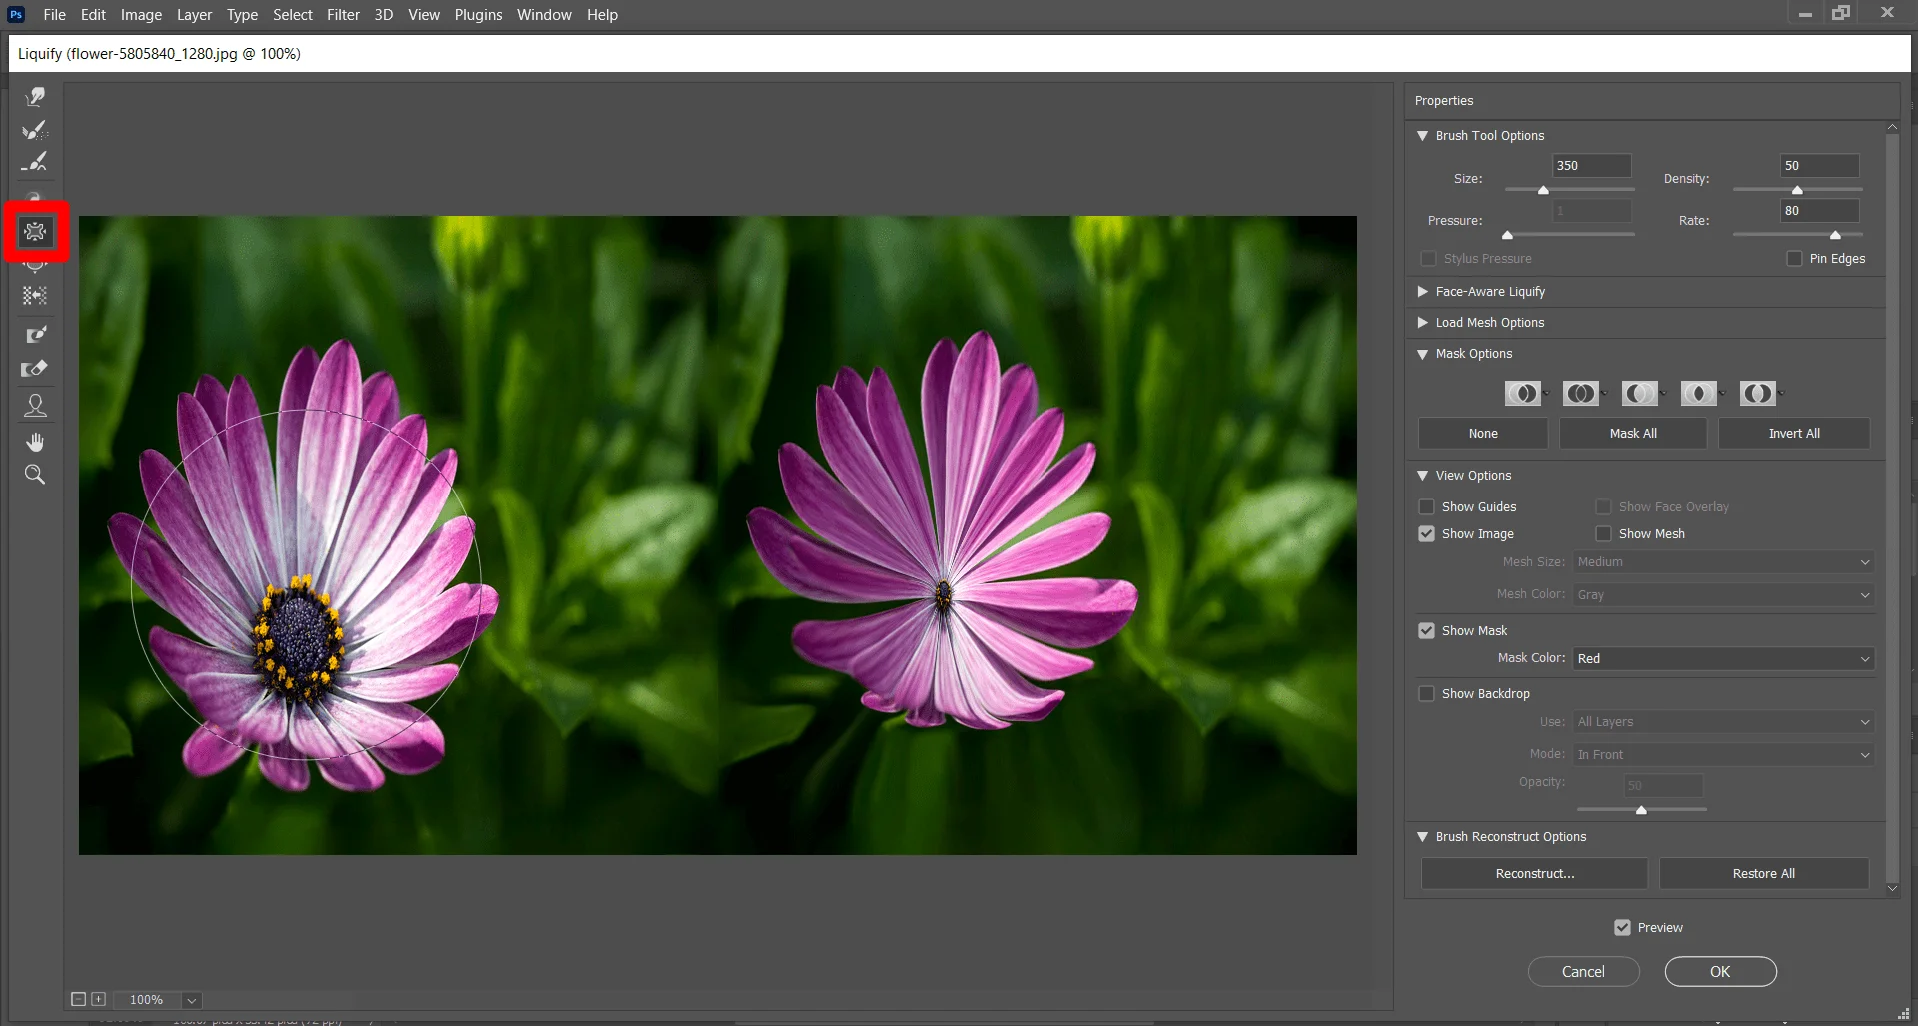
Pucker Tool (S)
The ‘Pucker Tool’ is one of the most used tools of the liquify Photoshop filter in Photoshop. You can change one’s fat body to a slim one. The Liquify Filter Pucker Tool moves pixels toward the center of the brush area as you hold down the mouse button or drag. The hotkey for the Pucker Tool is ‘S’ on your keyboard.
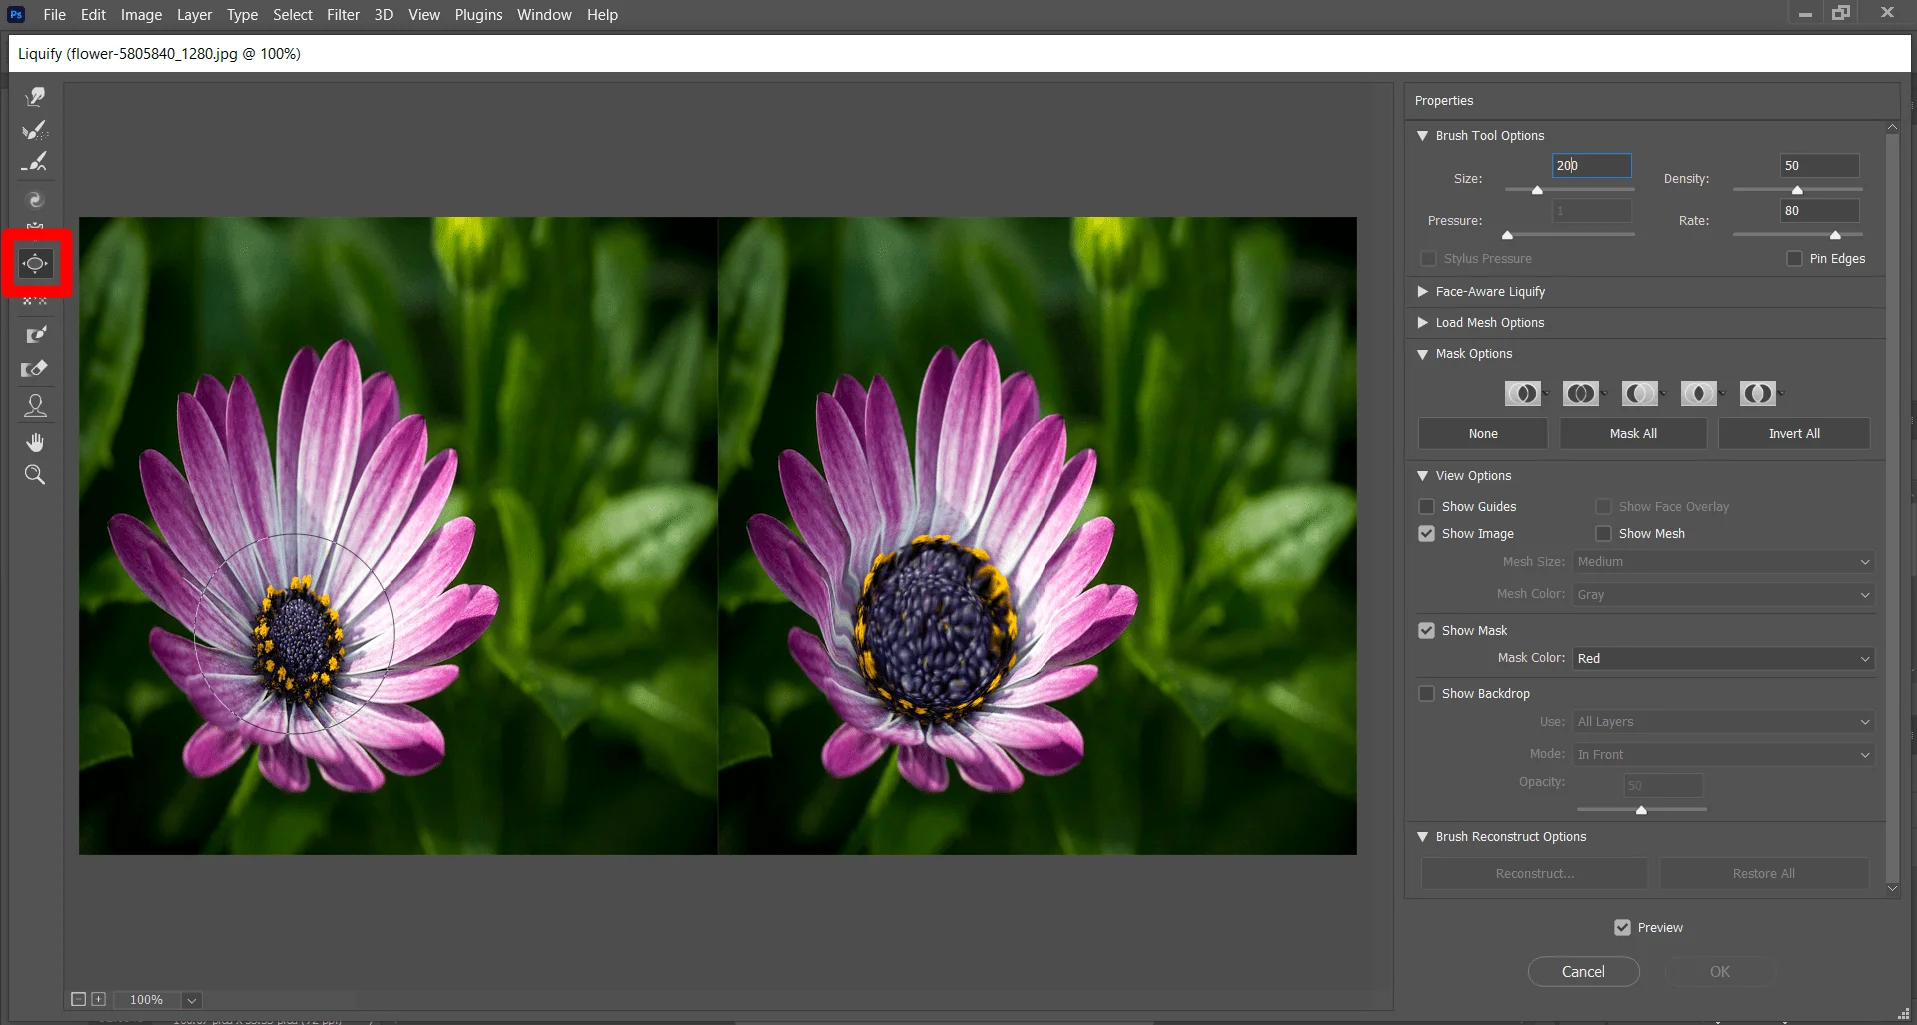
Bloat Tool (B)
If you know the ‘liquify photoshop filter Pucker Tool’ Then this Bloat Tool will be easier to use for you. The ‘Bloat Tool’ works just like the opposite of the ‘Pucker Tool’.
The ‘liquify Photoshop filter Bloat Tool’ moves pixels away from the center of the brush area when you hold down the mouse button or drag. You can also select the ‘Bloat Tool’ by pressing the ‘B’ key on your keyboard.
Push Left Tool (O)
The use of this Liquify filter brush is implied by its name. The ‘Push Left Tool’ moves pixels to the left when you hold down the mouse button and drag the tool straight up. You can also use this tool to move the pixels to the right by dragging the tool straight down.
You can also drag clockwise or counterclockwise to increase or decrease an object’s size. The Hotkey of the ‘liquify photoshop filter Push Left Tool’ is the ‘O’ key on your keyboard.
Hand Tool (H)
As we discussed earlier the ‘Hand Tool’ is used to adjust the position of photos on the review panel. You can hold the image and move in any direction to view the desired area of the photos in the preview section. Select this tool from the ‘liquify photoshop filter’ window toolbar.
You can also use the ‘liquify photoshop filter Hand Tool’ at any time no matter which Tool or brush is selected at the ‘liquify photoshop filter’ window toolbar. To use the ‘liquify photoshop filter hand tool’ at any time press and hold the spacebar on your keyboard. Or you can select the ‘Hand Tool’ by pressing the ‘H’ key on your keyboard.
Zoom Tool (Z)
The Zoom Tool is used to zoom in and out on a photo. The ‘Zoom Tool’ is positioned at the bottom of the ‘liquify Photoshop filter toolbar’. You can also select the ‘Zoom Tool’ by pressing the ‘Z’ key on your keyboard.
To zoom in on the preview photo on the ‘Liquify Filter’ Window select the zoom tool and click on the area you want to zoom in.
And to zoom out press and hold the ‘Alt’ key on the keyboard and click on the photo. You can also Zoom in and out by dragging the mouse while upper and down when pressed and holding the ‘Alt’ key.
Using Liquify Freeze Mask Tool And Thaw Mask Tool
You can freeze areas that don’t want to modify with the ‘liquify photoshop filter Freese mask Tool’. And the ‘thaw frozen tool’ thaw frozen area to make them editable again. As the ‘Pucker Tool’ and ‘Bloat Tool’, the ‘Freese mask Tool’ and the ‘Thaw mask Tool’ are opposite of each other.
Freezing Areas
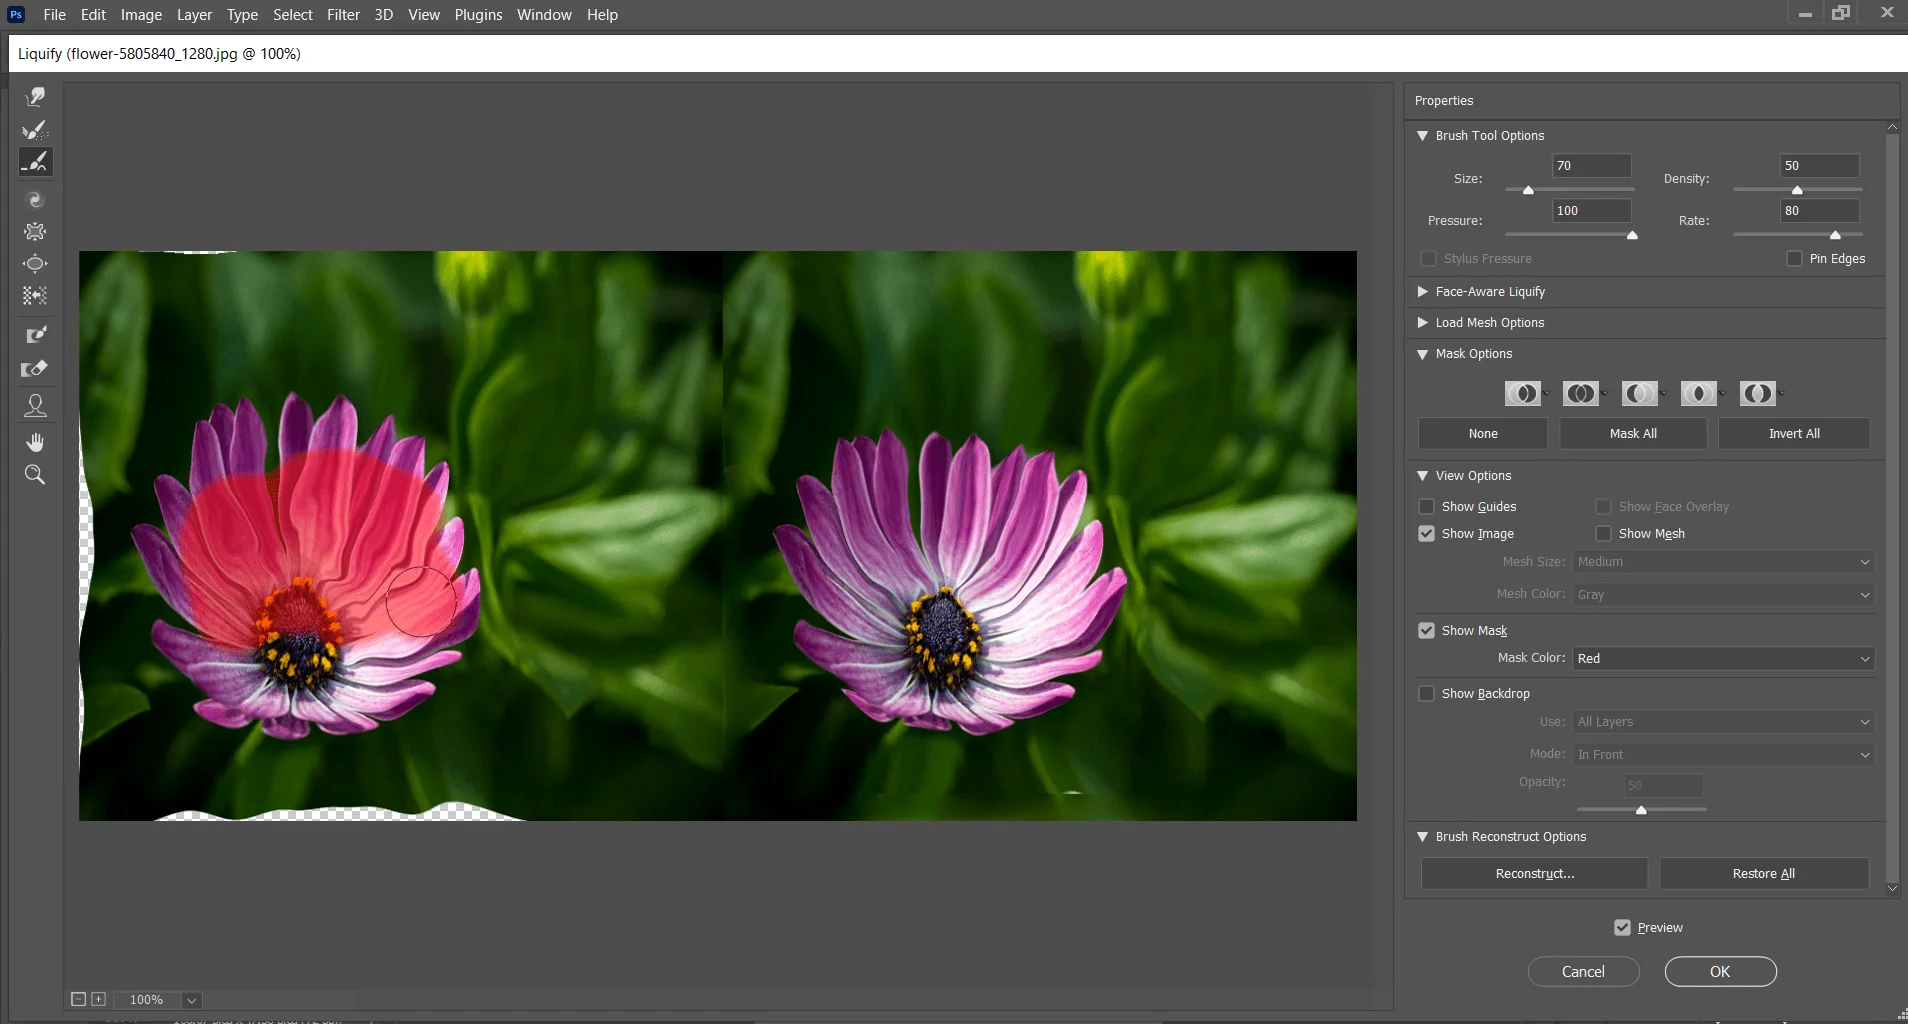
By using the liquify Photoshop filter’s ‘Freese mask Tool’ you can freeze a desired area. the frozen area will remain unchanged through the editing. you can select the ‘Freeze Mask Tool’ from the Liquify Photoshop filter window toolbar.
You can also select this tool by pressing the ‘F’ key on your keyboard. When you drag your tool on the photo the areas will marked with a color. Don’t worry if you use this ‘Liquify Filter Tool’ for the first time. That color is just a mark for the selecting areas. You can also freeze areas by using an existing mask, selection, or transparency.
Select the Freeze Mask Tool and drag over the area you want to protect. Shift -click to freeze in a straight line between the current point and the previously clicked point.
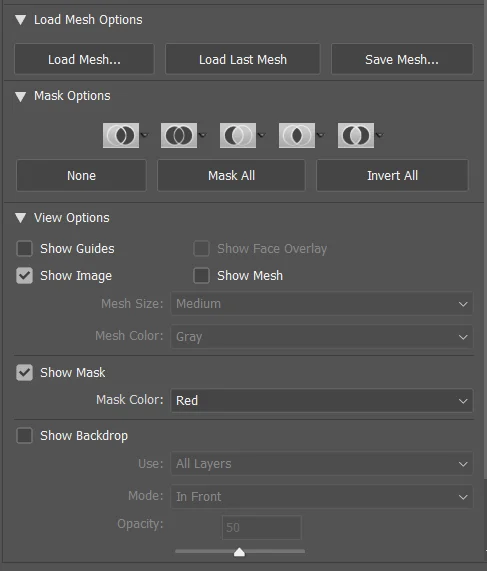
If you apply the ‘liquify photoshop filter to a layer with a selection of any of the Five icons’ pop-up menu in the mask Options area of the dialog box. These determine how areas of the preview image are frozen or masked.
Different Mask Options on the Mask Options Panel
‘All Mask’ Option
You can cover all areas of the photo by clicking the ‘All Mask’ option in the Mask options area of the dialog box.
‘Invert All’ Option
You can inversely select the area from the previous selection. If you want to edit on a desired area and none of the points of the photo. Then mark your desired area for the photos with the ‘Freeze Mask Tool’ and click on the Invert All option on the right side of the ‘liquify photoshop filter’ window.
The ‘None’ option
The None option will deselect your masks or selected areas.
Showing or hiding frozen areas: Select or deselect ‘Show Mask‘ in the View Options area of the dialog box.
Changing the color of frozen areas: Choose a color from the Mask Color pop-up menu in the View Options area of the dialog box.
Mask Options with the Liquify filter
When you already have a selection, transparency, or mask in an image, the information is retained in the ‘liquify photoshop filter’ dialog box. With the Existing selection, transparency, or mask in a photo you can select one of the following mask options:
Replace Selection: Shows the selection, mask, or transparency in the Original image.
Add To Selection: Shows the mask in the original image, so that you can add to the selection using the freeze mask tool. Adds selected pixels in the channel to the current frozen area.
Subtract From Selection: Subtracts pixels in the channel from the current frozen area.
Intersect With Selection: Uses only pixels that are selected and currently frozen.
Invert selection: Uses selected pixels to invert the current frozen area.
Thaw Areas
To thaw frozen areas of the preview image on the ‘liquify Photoshop filter’ window use any of the following,
Select the ‘Thaw mask Tool’ and drag over the area. Shift-Click to thaw in a straight line between the current point and the previously clicked point.
To Thaw all Frozen areas, Click the none Button in the Mask Options area of the ‘liquify Photoshop filter’ window.
To invert the frozen-thawed areas, click ‘Invert All’ in the Mask Options area of the dialog box at the ‘liquify Photoshop filter’ window.
Liquify Face With The Face Tool
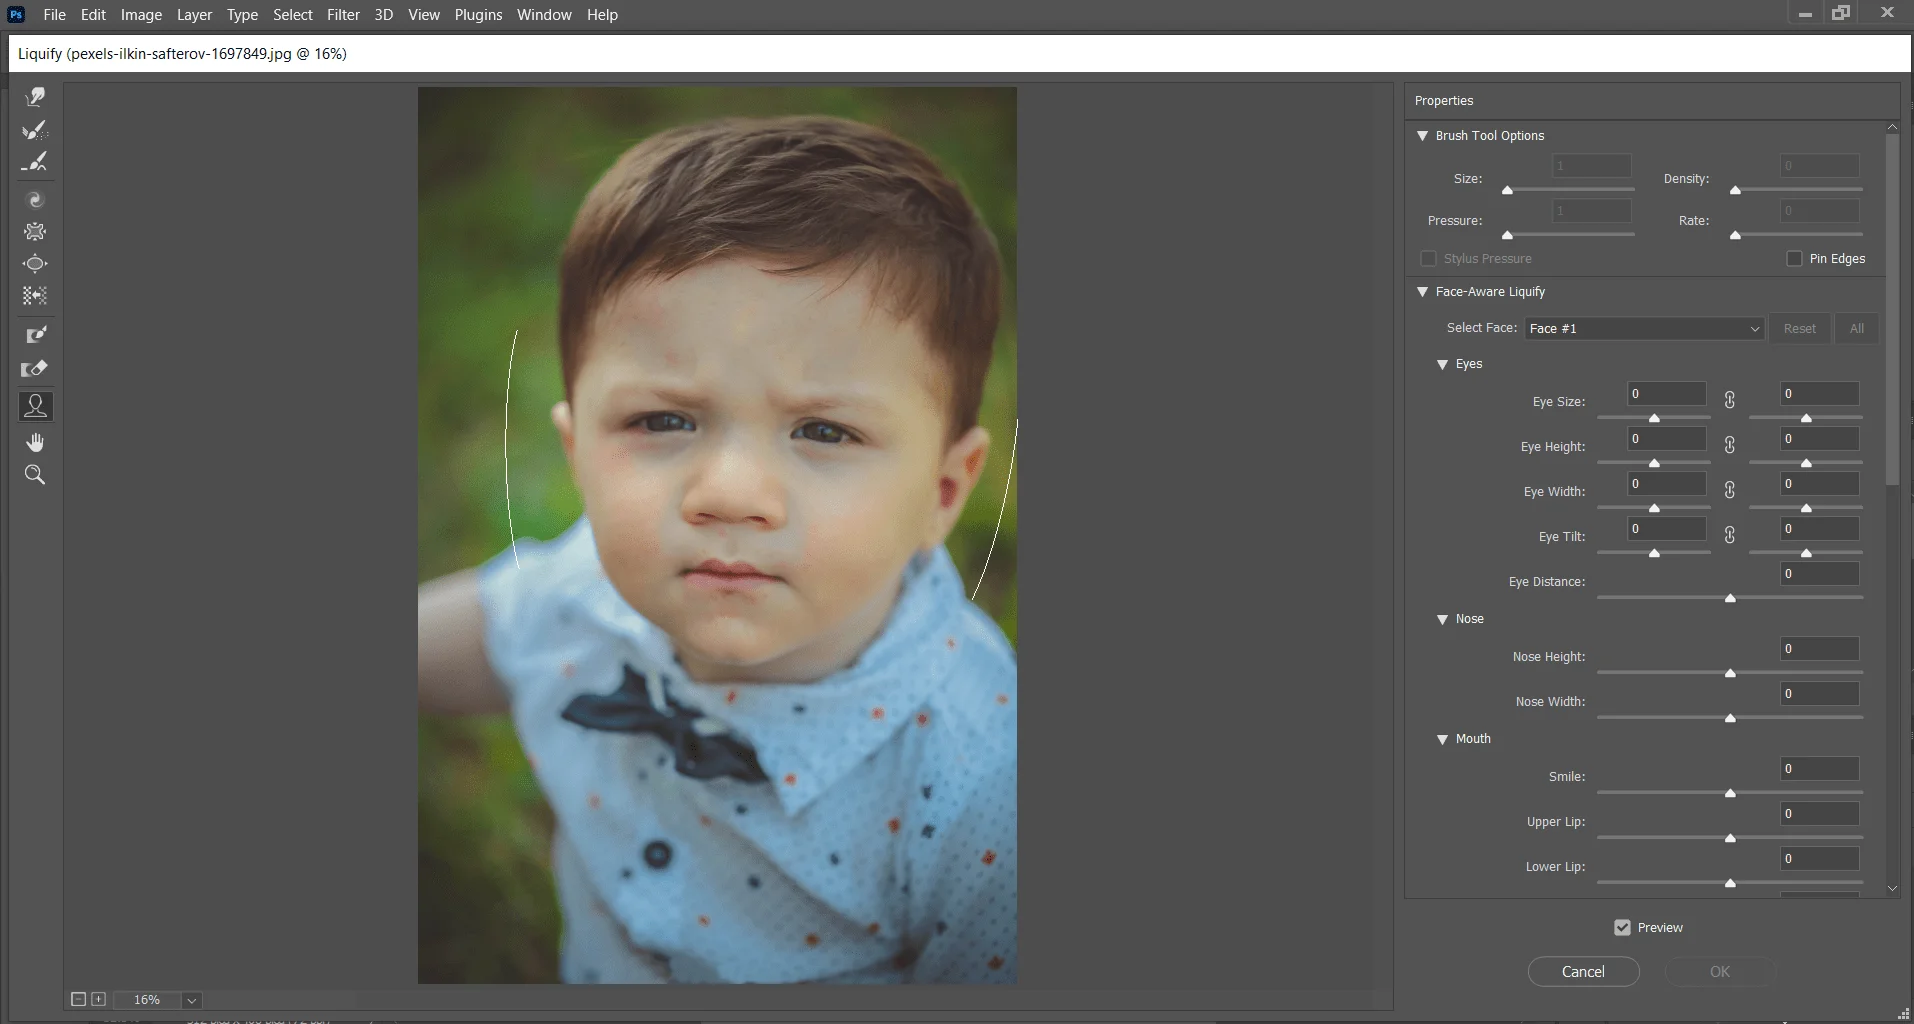
The ‘liquify Photoshop filter Face Tool’ was introduced in the ‘Adobe Photoshop’ CC2015.5 release. The Liquify Photoshop filter features advanced face-aware functionality that automatically identifies faces.
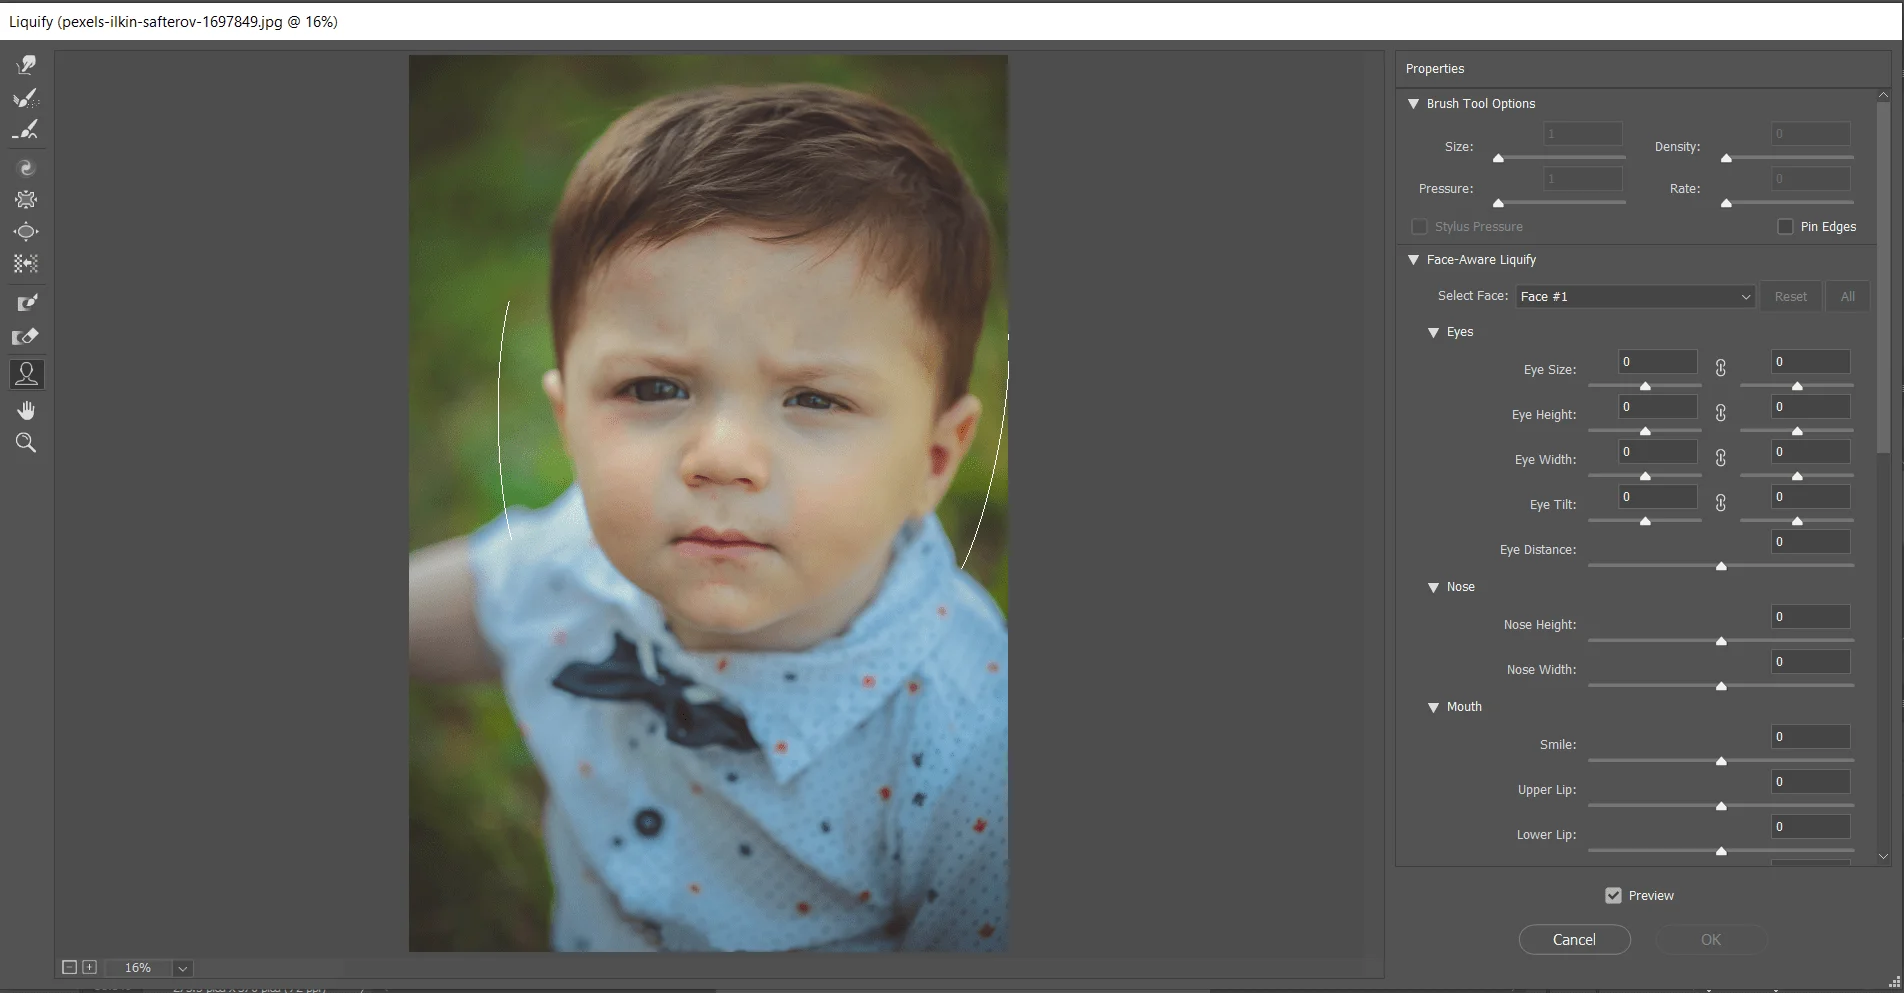
‘Adobe Photoshop’ makes its Face Tool very advanced and user-friendly. It can recognize Eyes, noses, mouths, and other facial features. Which makes it easy for you to adjust them.
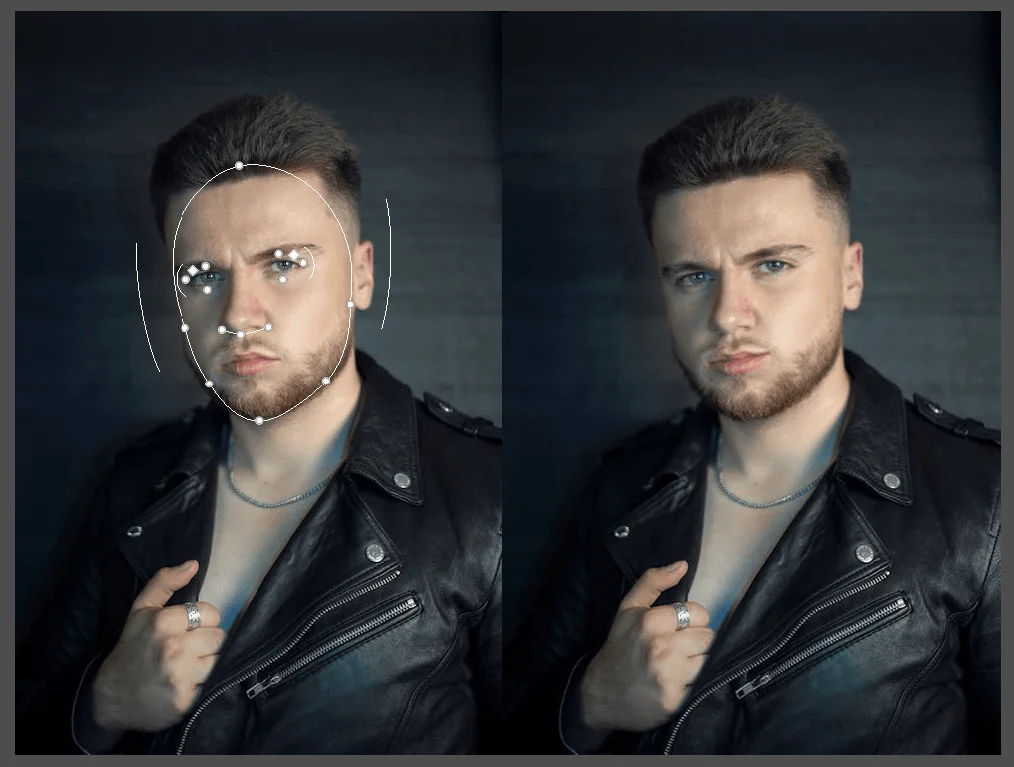
The liquify Photoshop filter’s ‘Face Tool’ is great for retouching portrait photos. You can use Face-Aware Liquify as a smart filter for non-destructive editing
Adjust Facial Features using on-screen handles
Step-01
In Photoshop, Open an image with one or more faces. Select Filter > Liquify. Photoshop opens the liquify Photoshop filter window.
Step-02
In the Liquify Photoshop filter window Tool panel, select ‘Face Tool‘ Or press ‘A’ on the keyboard.
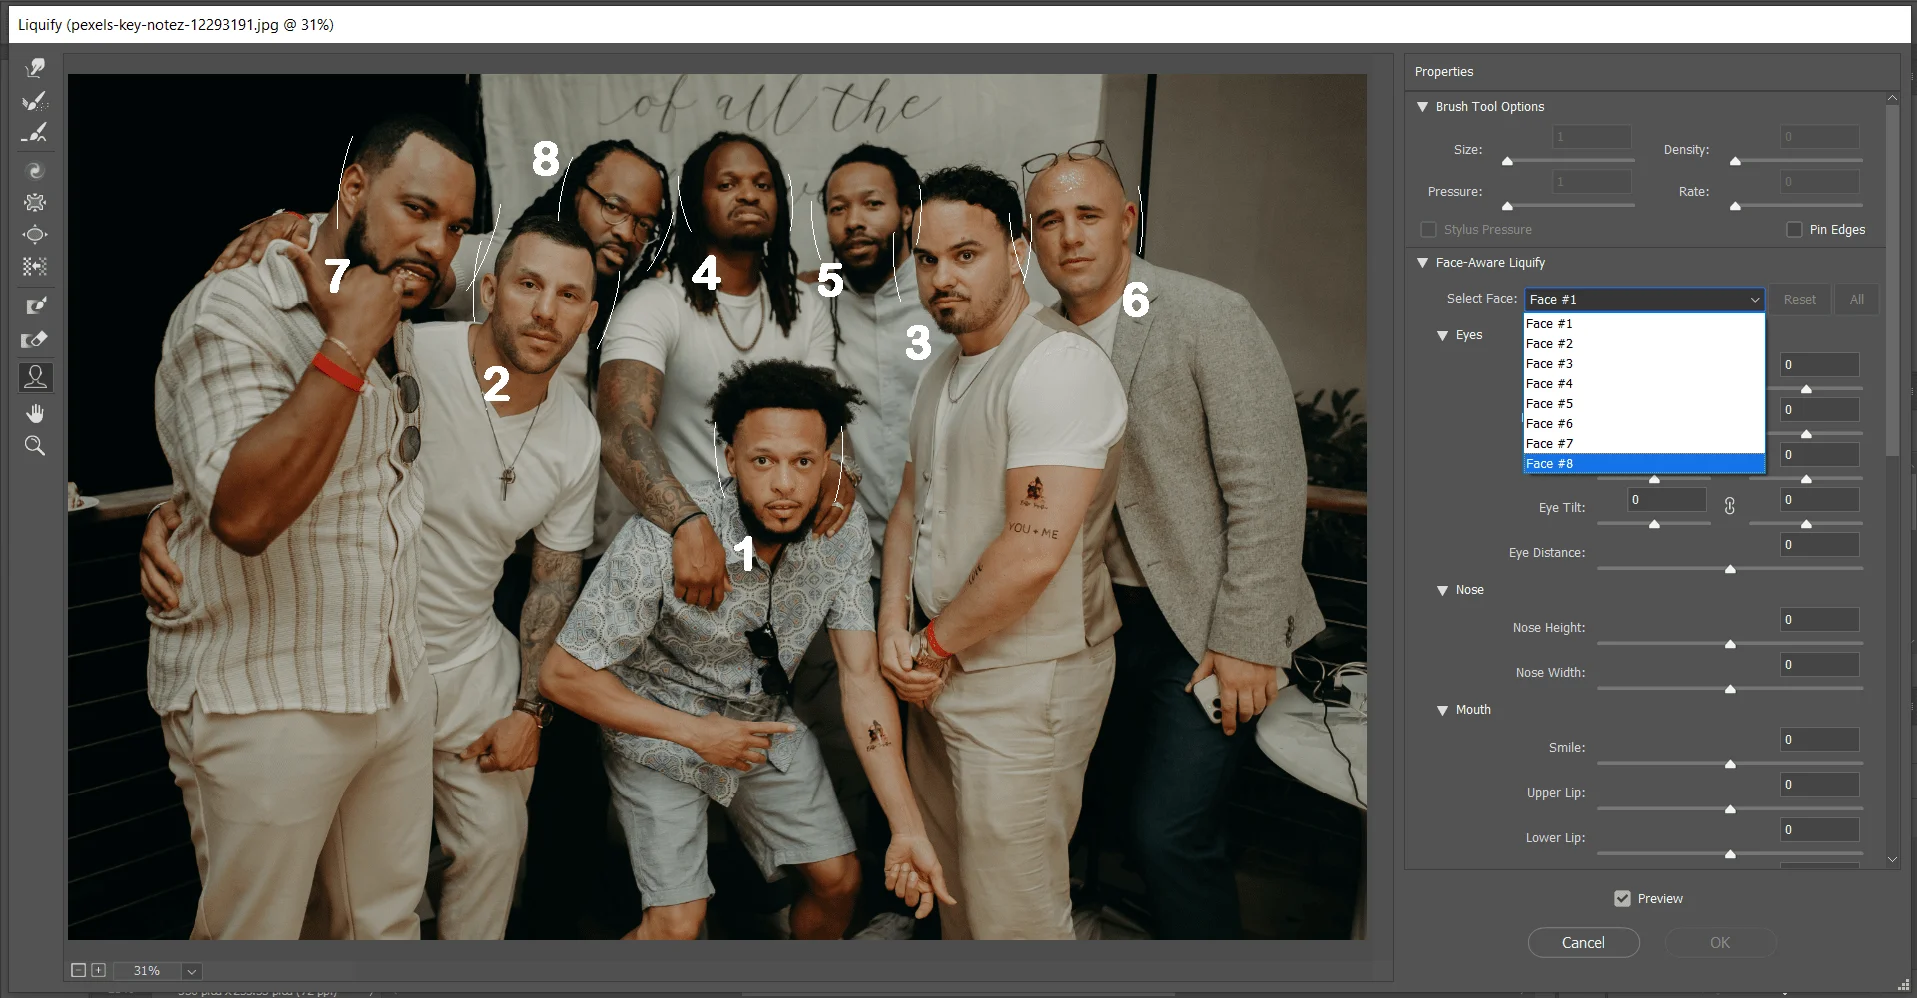
The liquify Photoshop filter’s AI will automatically identify the faces. The identified faces are also listed in the ‘Select Faces‘ pop-up menu in the Face Tool properties panel.
You can select a different face by clicking it on the canvas or selecting it from the pop-up menu on the Liquify Photoshop filter window.
Step-03
Adjust the sliders in the ‘Face_Aqare Liquify’ area to make appropriate changes to the facial features. Weh you’re satisfied with the changes. Click OK.
Applying different ‘Face tool’ Settings in a photo
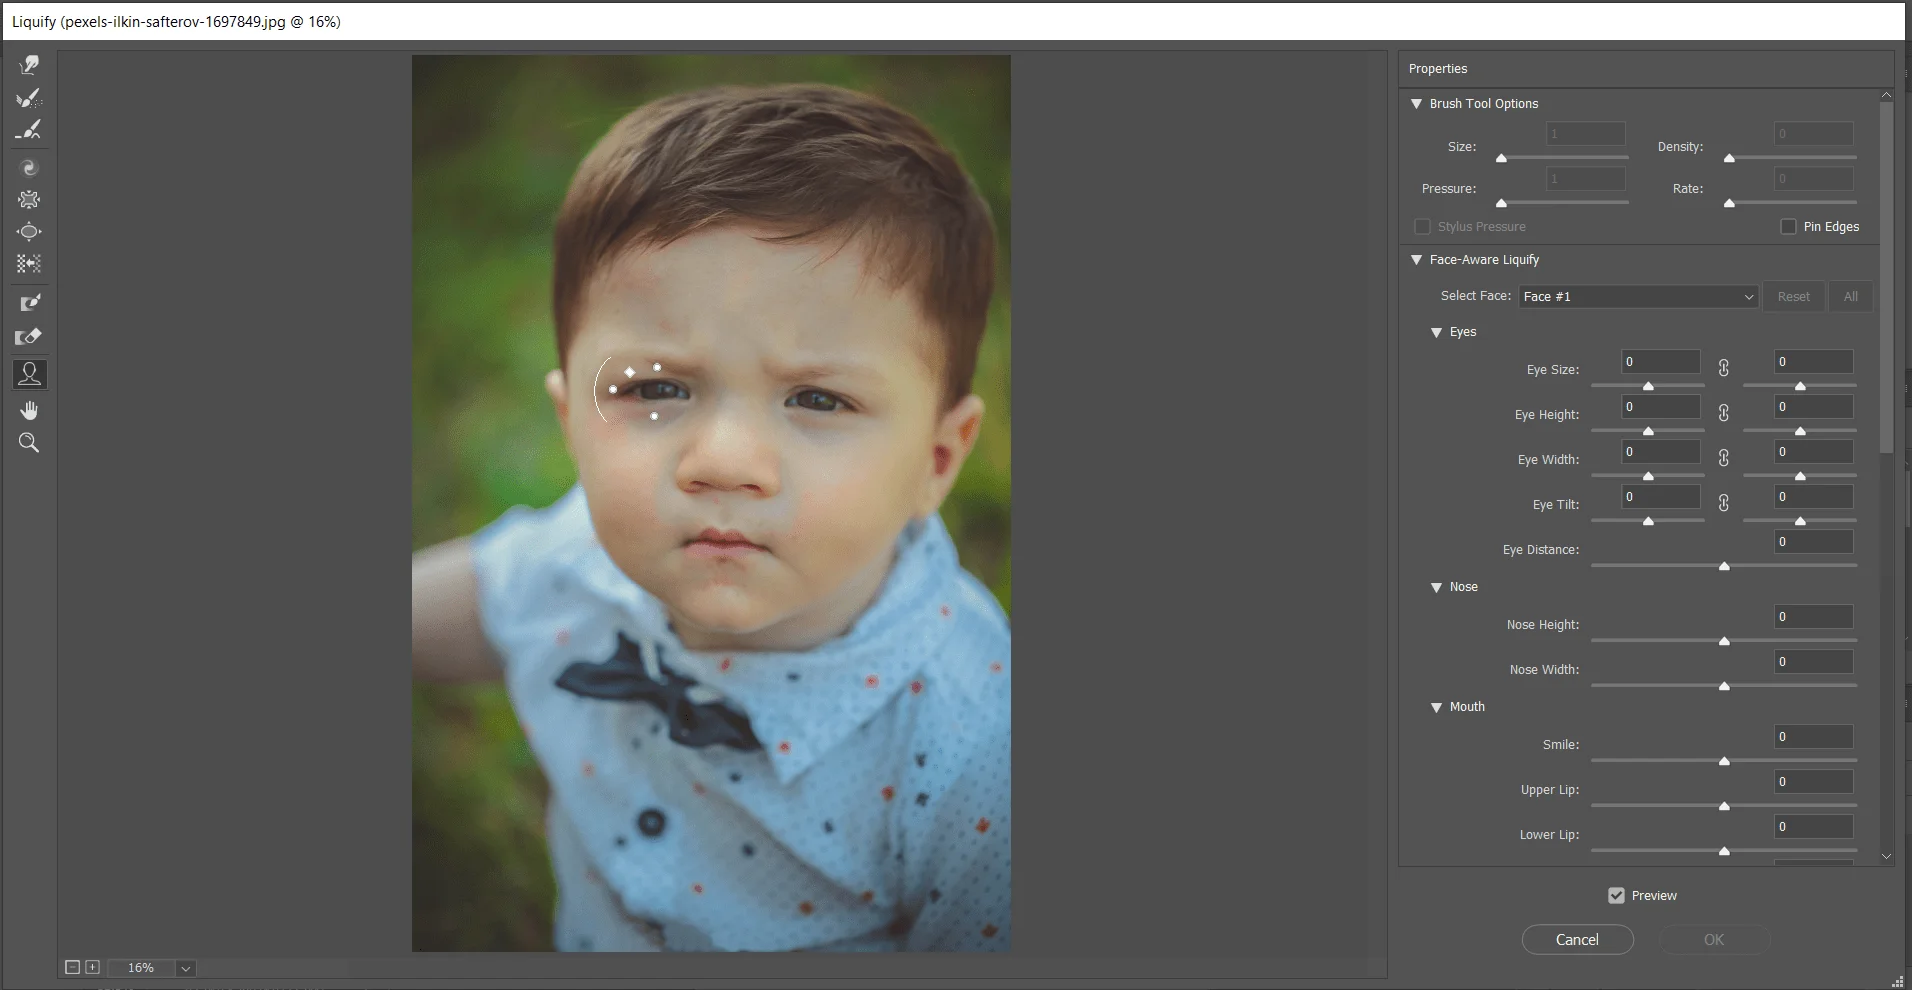
Eye Settings
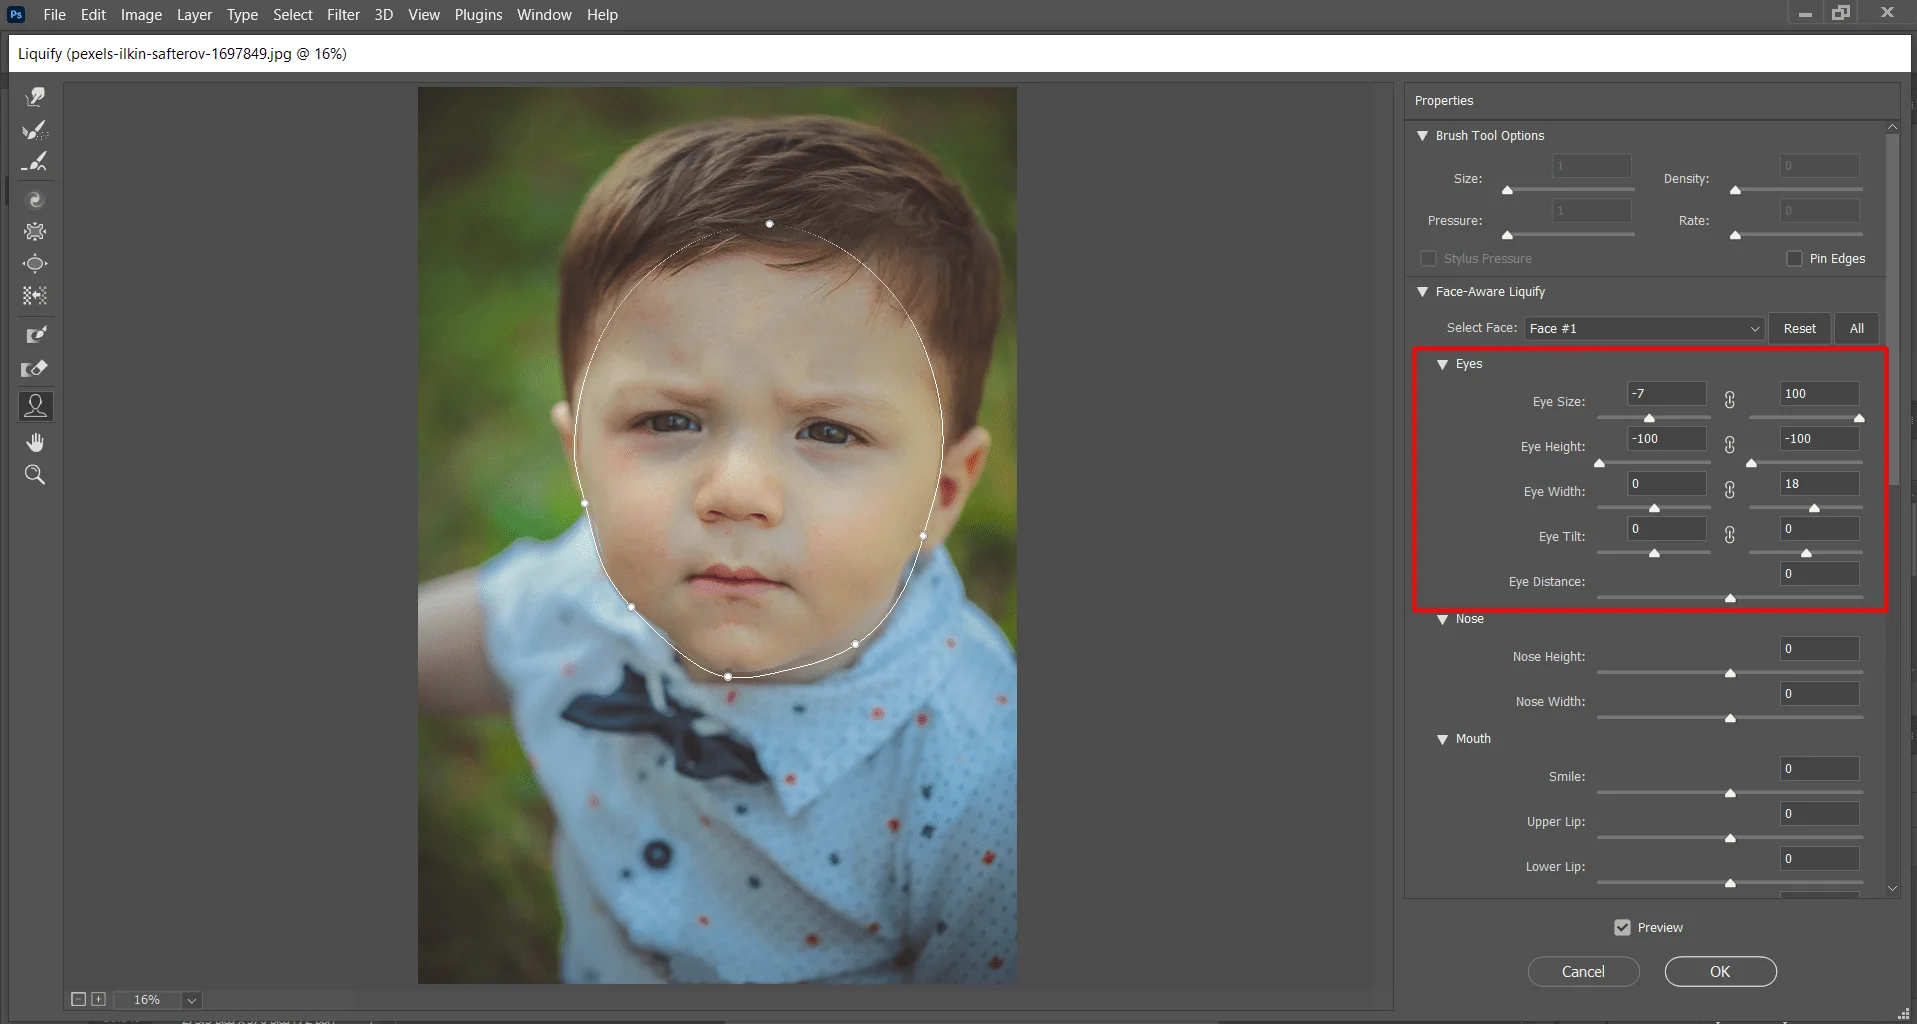
The ‘Adove Photoshop’ will provide individual slider options for each eye. You can edit eyes one by one on the ‘Eyes’ editing plane on the new Liquid y Photoshop window. Move the slider options for the left and right eyes to apply independent/asymmetrical effects to the eyes.
The preview panel will show the editing result live. If you are satisfied with the result then you can edit other parts you want to edit. You can also edit both eyes together. Click the link icon present in the middle of the sliders. This option will help to apply symmetrical effects to the eyes.
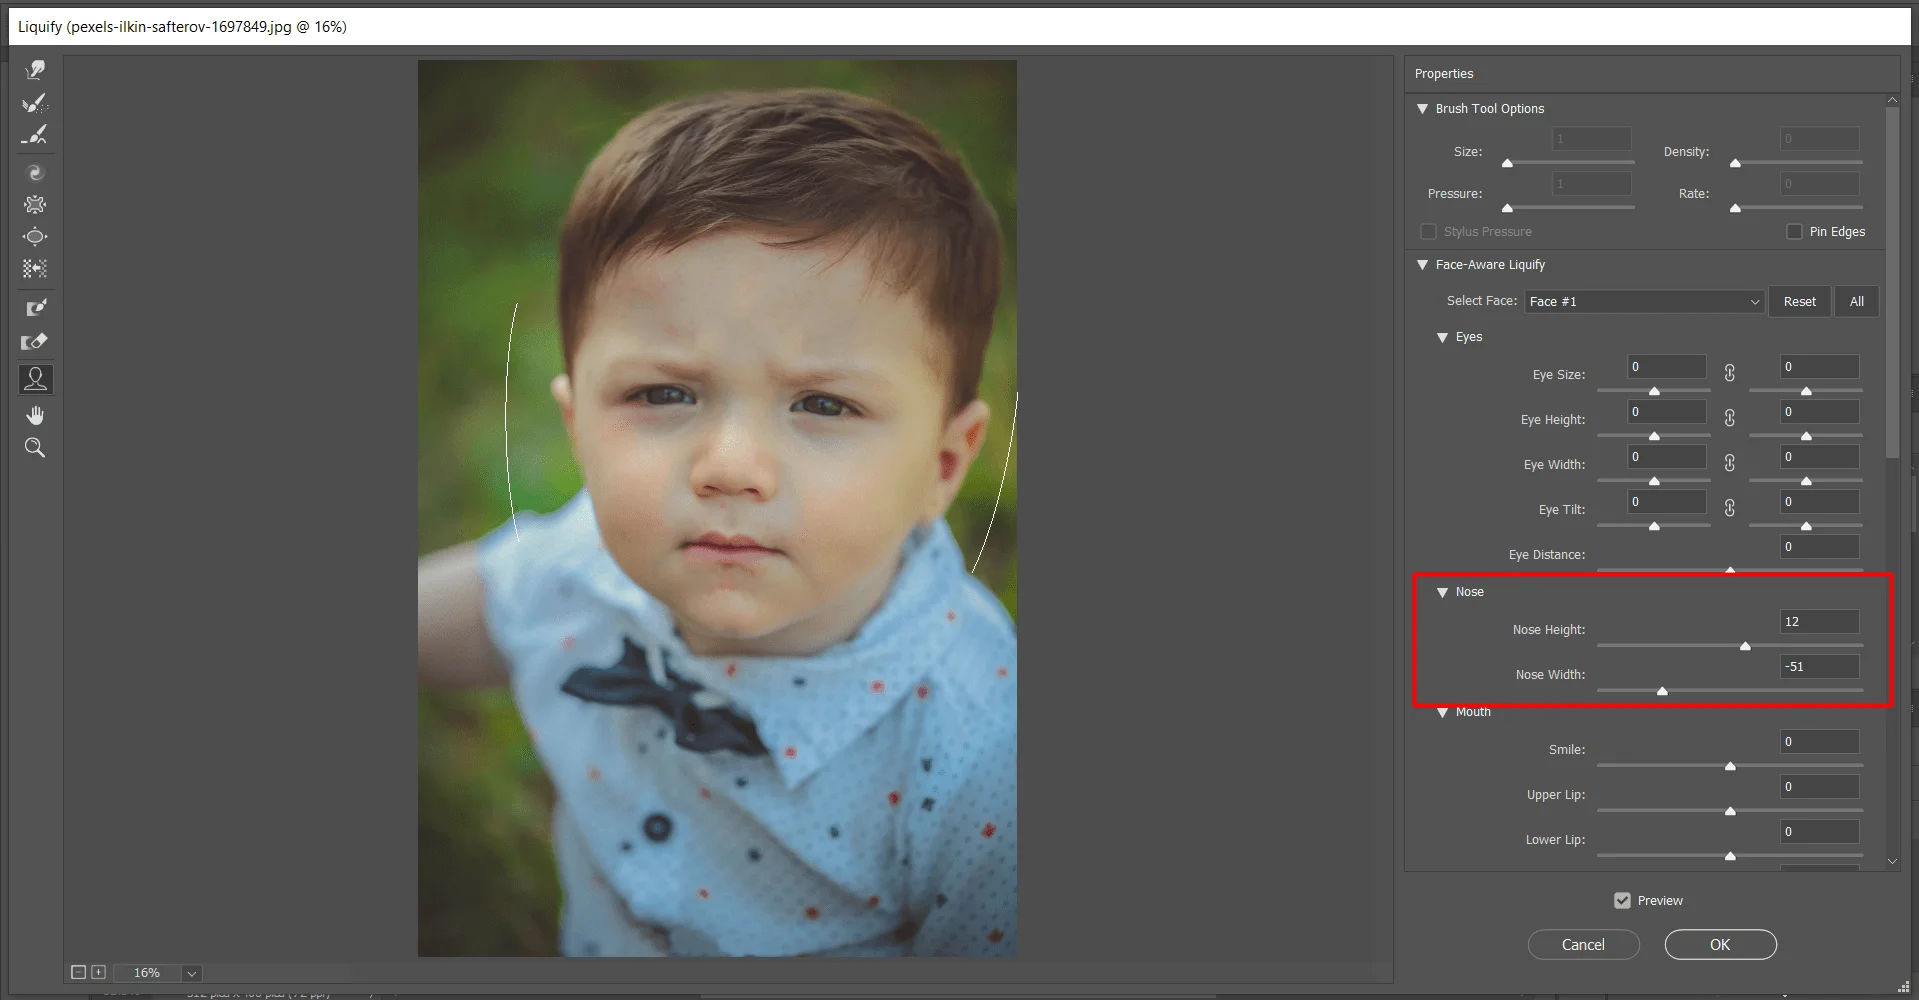
Nose Settings
Edit nose height and width with the Liquify Photoshop tool. You can edit the nose on the live preview panel or use sliders to increase or decrease the nose height and width.
Mouth Settings
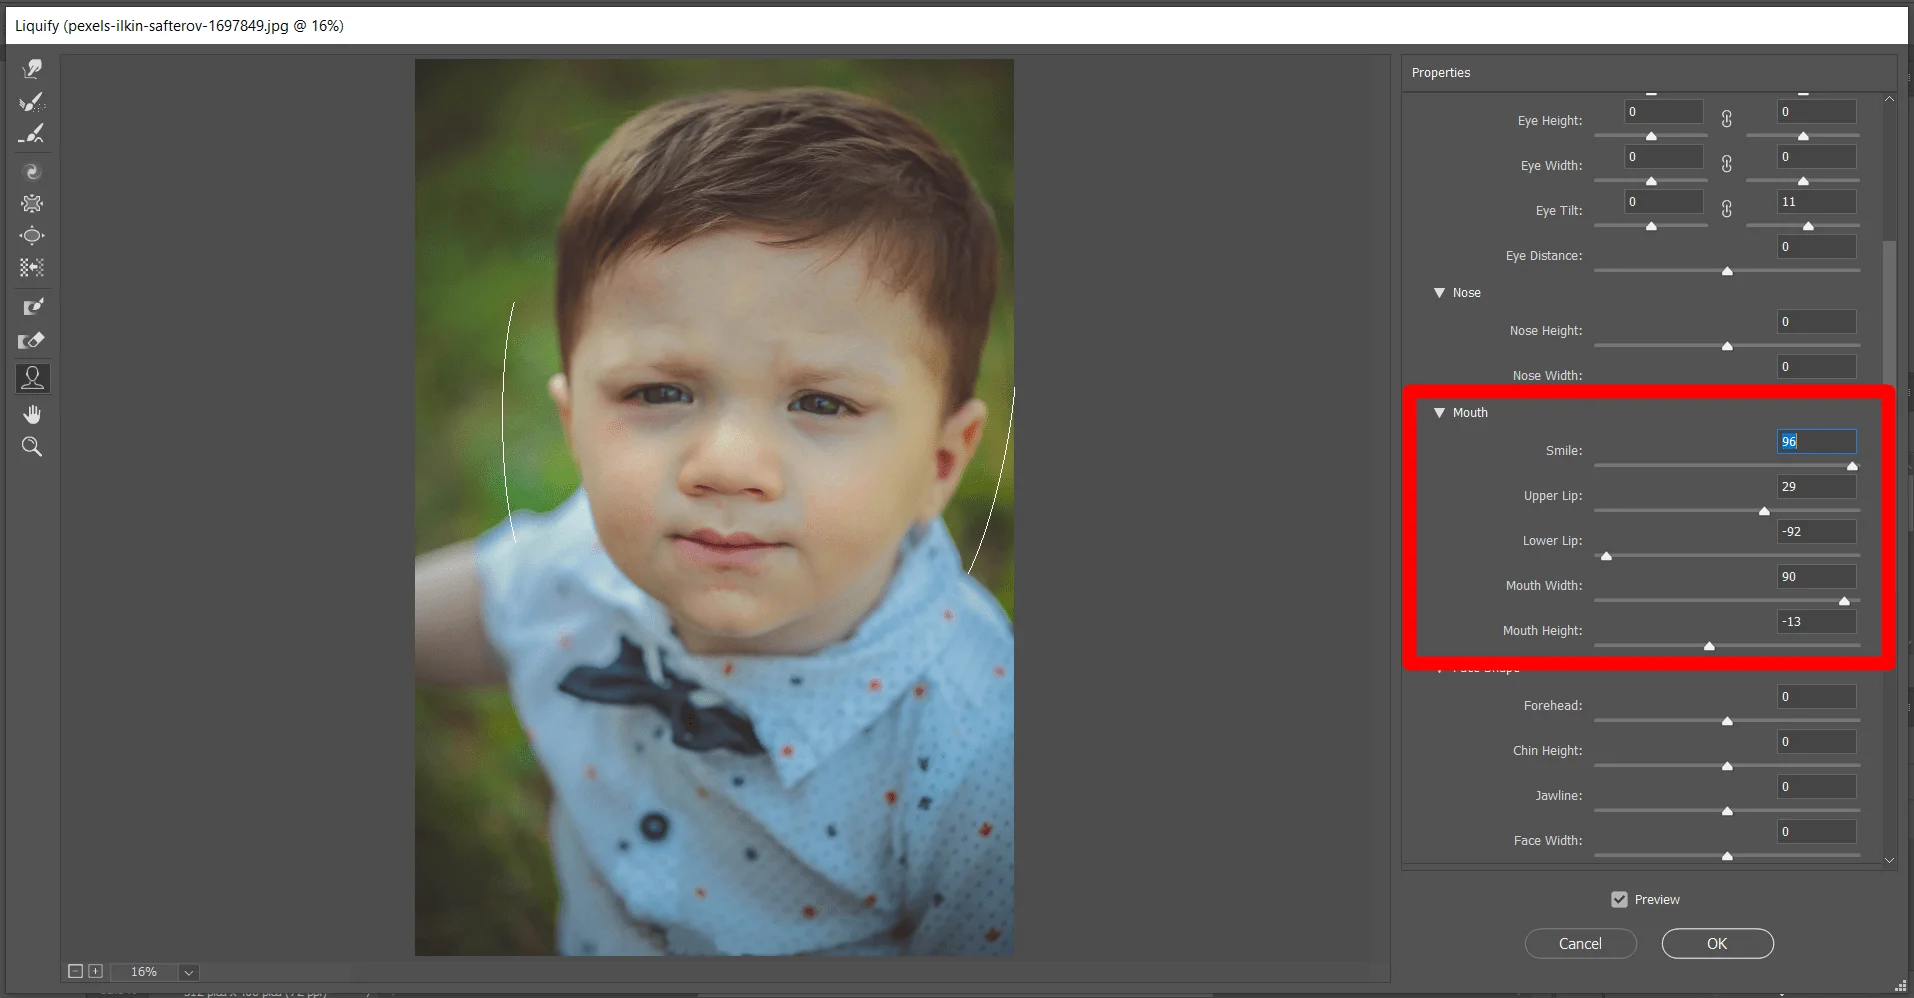
Now you can make smiling someone even in the photos too. The Adobe Photoshop AI works stunningly on the Liquify Photoshop Face tools. Making a sad face into a happy face is easy with Photoshop Liquify tools.
You can also change the size of the lips and mouth in a liquified Photoshop window. You can edit photos on the photo preview panel or at the liquify face tool editing panel by sliding left or right different sliders.
Face Shape Settings
Change the face shape at the ‘Face Shape‘ panel in the Liquify Photoshop window. You can change Chin height, Jawline, face width, and Forehead. Use the slider on the Face Shape panel on the left side of the liquify photoshop window. You can also edit at the previews photo panel.
PowerPoint Presentation of Liquify Photoshop Tool Overview
Face-Tool of the liquify Functionality works best on facial features facing the camera. For best results, rotate any titled faces before applying the settings.
The Reconstruct and Restore All options don’t apply to Face-Aware Liquify changes. Use the Reset and All options in the Face-Aware Liquify area to reset the changes Applied to a selected face and all faces, respectively.
In Summary
Every tool on the Photoshop Liquify toolbar is unique and has its use to edit your photos. It will be better to know the use of individual tools and brushes separately. Don’t try to learn which part of the image edit with which tool. Every photo has a different texture of pixels. Selecting a perfect tool for editing is very important.
So we think our article will help you to learn the liquify tools and their uses. If you are reading this article to learn how to use liquify tools in Photoshop you should practice too. if you read many articles about a topic you can know very details but if you want to develop skills in a feature you have to practice.
The Liquify tools place the main menu on the top of the screen. Click on ‘Filter’ on the main menu, a drop-down menu will appear. From the drop-down menu select Lquify. You can also use a shortcut on your keyboard. Press ‘Crt’ (win) or Command (Mac) + Shift + X on your keyboard together.
What does the Liquify Tool do?
The Liquify Tool is a transform tool that allows you to modify pixel layers by pushing and pulling the layers in the direction.
With the liquify Photoshop filter you can push, pull, rotate, reflect, pucker, and bloat any area of a photo or an individual part of the photo. You can liquify only one layer at a time.
You also can change face size expression with the liquify tools.
How can I blend in Photoshop?
Click The Smudge tool for the Toolbar. If you can’t find it, click and hold the Blur tool to show its related tools. You can also select this tool from the menu at the top of the screen.
Click on Windows > Brushes and Search for Smudge Tool on the tool panel. Click Smalpe All Layers in the option bar to smudge using colors from all visible layers.
Click Finger Painting in the Options bar to smudge using the foreground color at the beginning of each stroke. Click and drag over the area where you want to smudge the pixels.
How to flip in Photoshop?
Sele the layer you want to flip. Press ‘Ctrl’ + ‘T’ (win), or ‘Command’ + ‘T’ (Mac). Then right-click on the activated area and choose Flip Horizontally or Flip Vertically.
Logo fonts could create or ruin a design. Choosing the appropriate font may aid in telling your brand’s narrative and enhancing the impact of your logo wherever it is shown. However, the incorrect font might cause disaster.
There are millions of fonts available for logos and graphic solutions, which is precisely why we’ve compiled this list of the most influential logo fonts best of all time. Many of these fonts are stunning on their own but don’t forget that they’re also an excellent source of logo design inspiration. They may be tweaked and adjusted in a variety of ways to offer your brand a distinctive vibe.
Choosing the proper font for your logo is essential to showcase your brand value as well as to enhance UI design, so be sure you devote sufficient time to the process.
Best 21 Logo Fonts for Designers
Here we are going to tell you about the best 21 logo fonts for Designers. Let’s Begin.
01. Serif or Sans-Serif | Best Logo Fonts
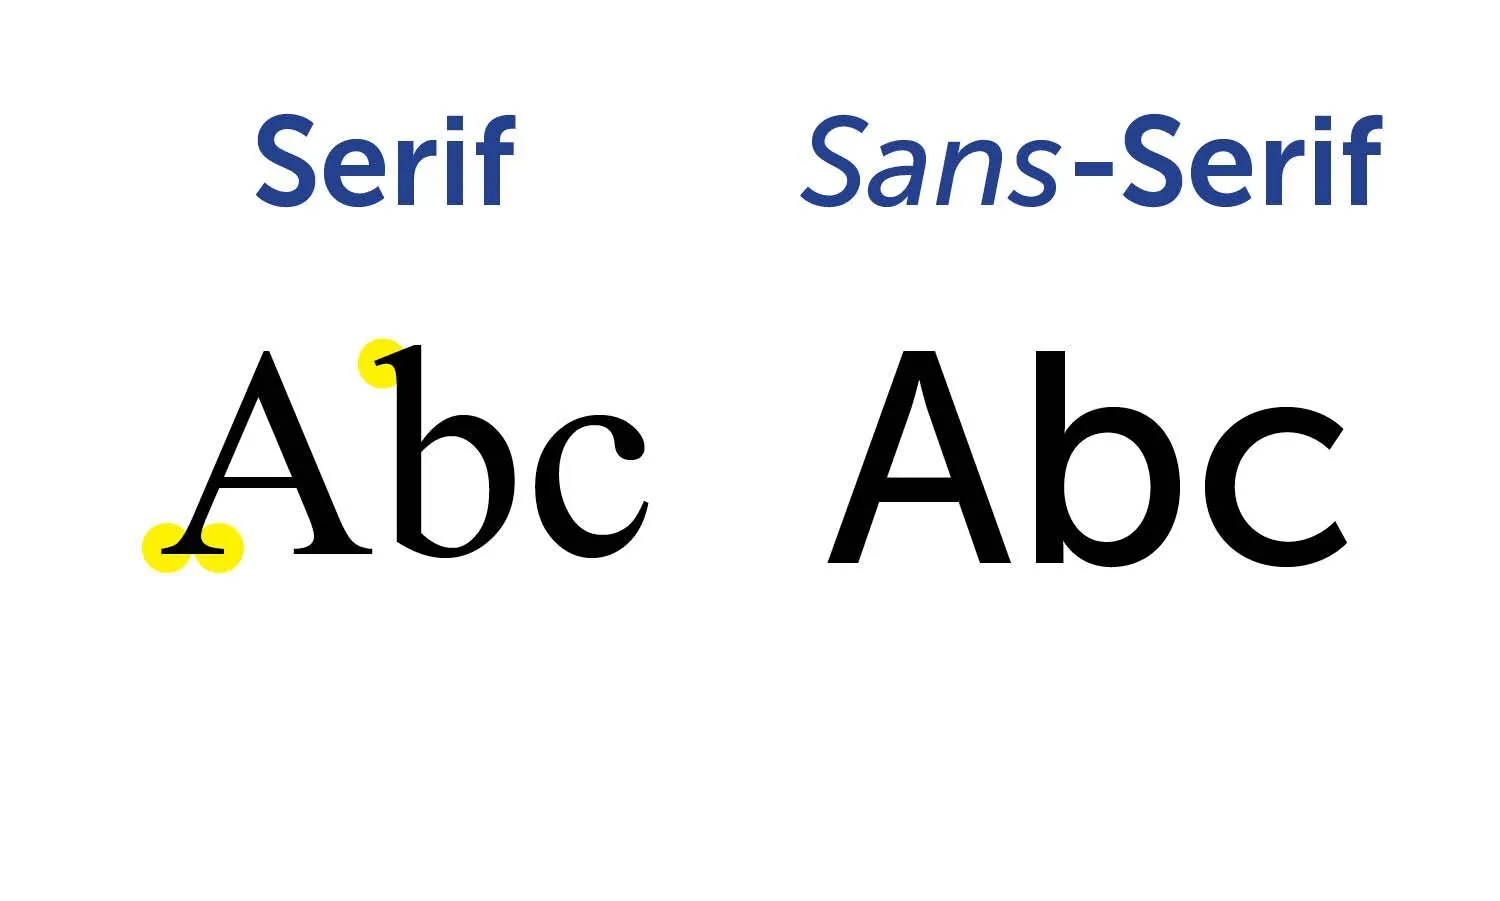
When picking a logo font, you must decide between serif and sans-serif. Serif and sans-serif fonts play a crucial part in developing a logo’s identity and business. The fonts you choose for your logo will define its formality or informality. Almost every premium brand or international company utilizes serif fonts in its logo.
Casual brands employ sans-serif fonts. Follow this trend when picking a Photoshop font for creative design or creating a logo to keep it consistent with your company identity and appeal to your target audience.
When selecting a font for a logo, one of the first considerations you must make is whether to choose a serif font or a sans-serif font. While there are many other types of fonts used in logo design, serif, and sans-serif will always play the most significant role in distinguishing the brand and business behind a logo.
The sort of font you use for your logo will influence whether your brand is official or informal. Almost all premium apparel brands and global corporations employ serif fonts in their logo designs. While more informal and personable companies choose sans-serif fonts.
You must follow this trend when selecting a font for your logo to maintain brand consistency and make it more appealing to your target audience.
Flix is a powerful display font with an elegantly rounded character design that gives it its distinct individuality. It is available in both normal and outline fonts. This font is ideal for producing logos for a wide variety of companies, including startups, design agencies, and more, due to its creative and informal lettering.
For creating a logo that stands on its own without the aid of symbols or emblems, this type of font is the ideal choice. Additionally, the font may be used in a variety of branding and stationery projects.
Randrake is a trendy logo font with an elegant script style. This font is perfect for a logo design for luxury, fashion, and garment firms. This font’s distinctive character style makes it suitable for both digital and print applications. This is one of the best fonts for creative designers and creative logos.
Do you want a font style that looks futuristic, sci-fi, broad, and bold? Try using the Brolink font type instead of anything else. It is a striking choice that comes with a beautiful lowercase that can be effortlessly combined with the uppercase in a variety of ways without negatively impacting the font’s legibility. In all honesty, among the very best fonts for use in the design of logos!
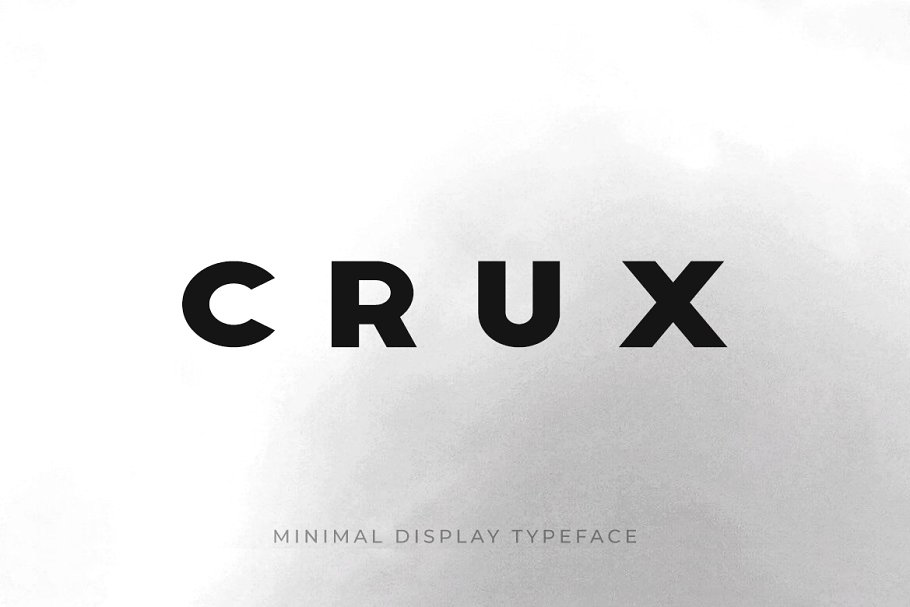
The next font on our list is a modern one called Crux. This design is great for headlines, minimalist logotypes, and other display uses. It comes in two different designs, which are Normal and Outline, and it can truly get the attention of your customers. Get a hold of it as soon as possible!
Exodus is a sumptuous serif font that comes with an extensive assortment of one-of-a-kind alternate characters, making it the ideal choice for nearly every display purpose imaginable.
The designer has a great deal of leeway and influence over the creative process when it comes to the creation of the logo fonts free download. A benchmark of excellence among the very best fonts for use in logos.
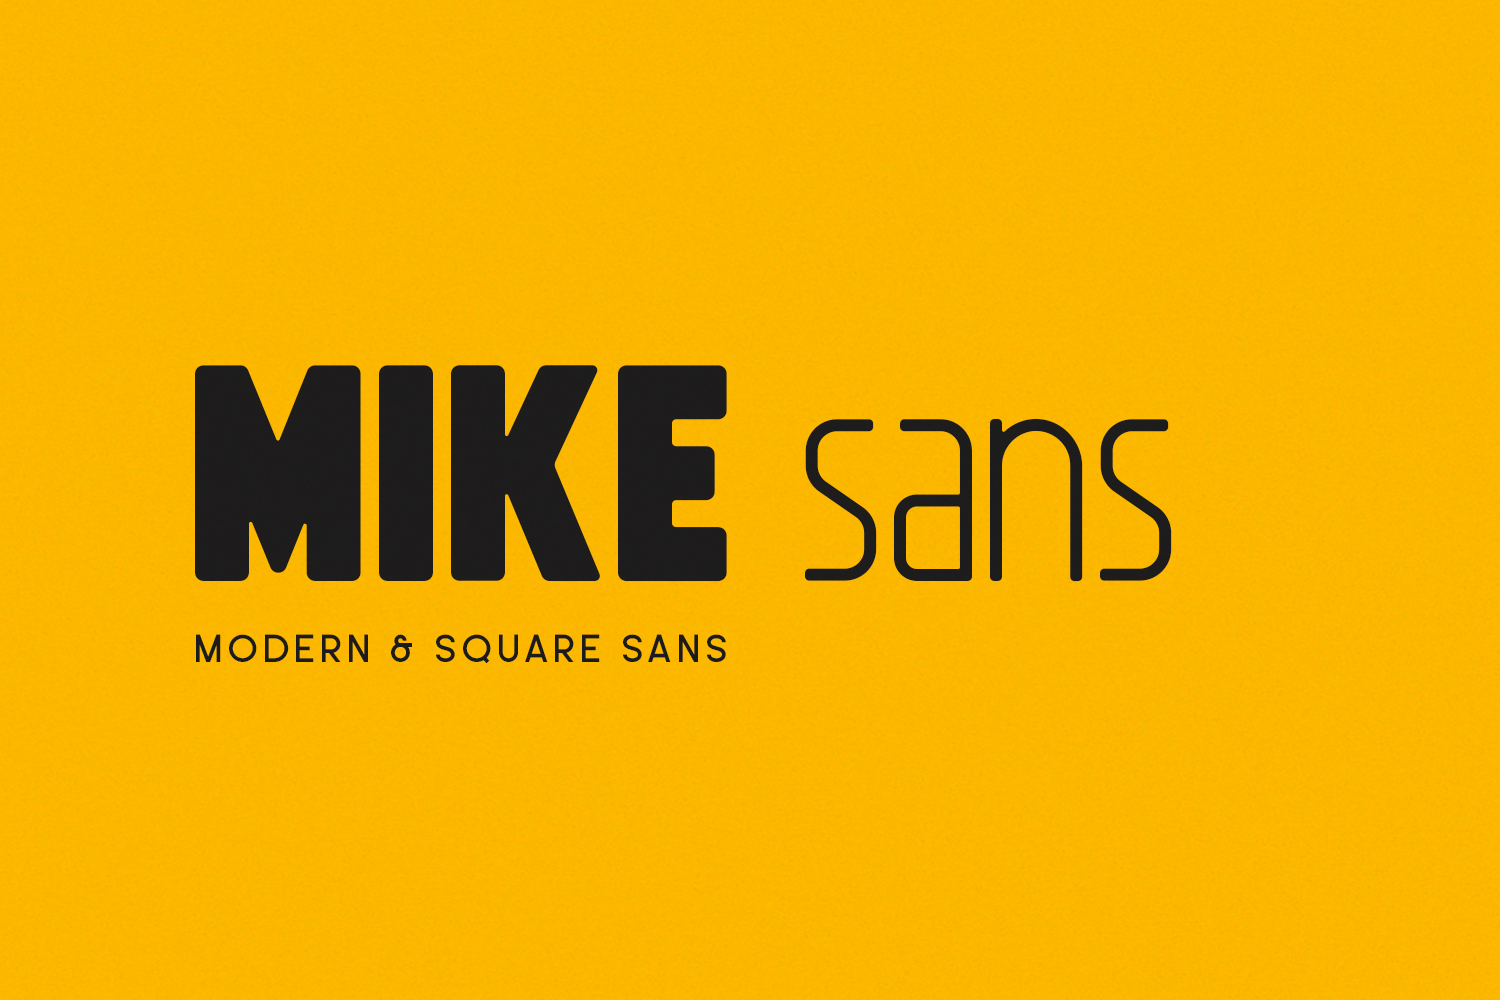
The characters in the strong sans-serif font known as Mike Sans are designed to have a square outline with corners that are rounded off ever so slightly. There are eight distinct weights of the typeface, ranging from thin up to exceptionally bold and hefty.
This font is ideal for you to use if you are in the process of designing a logo for a contemporary company, startup, or small business and are seeking a basic font with an exquisite style. It supports both capital and lowercase letters, in addition to several different languages.
10. Southern Script
Download Southern Script Font
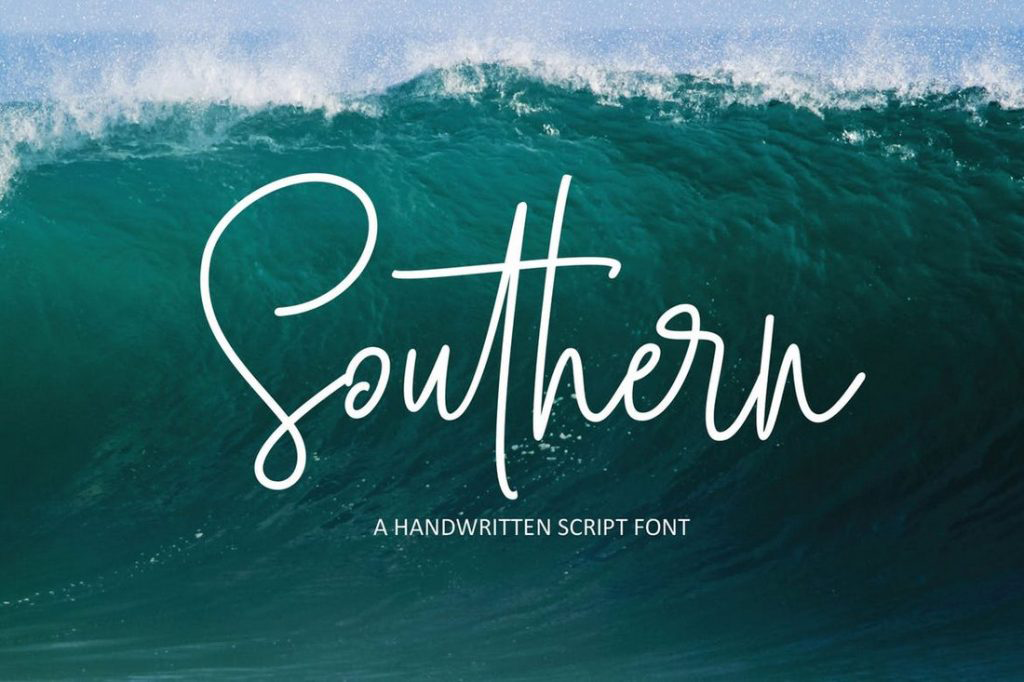
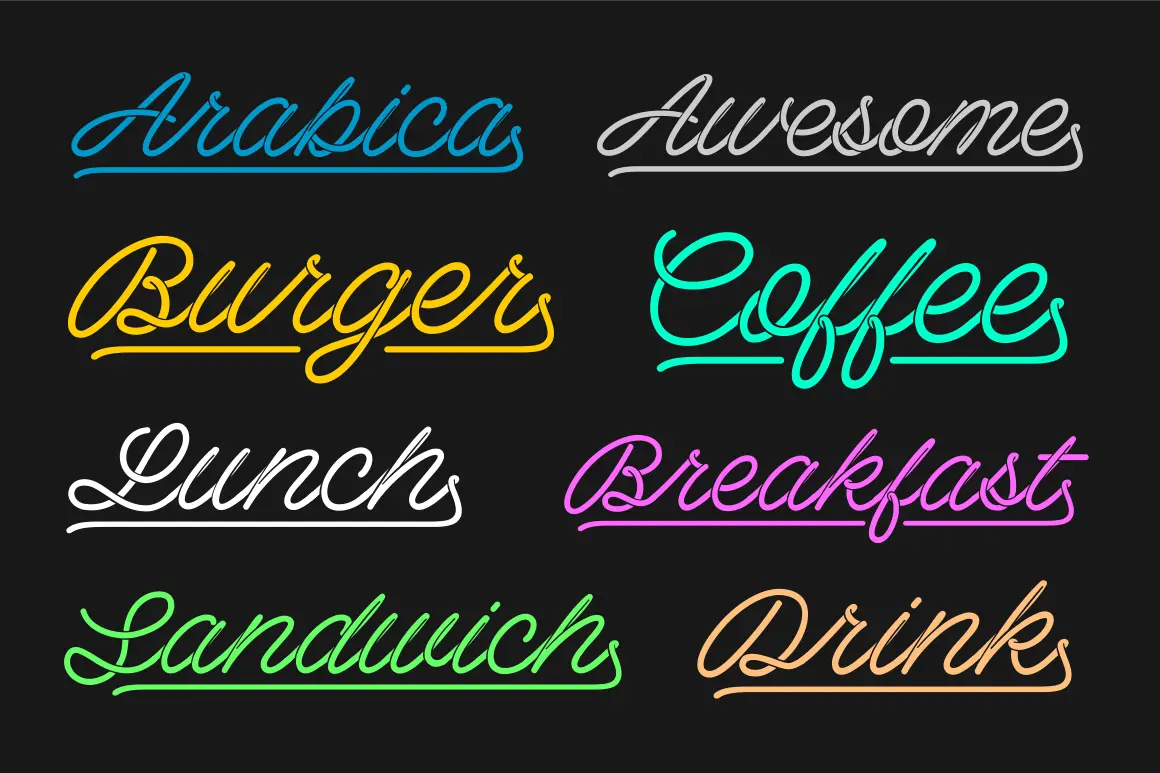
The script font is known as Southern has a distinctively handwritten look to it. Because of its one-of-a-kind, flowing form, the font is an excellent option for the development of signature-style logos for fashion and clothing firms.
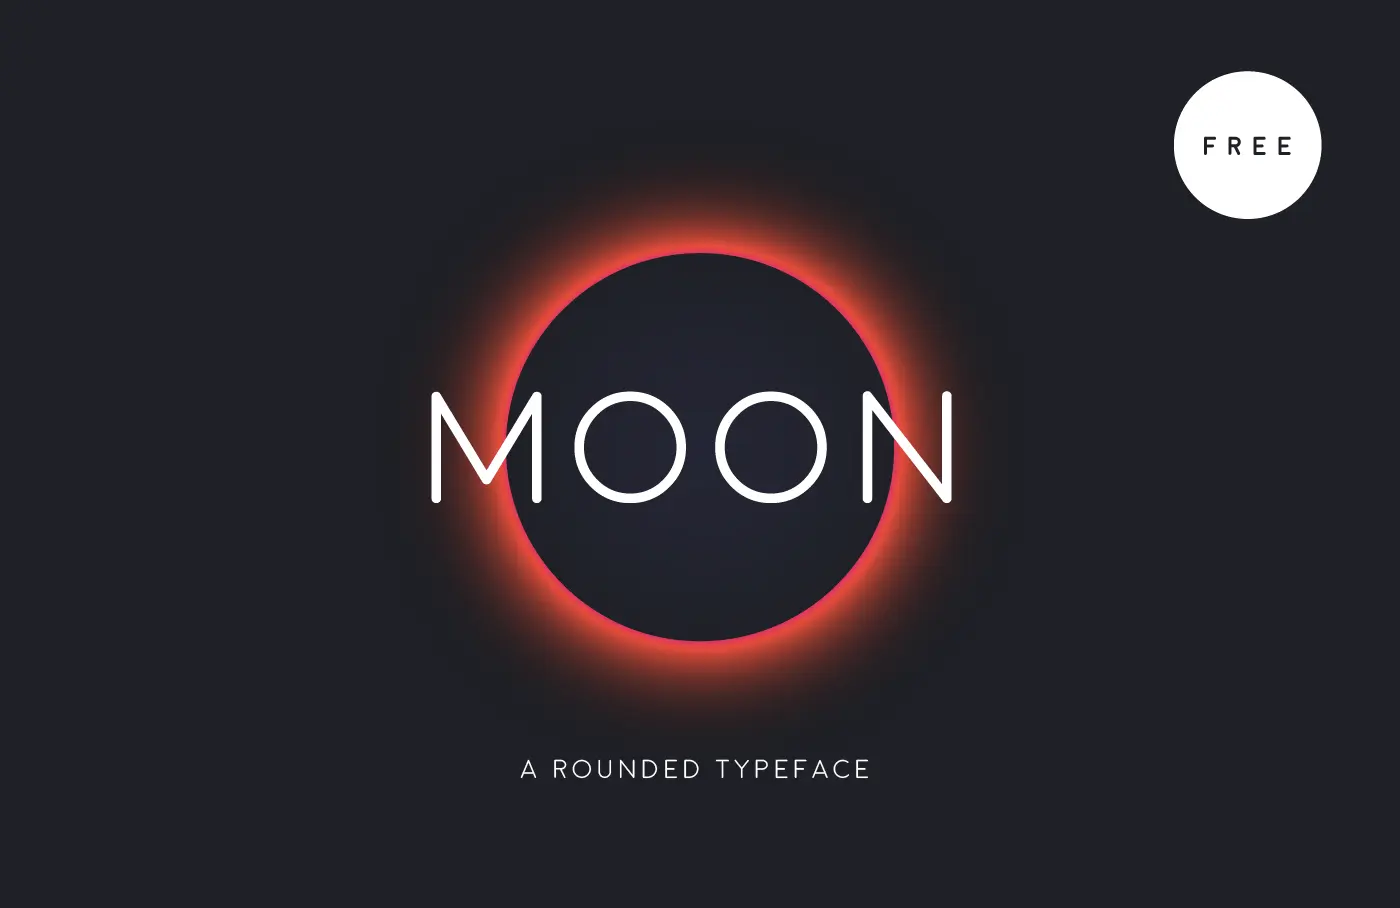
Moon is a free font that comes with an elegantly contemporary character design that features rounded edges. This font is ideal for use in the development of personal and innovative brand identities, such as logos.
It comes with three different weights, ranging from mild to normal to bold. Your projects are eligible for the usage of the font’s free version, which you can get here.
This font, even though it is offered without charge, has an original appearance that sets it apart from the majority of the other fonts on our list. Another advantage of utilizing this font is the availability of three distinct styles from which to select.
For anybody interested in acquiring the very best fonts for use in logos, Noir is a wonderful choice to consider. It has a contemporary style with all capital letters that work well for logotypes, headlines, and a variety of other applications involving brand identity.
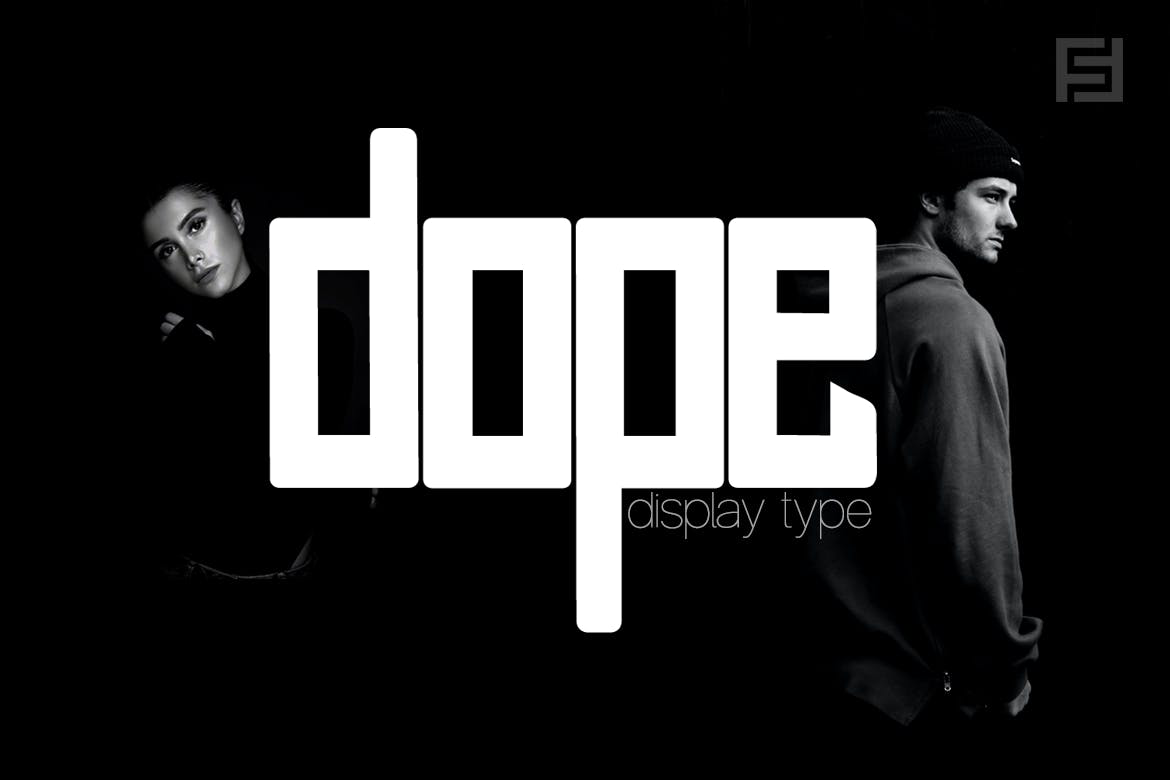
Dope is a font that deserves serious consideration for purchase since it is ideal for use in the creation of logos, monograms, posters, and headlines. You will be able to get the most out of your purchase thanks to the fact that it comes complete with three weights, italic counterparts, and expanded Latin character sets.
Cloudy Aurora is a wonderful product that includes two fonts: one is a modern serif, while the other is a handwritten script. Cloudy Aurora may be purchased here. It is one of our most preferred one of the most modern logo fonts on our list because it comes pre-packaged with six different logos that we can use right away. Examine it at this very moment.
The font known as Saudagar exudes sophistication and style, yet it exudes an individuality that is all it is own. It includes a complete collection of uppercase and lowercase letters, numerals, and alternates, and it is an excellent option for any company that wants to establish an elegant and sophisticated logo design.
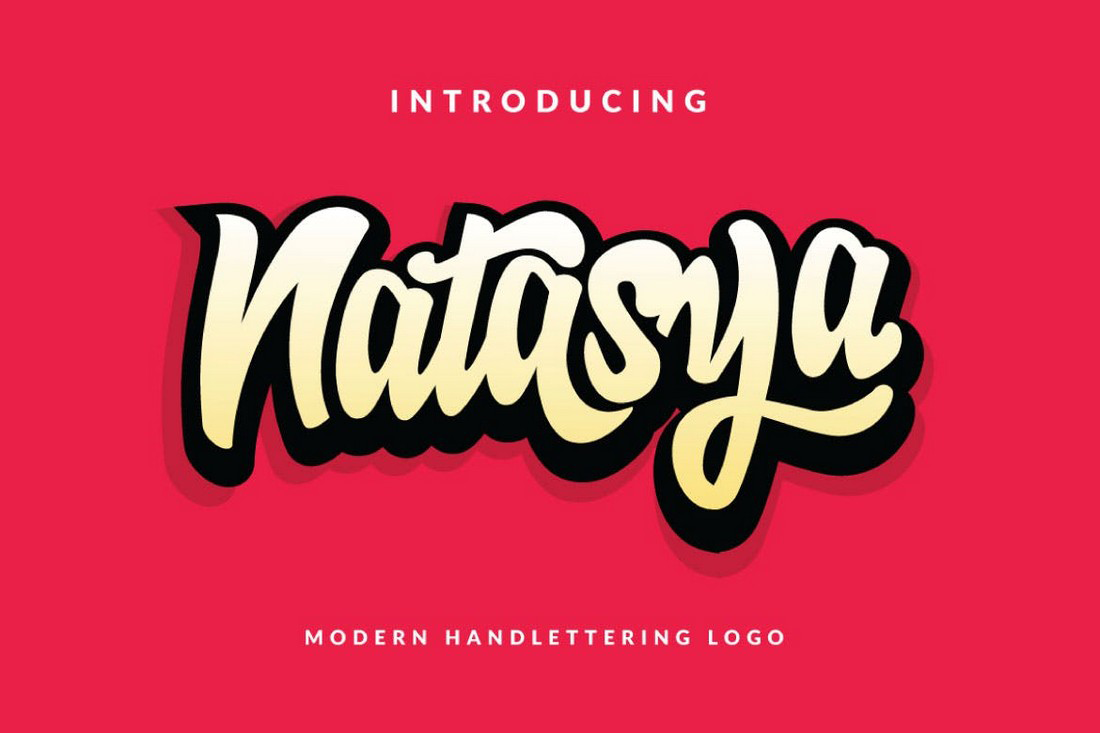
16. Natasya is a Sophisticated Font for Logotypes
This unique hand-lettering logo font features a look that is highly on-trend and contemporary and is reminiscent in some ways of graffiti fonts. It works well for developing logos for trendy and contemporary businesses and corporations. The font has a total of 400 glyphs and a large number of alternative characters.
17. Free Script Font Known as Mango Is Used as Logo Fonts
Mango is the next font on our list, and it is a geometric, future-based lowercase font. It features an original cast of characters as well as some outstandingly clean and sharp letterforms. It is difficult to avoid using this font when designing a logo because it is one of the best available.
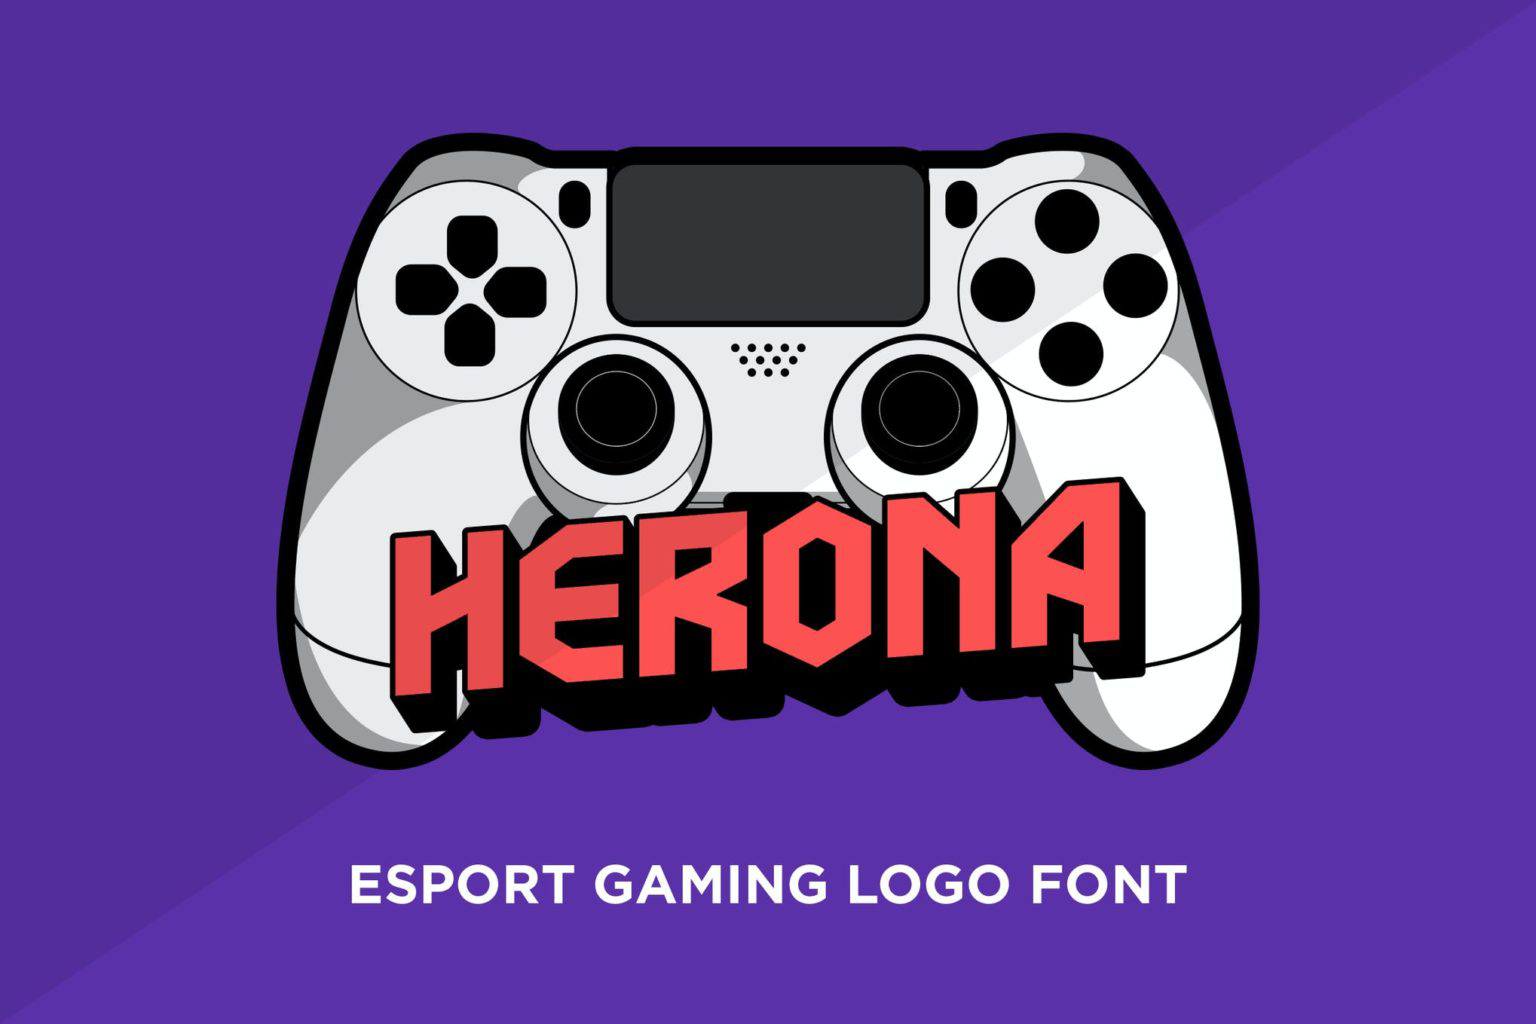
Herona is a logo font that comes with a design that is based on classic video games. Because of this, it is an excellent option for use in the creation of logos for eSports teams, YouTube channels, and Twitch broadcasters.
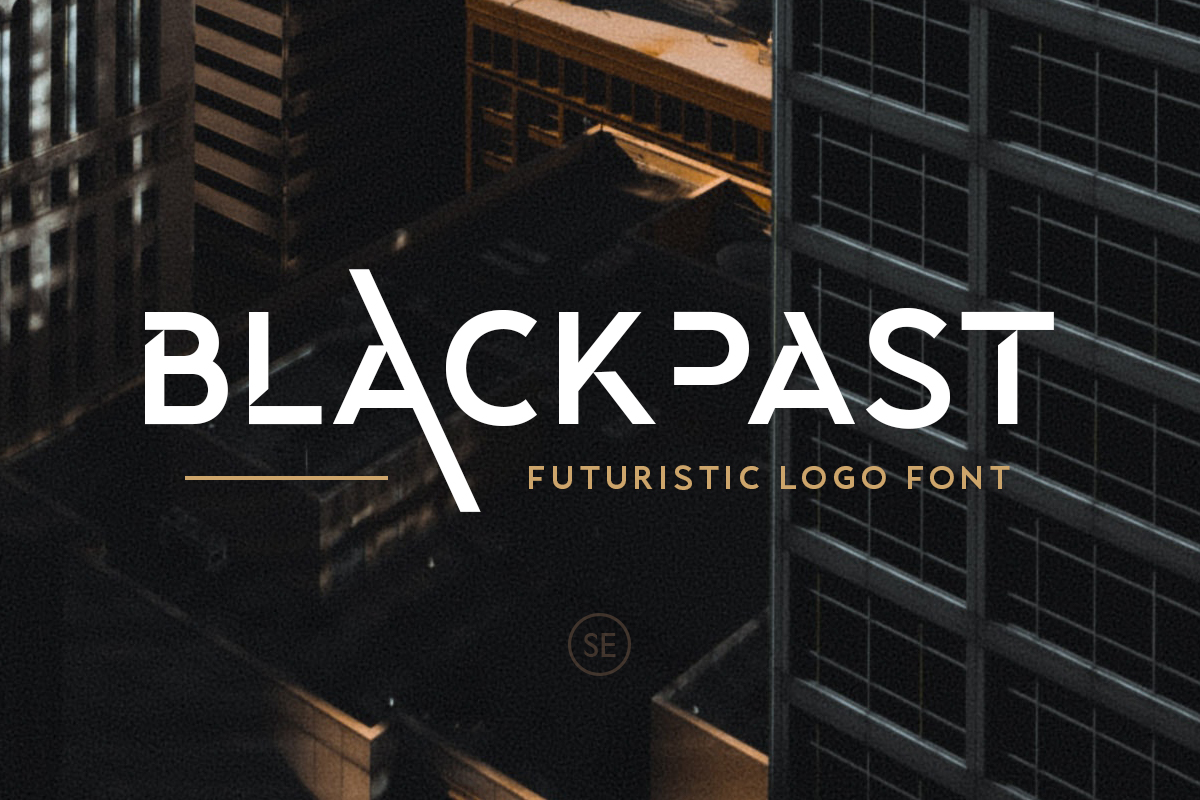
19. Blackpast is a Font for Creating Futuristic Logos
Blackpast is a distinctive logo font boasting a futuristic look. This font was developed with contemporary companies and start-ups in mind from the ground up. It consists of a series of letters that each have a peculiar appearance. Consider the letter P as an illustration in this regard.
This imaginative font works wonderfully for producing logos for companies that focus on the natural world or the environment. It possesses an elegant letter design together with one-of-a-kind glyphs and special characters, which makes it possible for you to develop a logo for your company or group that is both elegant and pertinent.
You can use the gorgeous and unique font known as Fresh Guava to design logos for businesses and brands that are known for their creativity and originality, just as the name indicates. It appears to be particularly more appropriate for logo ideas relating to food and drink.
What Do You Need To Know About Good Logo Fonts?
Branding your business requires you to carefully select fonts for your logo. These main takeaways in mind as you design your logo.
Conclusion | Logo Fonts for a Simple and Elegant Logo Design
You should rely on straightforward and geometric sans-serif fonts, such as the selection that is presented above, to create logos and brand identities that have an appearance that is clean and uncluttered.
Many sans-serif fonts have been thoughtfully produced, but I’m hoping that this best-selling collection can spark some ideas for you while you work on the process of creating a logo. Which simple and clean typeface do you choose to use most often when designing logos? Share your thoughts with us in the section below!
FAQs | Logo Fonts
Which fonts have geometric shapes and are clean?
RNS Miles and Visby CF is a beautiful clean font that was inspired by geometric shapes that are shockingly angular. It can undoubtedly assist you with your designs and is a terrific source of inspiration.
How can I create a minimalistic logo?
Brooklyn is an excellent choice when designing more understated and simple logos because of its subtlety.
Which logo fonts are great for professionals?
For professionals seeking a more polished appearance, fonts such as TT Commons, Visby CF, and Frank are a few examples of crisp and bold options.