Table of Contents
Pokemon is a popular game. It is one of the most played games in the world. The effects of this game have been driven us crazy. What if you can create these effects by yourself? Here we will learn about the Pokemon text effect in Photoshop.
Writing a text in Photoshop is easy. However, creating text effects requires unlocking the artistic mode. In this regard, you must know the basics of art effects to get your desired design. So, how favorite electric Pokemon attack? Well, look no further!
Here we will start from the basics. Then we will move to the advanced text effects. So, don’t worry if you are a newbie in Photoshop. Let’s harness the power of Photoshop to create stunning Pokemon text effects.
Steps for Creating Pokemon Text Effect in Photoshop
Here you will get step-by-step guidance for creating Pokemon text effects in Photoshop. Strict to basics and follow the guidance to get your desired text effect.
Step 1: Setting Up the Document
We will start with creating a new document for this text effect. Those who have already used Photohahop may know how to create a document in Photoshop. But it’s important to create documents with appropriate dimensions. It is necessary to get the desired resolution.
So, launch Photoshop on your computer. Then go to File > New or try the keyboard shortcut Ctrl + N for Windows and Command + N for Mac. Here you will get the option to choose the dimensions. I choose the default one for this tutorial.
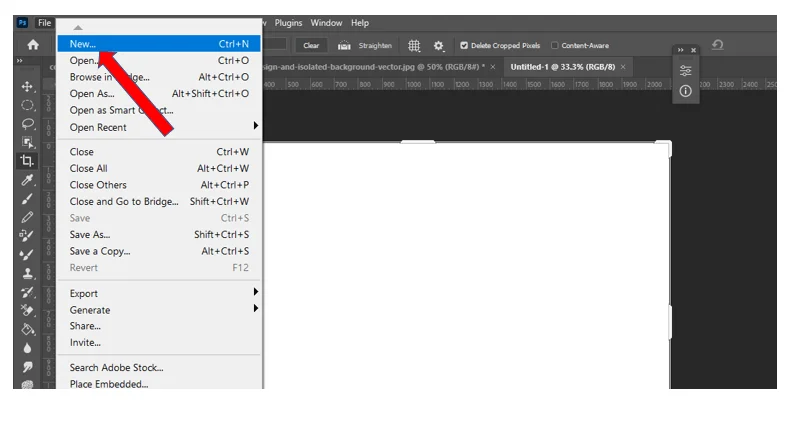
However, if you’re creating a Pokemon text effect for social media, you should choose a dimension that is suitable for Facebook, Instagram, or Twitter. Then set the resolution. I am going for the 72-pixel as it is standard for digital designs. You can aim for higher resolution for high-quality output.
Now set the color mode to RGB if it is set to CMYK. You can use a background color or leave as it transparent. Finally, give your document a name and save it by going to File>Save as.
Step 2: Downloading and installing Pokemon Font
You have to download the Pokemon font and install it on your computer. Search on Google to get the websites for downloading this font.
Then open the downloaded zip file. Most of the websites provide two types of Pokemon font files. For this tutorial, we will use the Pokemon Solid. Click on the font file. It will open in Notepad. You will get the install button on the top. Click on this button to install the file.
Step 3: Adding Text
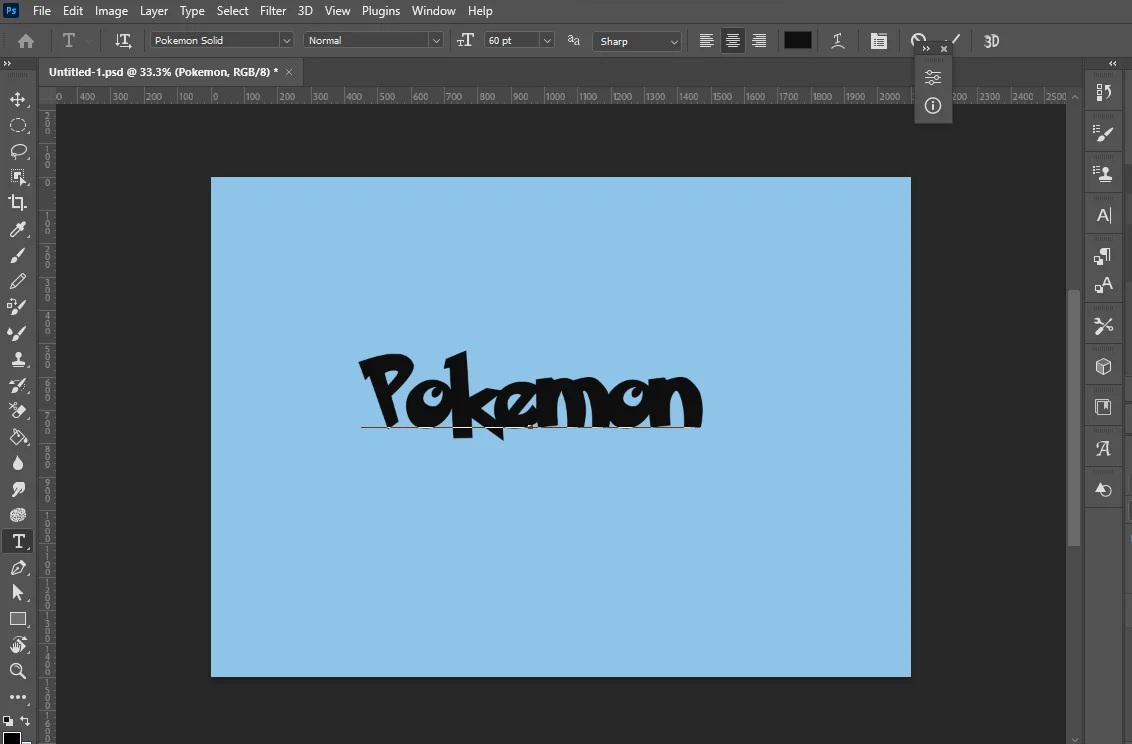
Now we are going to add text to this newly created Photoshop document. To write any text on the document select the text tool from the Photoshop toolbar. You will get the tool in the Photoshop toolbar. The capital letter “T” in the toolbar is the Text Tool. Click on it or type T from the keyboard to select it.
After selecting the tool, you will get some options for the text effects in the options bar. Here you can choose your font, font size, and other text properties. We will start with selecting the font size to 60 pt. Keep the text style Regular and select the font type “Pokemon Solid”.
Now click on the canvas to add text. Click anywhere in the document. We can change the text position later if it is necessary. Now you can resize or change the position of the text using the Move tool. You will get this tool in the toolbar (the arrow sign).
Again if you want to add different effects on different parts of the text consider duplicating the text layer. Thus you can work on each layer. Finally merging the layers will create a Mesmerizing effect.
Step 4: Applying Layer Styles
You have added your text, now it is time to apply some layer styles. The layer styles in Photoshop allow you to add different effects to your text. Thus the overall look of the text will be enhanced.
Here are the three popular layer styles we need to add to our Pokemon text effect in Photoshop:
01. Stroke Effect
The Pokemon text effect has a stroke in it. Select the text layer to apply the stroke effect in the Layers panel. With the text layer selected, go to the bottom of the Layers panel and click on the “fx” icon.
From the dropdown menu, choose “Stroke.” Also, you can double-click on the layer to get the layer-style dialogue box.
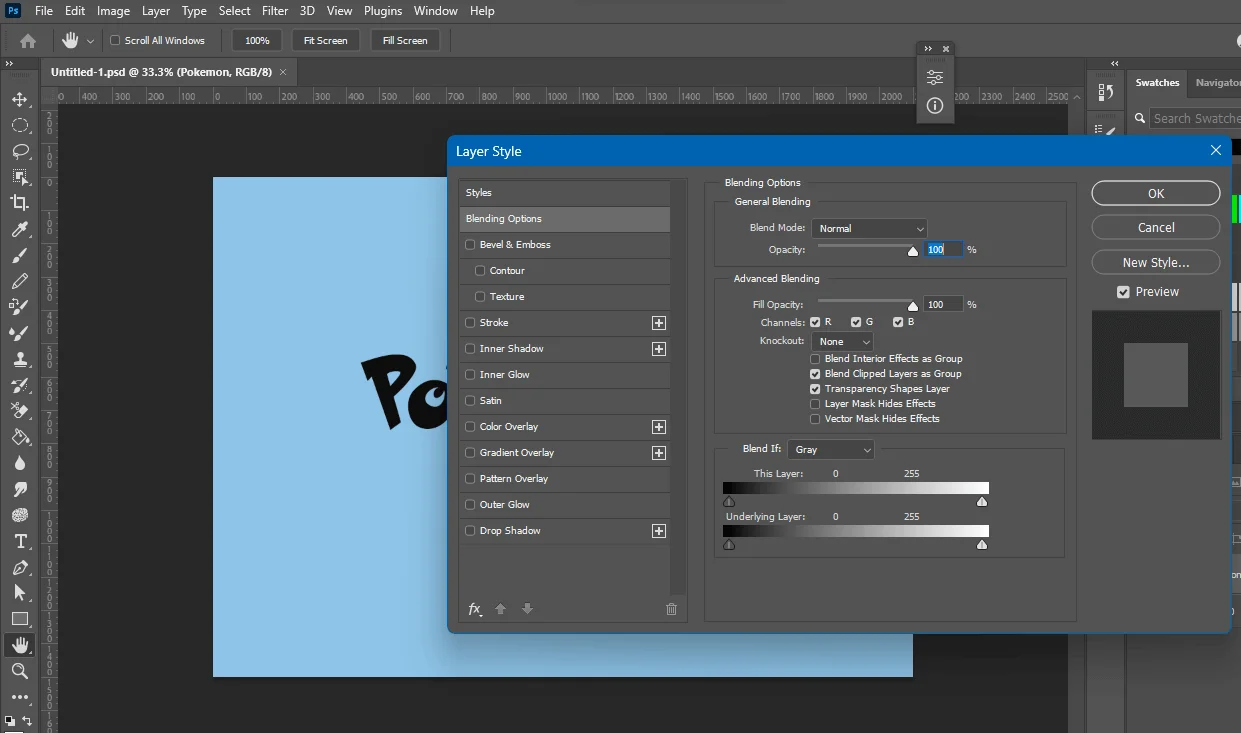
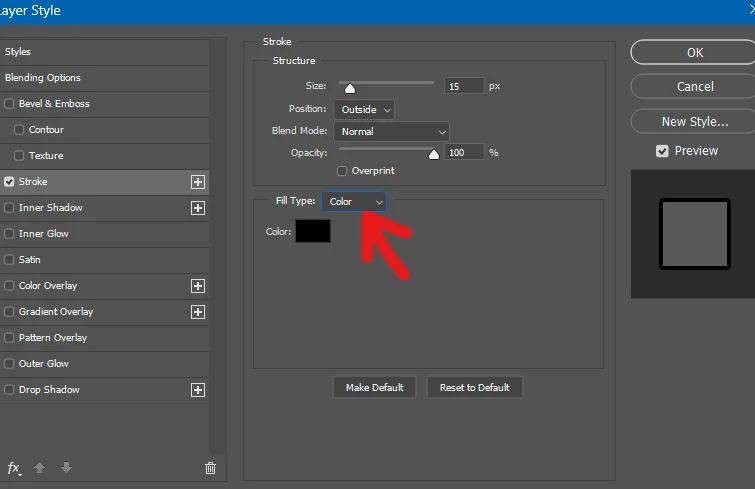
Now, you can customize the stroke options to your preference from the appeared box. We will start by adjusting the thickness of the stroke. We will increase the stroke by 15 px by moving the slider.
You can choose the position of the stroke. You can apply the stroke inside, outside, or centered on the edge of the text. We choose outside for this tutorial. The blend mode will be normal and the opacity will be 100%.
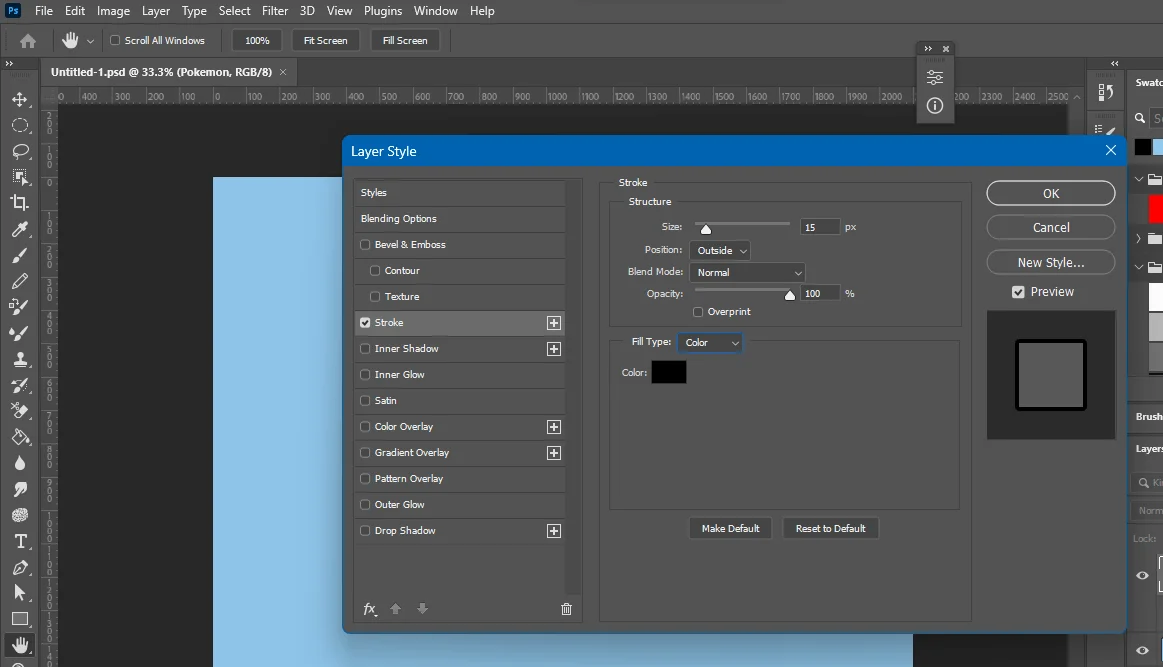
Then click on the fill type drop-down and select Gradient from the dropdown menu.
Here style will be normal and the angle at 90 degrees. Then set the scale at 100%. Then click on the gradient option. We have used #263159 for the first point. For the second point, we have set the color to #20659E and for the last point, we again set the color to #263159.
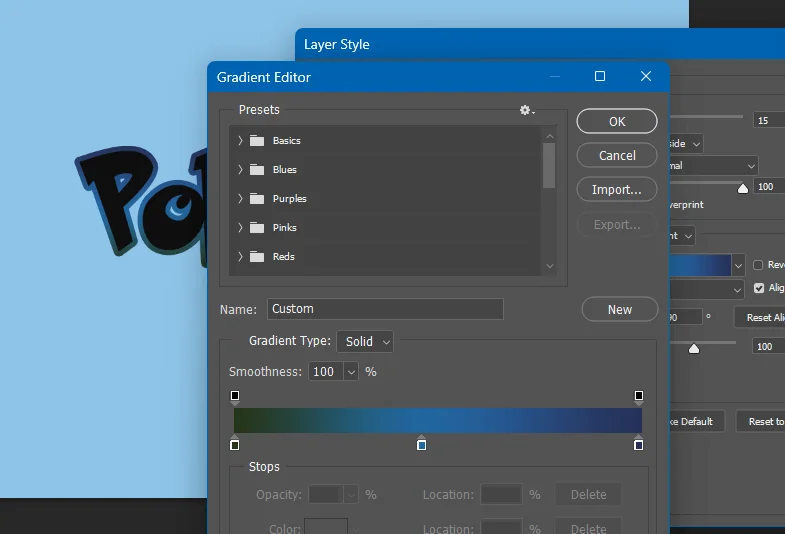
Once you’re satisfied with the stroke settings, click “OK” to apply the effect.
Then create a duplicate layer of the text layer. Use the keyboard shortcut ctrl+j to create the duplicate layer. Name it the “color layer”.
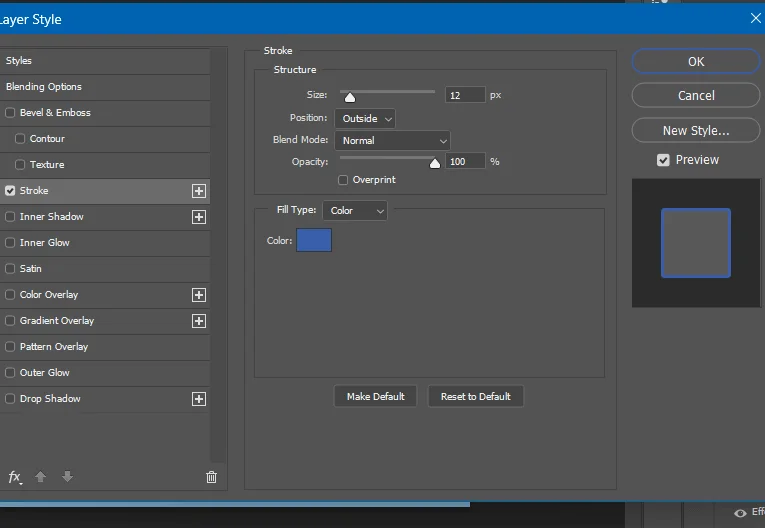
Then got to the layer style by double-clicking on the duplicated layer. Click on stroke again, with the outside stroke selected set the stroke size to 38 px. Now fill type will be color and set to #395faa. Hit ok to move to the next step.
02. Gradient Overlay
Now it is time to apply the gradient overlay. In the layer style dialogue box, you will also get the Gradient Overlay option. Click on it to make adjustments. You can customize the gradient overlay options like blend mode, opacity, gradient, angle, scale, and style.
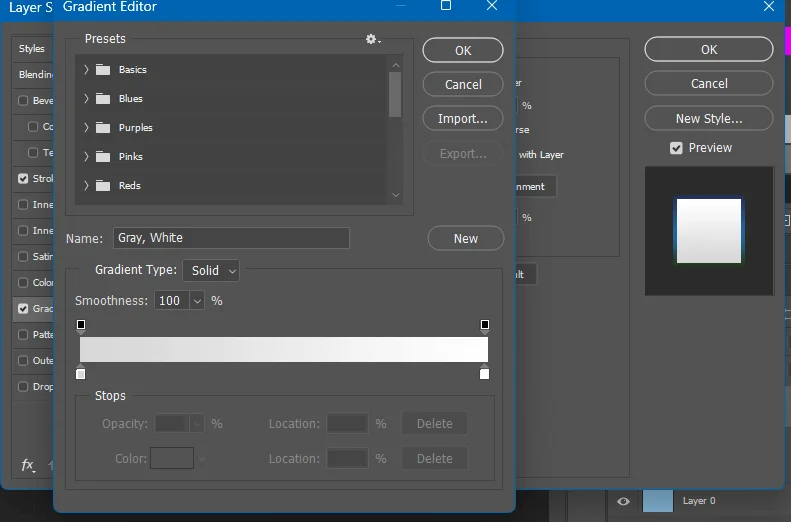
We are going to use #996868 for the first point, and #caeb11 for the second point.
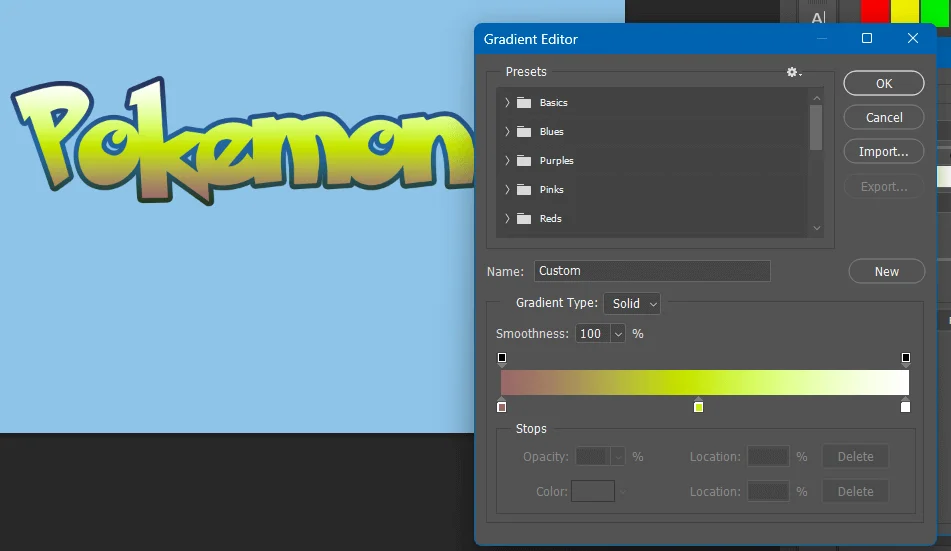
Instead, we can use the color overlay. Let’s see how to use the color overlay option to get the yellow color.
03. Color Overlay
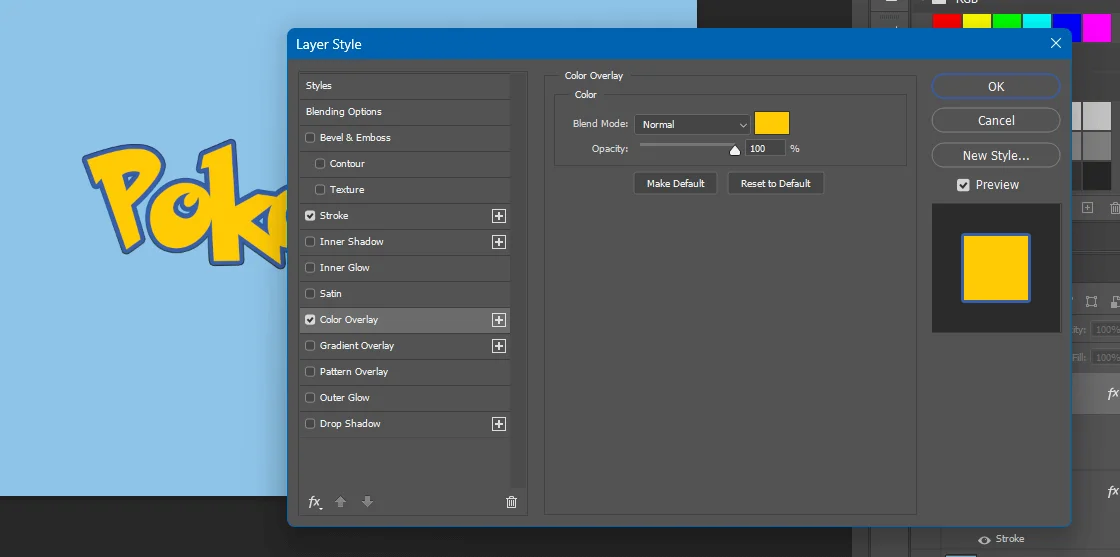
Again go to the layer-style dialogue box. This time select the Color Overlay option. Set the blend mode to Normal and Opacity to 100%.
Then click on the color box to set the color. We have used #ffcb05 for the Pokemon text effect. Once you’ve set the color overlay to your liking, click “OK” to apply the effect.
Adding Inner Shadows
It is time to add inner shadows. Shadows add depth to a picture. The Pokemon text effect has an inner shadow in it. Go to the layers style by double-clicking on the “color layer”. Now go to the Inner Shadow option from the layer style.
In the Layer Style dialog box, you will get some options to adjust the shadow. Experiment with the blend mode to see how the shadow blends with the underlying layers. Then play with the Color slider. Also experiment with opacity, angle, distance, spread, and size.

Here we are going to set the blend mode to normal. Then click on the color box and set the color to #c7a008. Opacity has been set to 100%. Now uncheck the “Use Global Light” and set the angle to 27. For this Pokemon effect, we have set the distance to 7, the choke to 100, and the size to 2.
Once you’ve configured the drop shadow settings, click “OK” to apply the effect. However, never forget that experiment is the key to creating authentic art. Play with different settings and combinations to achieve the desired look for your design.
Adding Pokemon Elements

Now we have created the Pokemon text effect. We can use the Pokemon images or sprites to make our image look more crispy.
So, find high-quality Pokemon images or sprites by searching them on Google. You can download the official artwork, fan art, or sprites from the Pokemon games.
- Open the downloaded image in Photoshop by navigating File > Open.
- Then use the move tool to place the Pokemon element onto your text. You can use the Move Tool (shortcut: V).
- Now you have to position the Pokemon to the right place. Think about aesthetics when you place the element.
- Use the transform tool to resize and rotate the Pokemon as needed. To get the transform tool use the keyboard shortcut Ctrl + T on Windows or Command + T.
- Use different Pokemon elements around the text. Use these elements strategically so that the overall composition gets a spicy look.
- Use the arrow keys from your keyboard to position the elements precisely.
- Then you can experiment with the layer blending modes. Thus you can create a comprehensive design where the text and Pokemon elements complement each other.
Downloading Pokemon Mockup Templates Free
Here we have another way to create outstanding designs in Photoshop using Pokemon text effects. You can download free Pokemon text PSD templates and use them to create your desired designs.
Here is a list of three websites using which you download the Pokemon mockup templates:
01. PS Files

The PS files is a popular website for downloading the PSD files. You can download free Photoshop mockup templates from this website. Then open the downloaded template in Photoshop and edit it according to your requirements.
02. Freepik
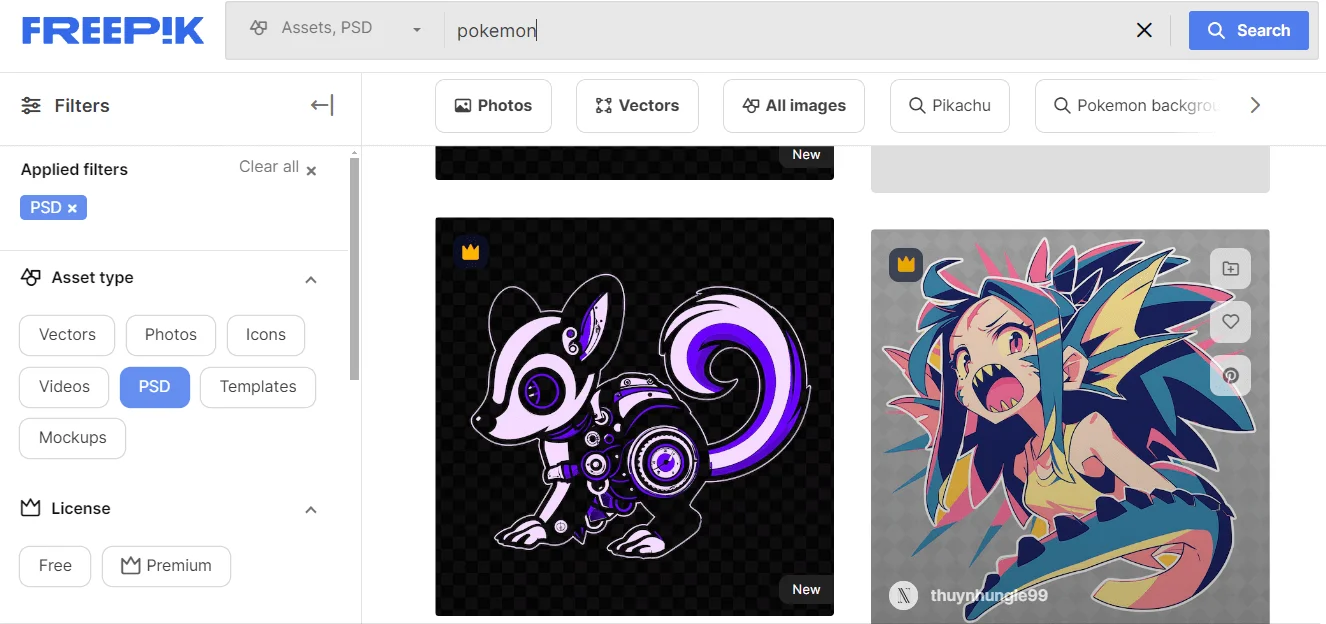
Freepik is a reliable and free photo-downloading platform. Freepik offers 100+ high-quality free Pokemon mockup templates.
Here you will also get different Pokemon cards including birthday cards. These are high-quality Pokemon templates that you can edit according to your requirements. So, download Pokemon text effects in Photoshop for free.
03. 365 Web Resources

The 365 Web Resources also allows downloading free PSD templates for Photos. This platform has a vast library. So you will get a lot of relevant PSD files to edit in Photoshop to create unique designs.
FAQ | Pokemon Text Effects in Photoshop
How to Make Text Effects in Photoshop?
Though this article is about the Pokemon text effect, you can create different text styles following the same technique. So, download different fonts and edit them in Photoshop to create your unique design.
Who is the Affordable Text Effect Service Provider?
The Graphics Cycle is the best text effect service provider. They offer high-quality services at affordable prices. Also, they offer other high-quality image editing services. So, you will get all the services under the same roof.
Can I Sell Pokemon Text Effects?
Yes, you can sell the Photoshop text effects. There are a lot of websites that allow you to showcase your designs and let the purchasers buy them. The Pokemon text effect is so famous. Yet most of the purchasers like to get the PSD file rather than the photo.
Don’t Miss Out
- Lilac Color’s Best Uses for Design in 2024
- Pixieset Review 2024 | Is It Best Software for Photographers
- Pumpkin Drawing in Photoshop Step-by-Step Guide
- How to Use Liquify Photoshop Filter Tool
Final Thoughts | Pokemon Text Effects in Photoshop
Creating an eye-catching design depends on several aspects. It depends on how you plan your workflow and your dedication to executing that plan. Here I tried to give an insight into Photoshop text effects.
Using this idea you can create stunning Pokemon text effects in Photoshop. However, experiment is the key to creating authentic designs. So, do not only be strict with the provided methods in this tutorial. Try different combinations to create your effect.
However, if you need photos at a bulk number, you should hire an expert photo editor. The Photo editing agencies like Clipping World and Graphics Cycle can be a help in this regard. They are the leading image editing service provider in the market.
The 200+ professionals of this agency are ready to provide the required photos within the deadline. Additionally, they have the best pricing policy in the market. So, consult with them today to get your required photos.


