




How to Turn a Photo into a Line Drawing Online for Free
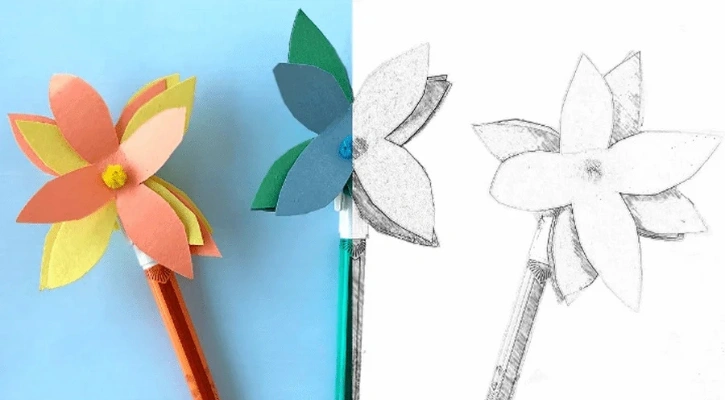
Drawing a sketch or a line drawing is an art that requires good skills and a lot of practice. Now, you can turn a picture into a line drawing or sketch with a few clicks using your Photoshop photo editing software. Here we will discuss the procedures and steps on “How to Turn Photo into Line Drawing Online Free”.
There are some aspects that you have to keep in mind. It will be better if the background of the picture is plain. Turning a complex background into a sketch will need more effort and skills.
You have to be conscious about the subject. It will be better if you pick one subject or a separate individual subject in the picture with a plain background.
What Is Line Drawing?
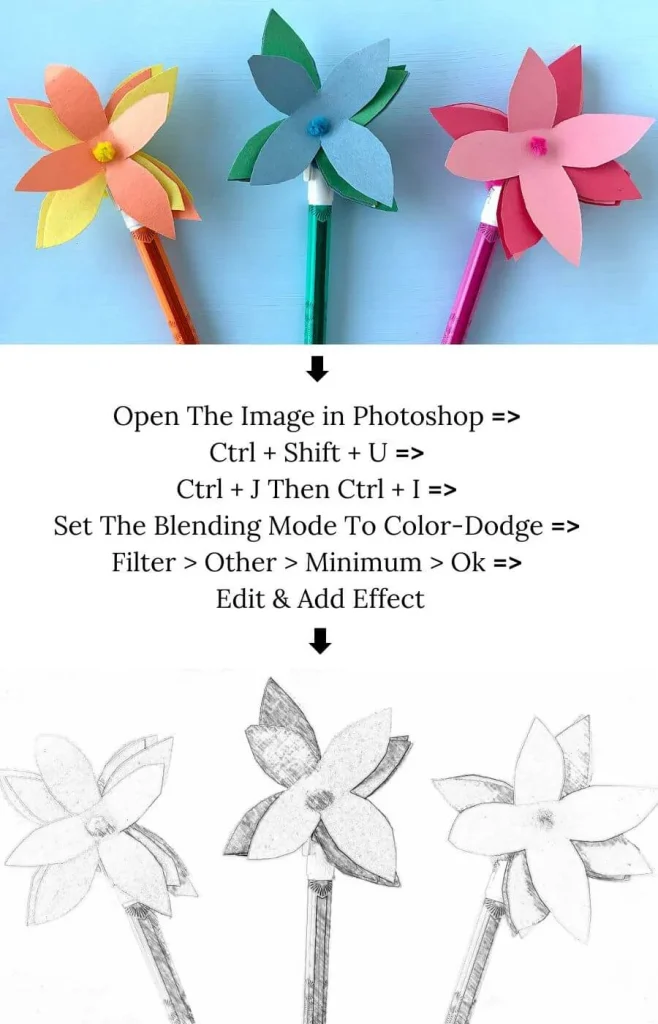
A line drawing image is created using only lines. It portrays objects in black-and-white form. The lines can be straight, curved, or any other form. There will be no shading or color variations. The line drawing completely relies on lines’ placement and thickness.
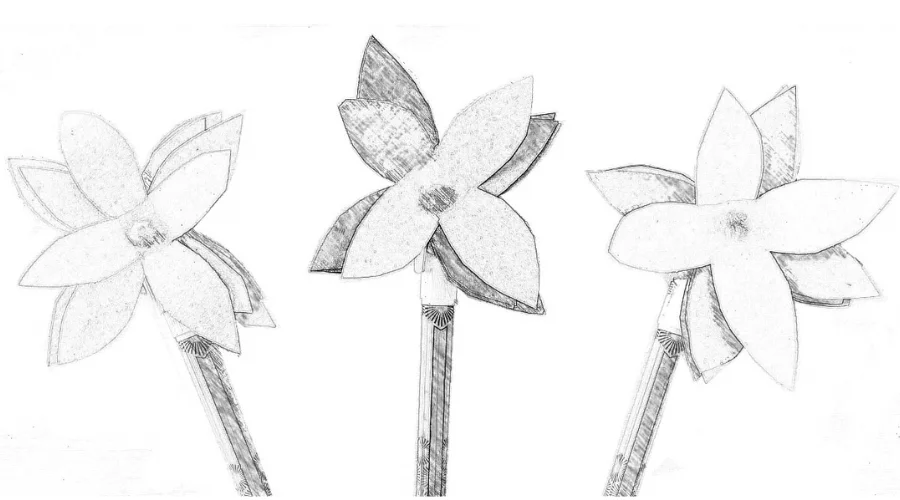
However, these are the traditional methods of line drawing. Now you do not need a pen and ink or pencils to draw. You can do it digitally using different programs.
Importance of Line Drawings in Digital Art
Line drawings are the initiation of any art. They serve as the foundation on which the artist works to create the final art form. Artists often start with a sketch composed of lines to outline shapes.
Again, lines provide clarity and precision. Using lines, you can define the edges of objects. This is useful in creating readable images. That’s why line drawings are frequently used in illustrations, animations, or design work.
Using line art, you can convey complex ideas with minimal detail. Thus, you can create form and expression. You can easily modify and adjust the lines using the digital toolkit.
How to Turn a Photo into a Line Drawing | Easy Steps
Let’s start the tutorial with some simple steps.
Step 1: Open Your Photo in Photoshop
Select the photo, Right-click on your image, and select ‘Open with Photoshop’. Or Right-click on the image, then go to ‘Open With’ and select ‘Photoshop’.
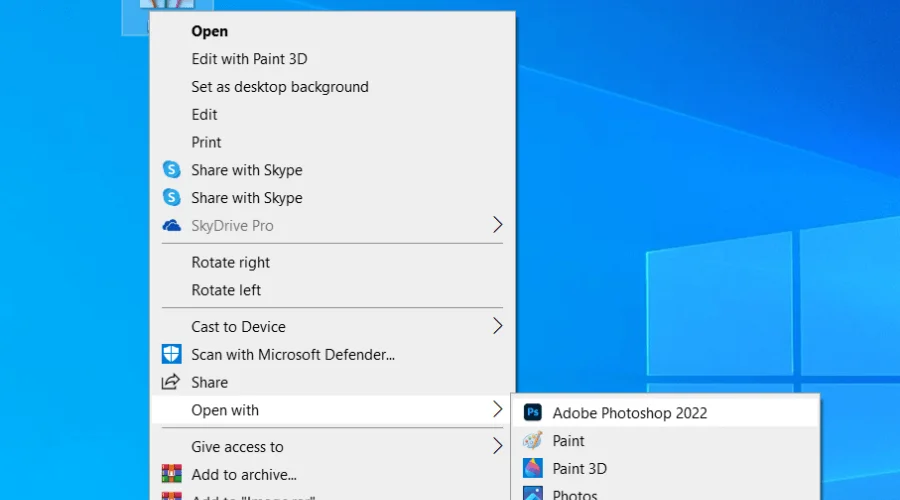
In Short,
Right-Click > Open With > ‘Photoshop’
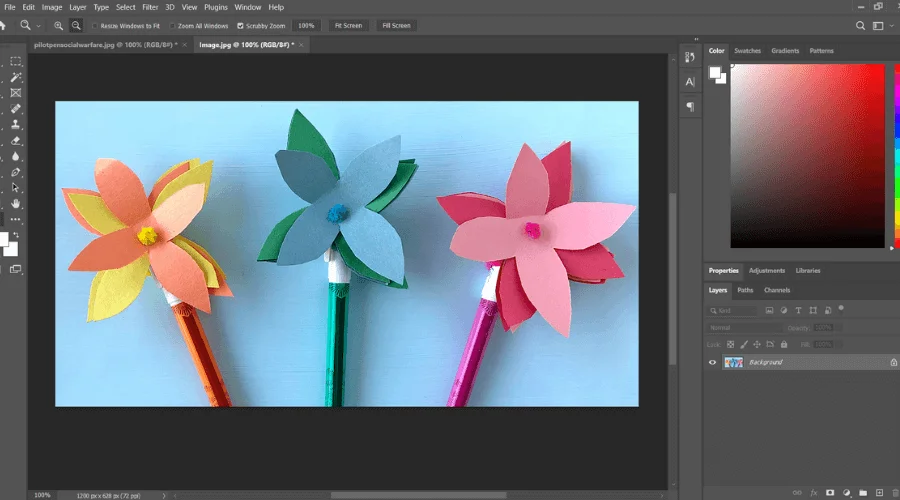
Step 2: Resize The Image (Optional)
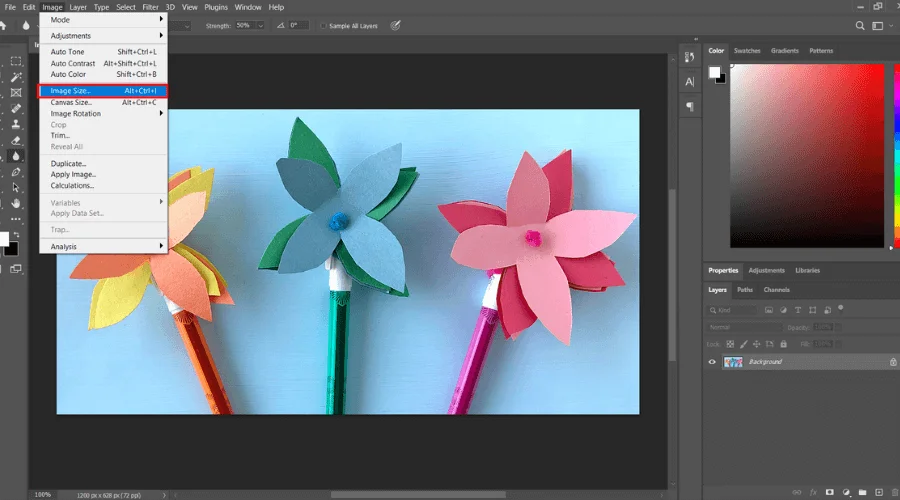
If you need a particular size of sketch. Or a different-sized sketch, you have to resize the image that you open in Photoshop. Go to ‘Image’ from the menu at the top. Select ‘Image size’ in the dropdown menu. A dialog box will open: ‘Image size’.
You can resize in various scales: inches, centimeters, and pixels. To maintain the proportions of images, make sure Constrain Proportions is checked.
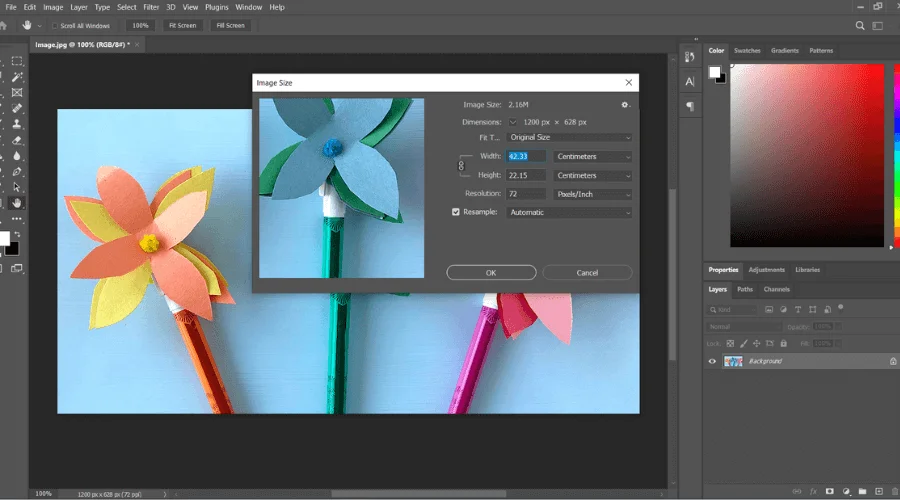
In Short,
Image > Image Size + Constrain Proportions Checked
Shortcut
Alt + Crtl + I (Win) or Option + Common + I (Mac)
Step 3: Unlock The Layer & Make A Duplicate Layer
If your image is locked, a small lock icon at the right of the image layer will show. Click on the lock icon to unlock the image layer of the adjustment feature.
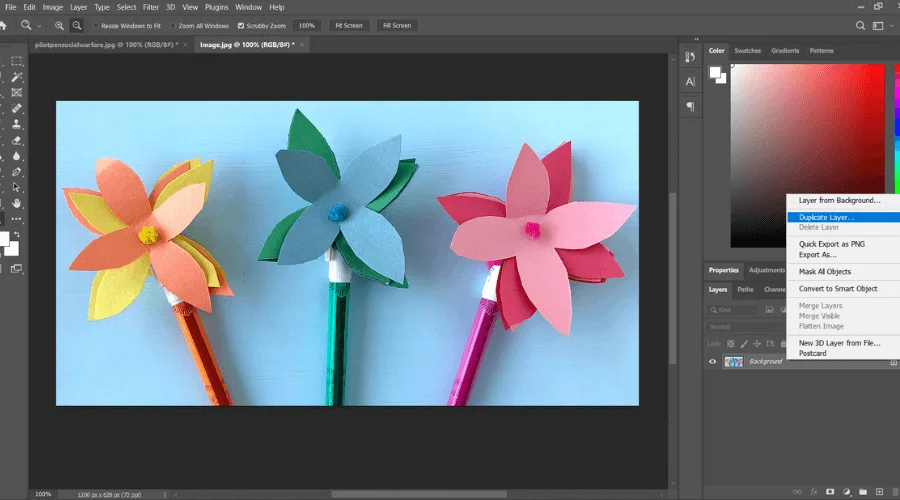
To make a duplicate layer, simply press Ctrl + J . Or right-click on the layer in the Layers panel. A dialog box menu will appear; then click on the duplicate layer. Now rename the duplicate layer as you want.
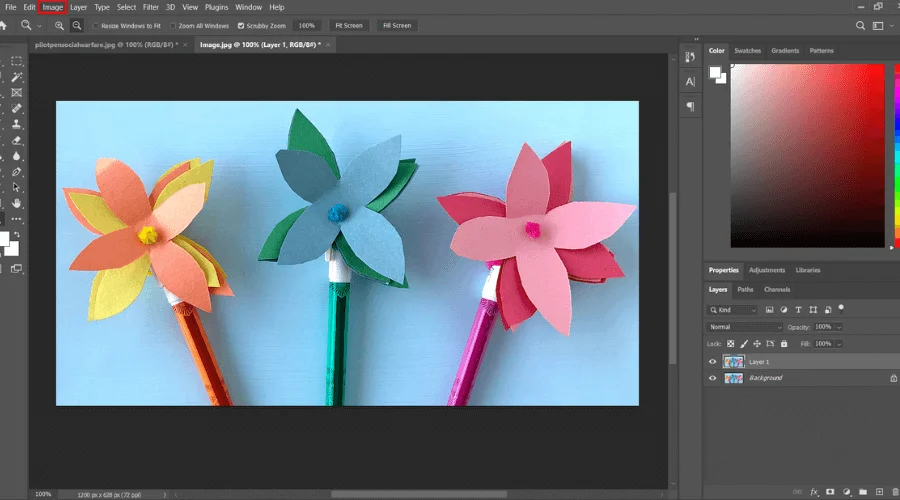
In this example, we are naming this layer as ‘layer 1’.
In Short,
Layers Panel > Select and Right-Click on the Layer > Duplicate Layer
Shortcut
Crtl + j (Win) or Command + j (Mac)
Step 4: Adjust The Contrast
If your subject is similar to the background color, then you have to adjust the contrast of the image. Adjusting the contrast will increase the visibility of the edges of the subject.
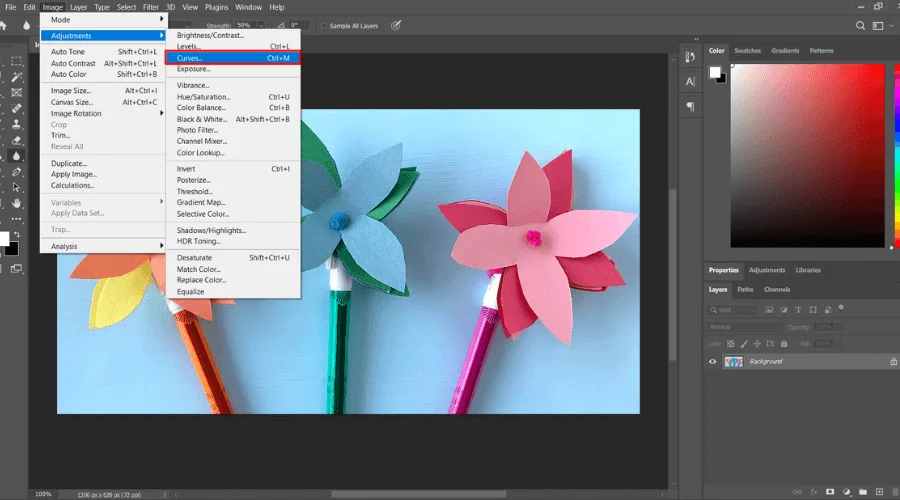
Now go to the ‘Image’ in the main menu. Select ‘Adjustments’ from the dropdown menu. A sub-dropdown menu will appear to select curves.
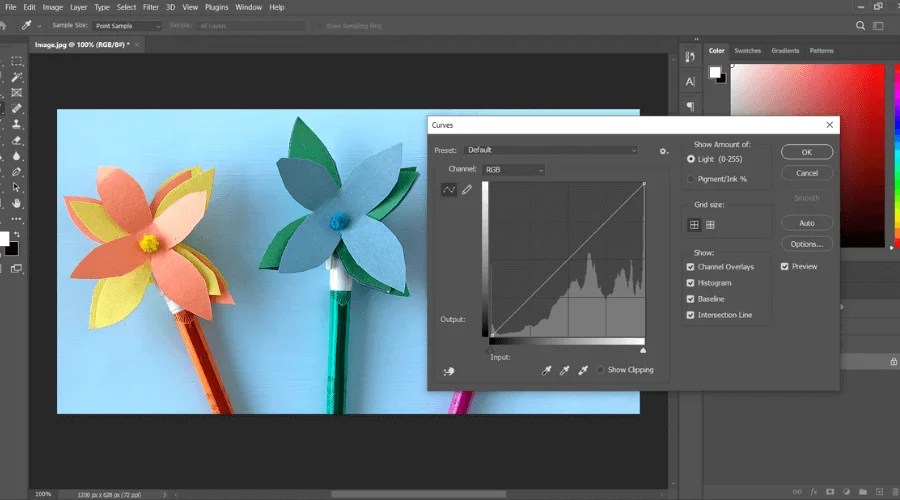
A dialog box with a contrast graph will appear. Click on the pointer and drag it downward. The black area will become darker. Adjust the pointer as your image is required to visualize the edges of the subjects.
Make sure the ‘Preview check’ box is checked to see the on-time preview.
In Short,
Image > Adjustments > Curves + Preview
Step 5: Make Grayscale of The Image
To make a grayscale of your image, select the ‘sketch_layer ’. Go to the ‘Image’ in the main menu again. Select ‘Adjustments’ for the dropdown menu, and from the 2nd dropdown menu select ‘Desaturate’.
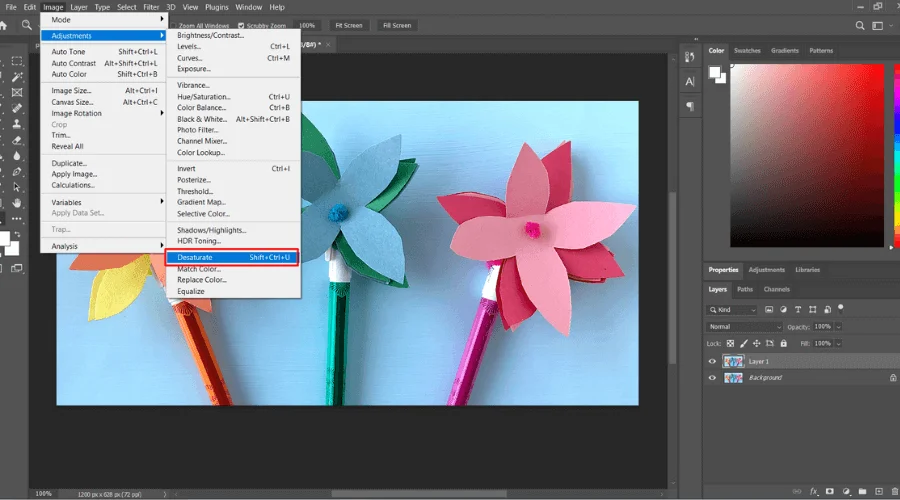
It will make your selected layer a desaturated layer.
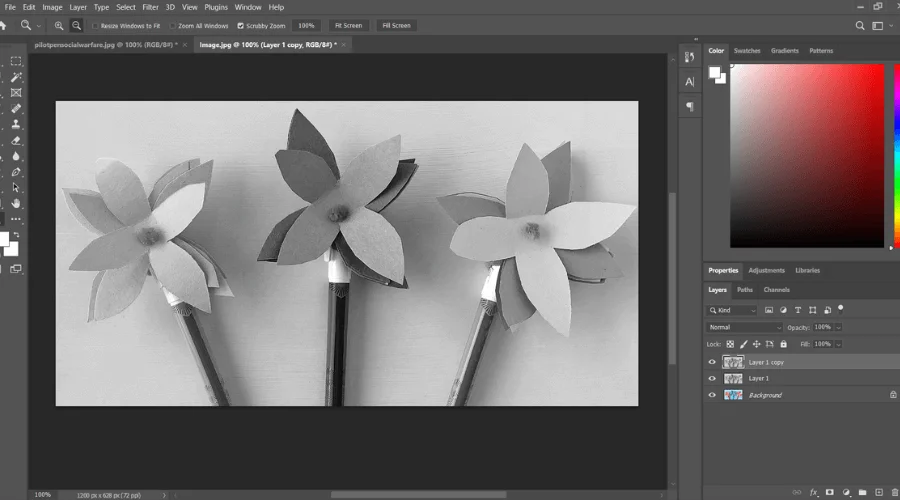
In Short,
Image > Adjustments > Desaturete
Shortcut
Shift + Ctrl + U (win) or Shift + Command + U (Mac)
Step 6: Invert the Image
Once again, you have to duplicate your desaturated layer. This is named ‘Layer 1 copy’ in this case. Now select the new layer, go to the ‘Image’ select ‘Adjustments’ from the dropdown menu. From the second Dropdown menu, click on ‘Invert ’
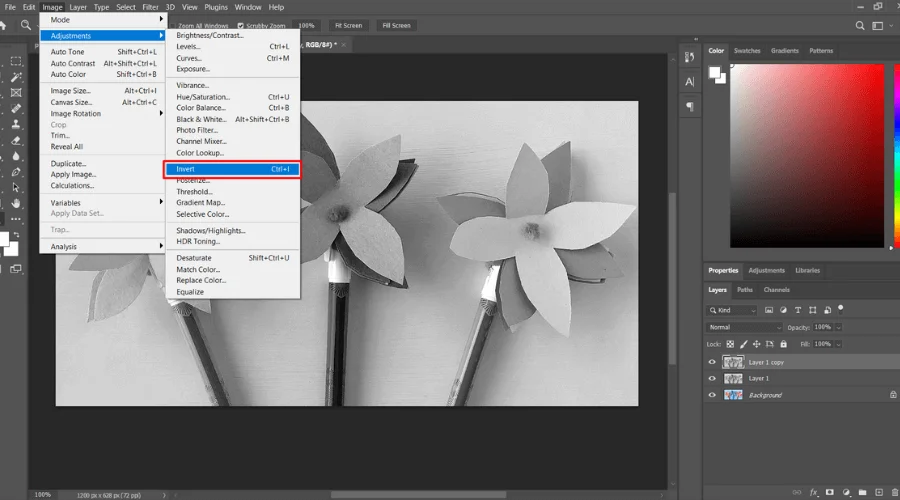
In Short,
Image > Adjustments > Invert
Shortcut
Ctrl + I
Step 7: Filter Image
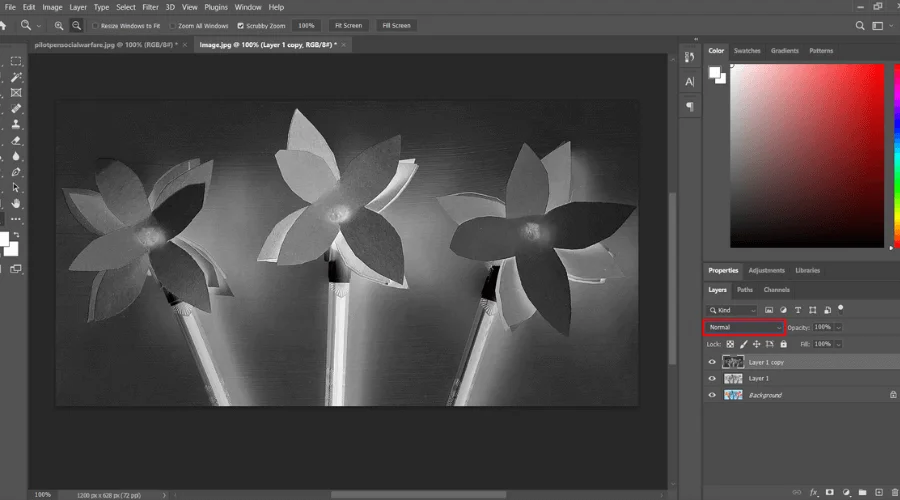
In the Layers Dialog box, there is a blending mode selection option. It is ‘Normal’ by default. Click on the Normal dialog box menu and select ‘Color Dodge’. It will make the image white it is all good.
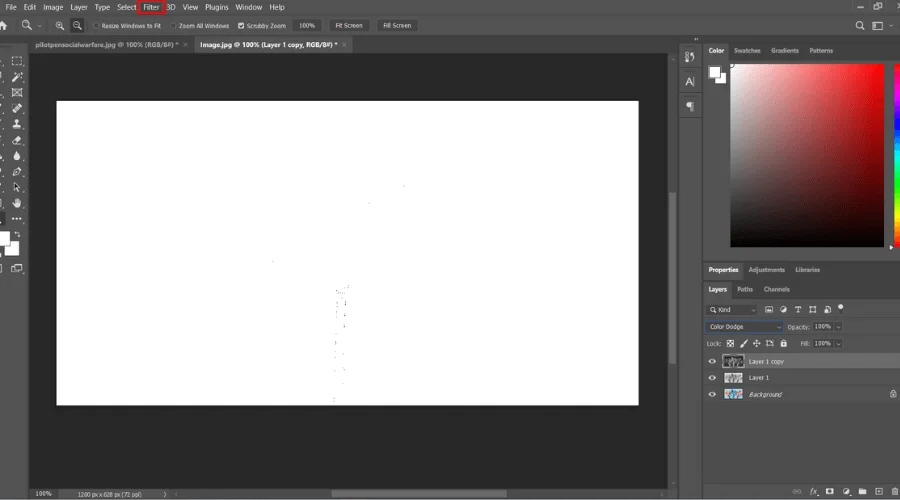
Now go to ‘Filter’ in the main menu, and select ‘Other ’. A 2nd dropdown menu will appear; select ‘Minimum’. A dialog box will appear; we have nothing to do here. Just click on the ‘OK’ button.
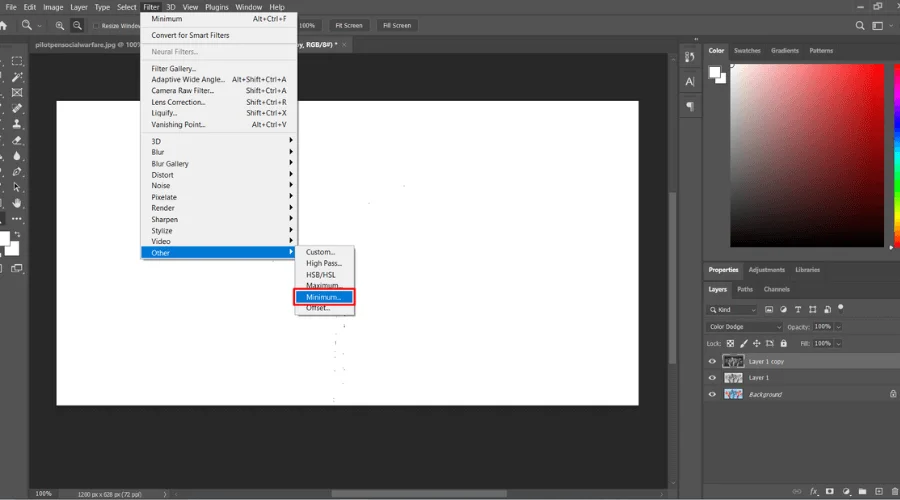
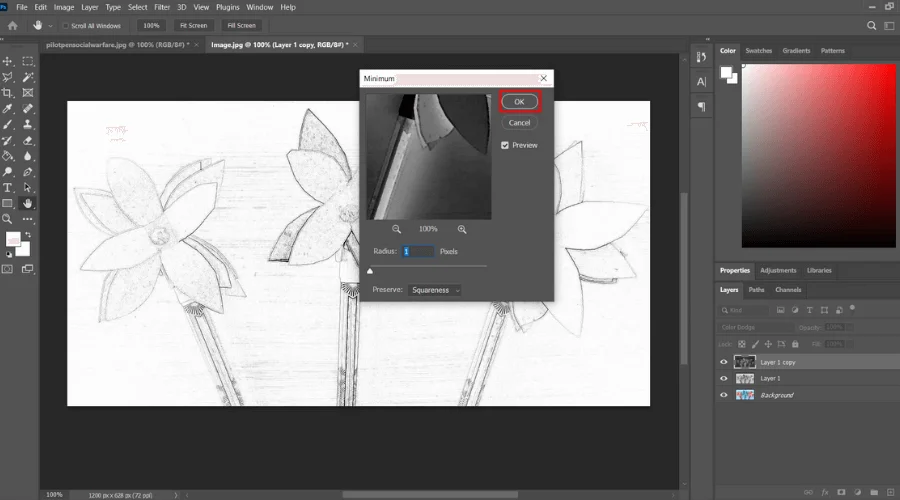
Your picture will convert into a line drawing.
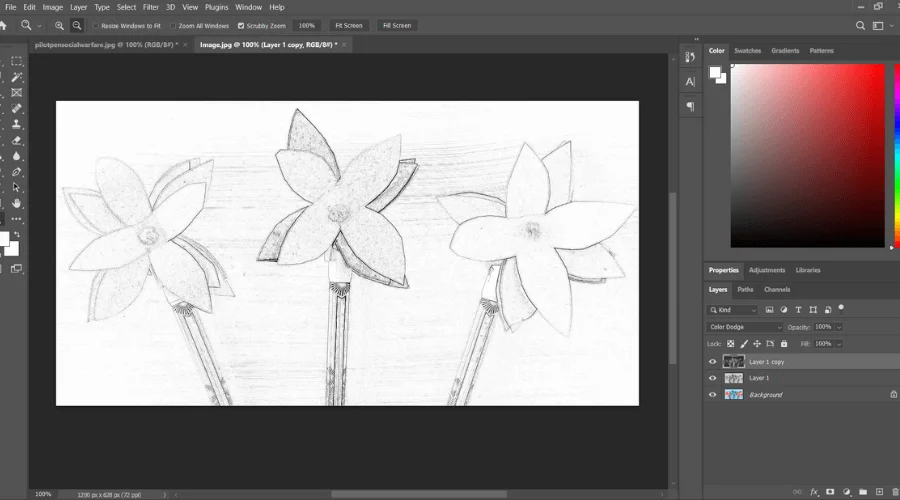
In Short,
Filter > Other > Minimum
Step 8: Filter Gallery Option
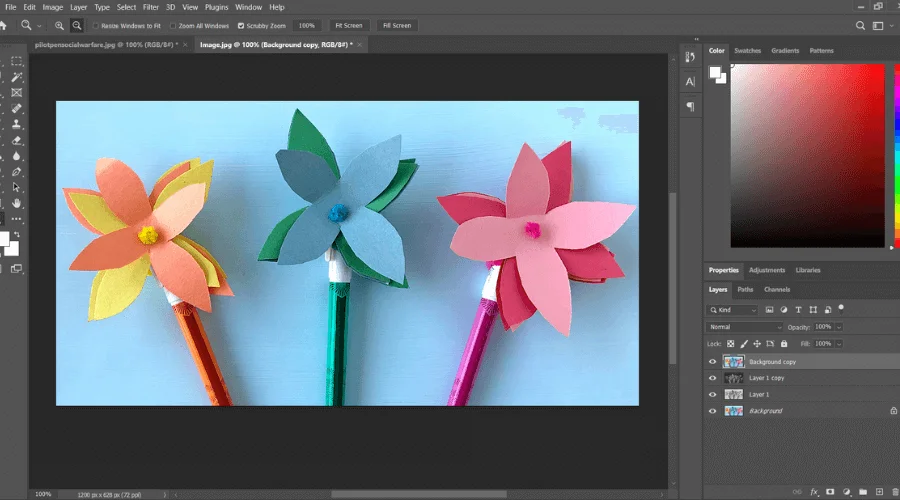
If you are happy with the ‘Minimum Filter ’, you can skip this step. For some more detailing. Select the bottom layer from the layer dialog box. Duplicate the layers and bring them to the top. Click on the Copyed layer, hold and drag to the top.
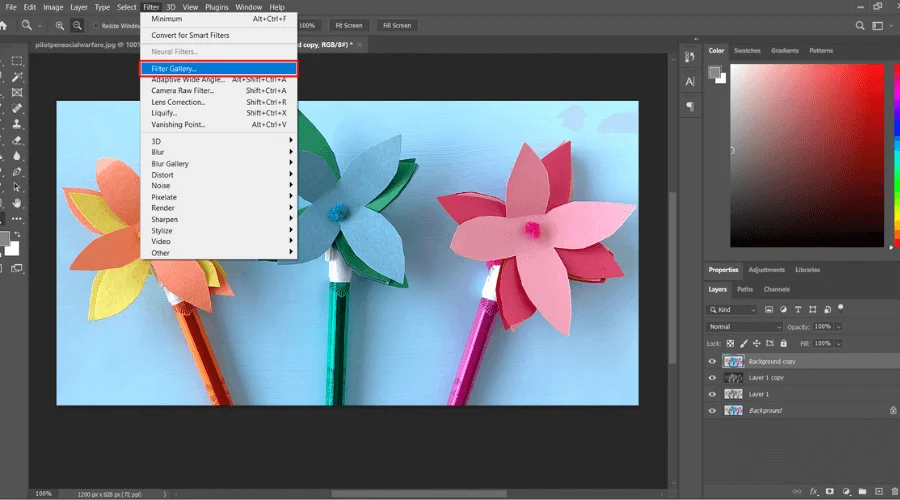
Set the background color to white and the foreground color gray. Now go to the ‘Filter’ from the dropdown menu. Select ‘Filter Gallery’. A new window will appear. There is a folder named ‘Sketch’ where there are some options.
You can choose ‘stamp’ or ‘charcoal ‘. There are three sliding parameters: Thickness, Detail, and light/Dark balance. Adjust the parameters as you want.
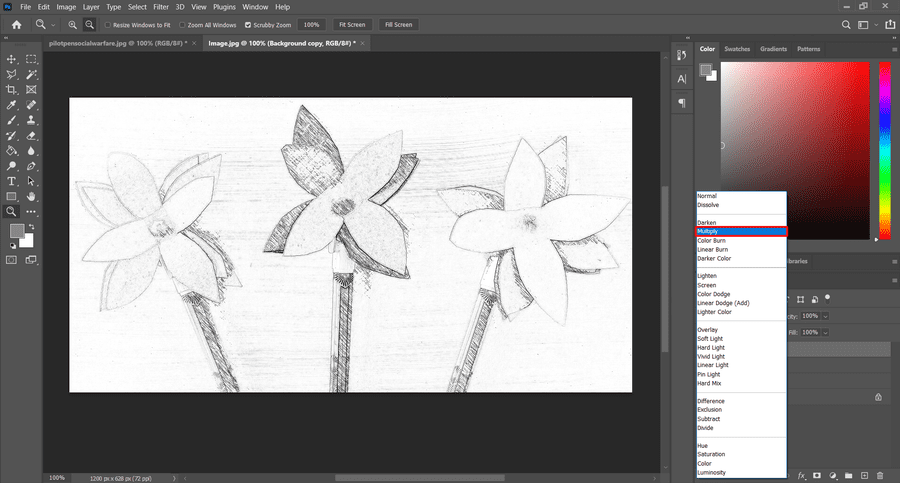
In this window, there is a layer dialog box. Click on the new layer icon. When the previous layer is selected, click on the ‘Graphic Pen’ option. Adjust the Stroke Length and Light/Dark balance parameters. Change Stroke Direction to Left Diagonal.
In Short,
Filter > Filter Gallery > Sketch> Charcoal or Stamp > New Layer > Graphic Pen
Now, from the blending mode selection option, select ‘Multiply ’.
Step 9: Edit and Save Your Line Drawing or Sketch
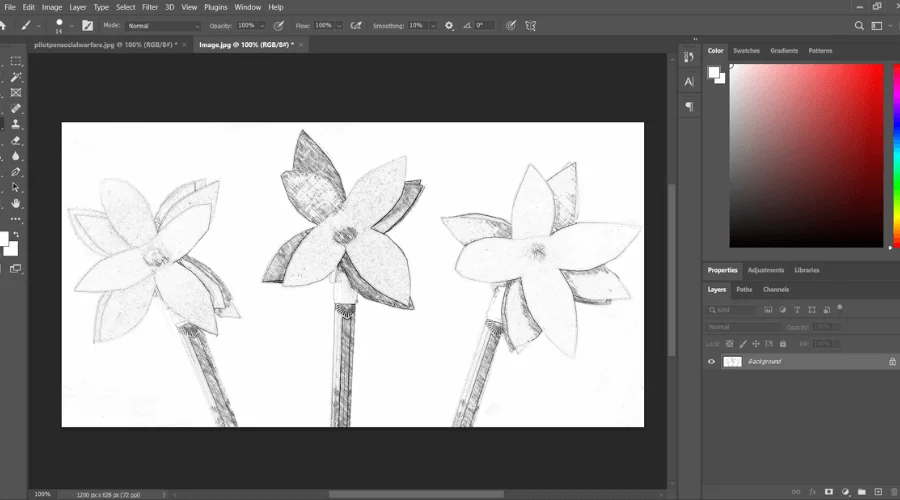
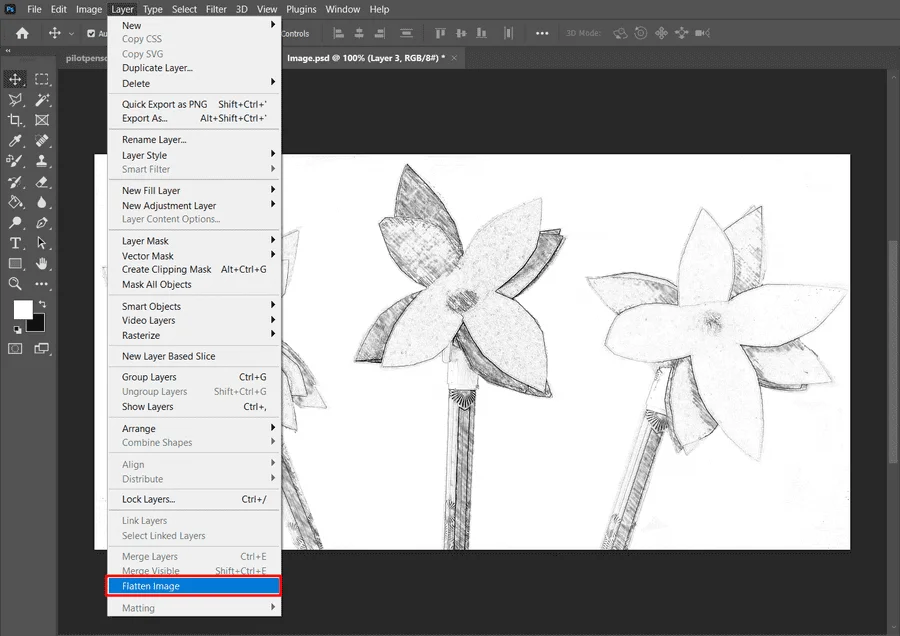
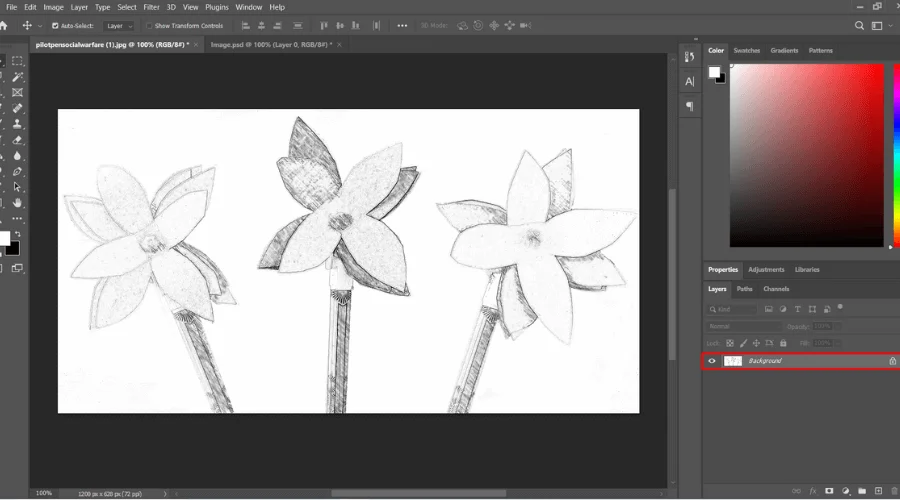
Go to Layer in the main menu at the top. Select Flatten Image. It will merge all layers into one layer. Use brush tools to give your line drawing a realistic look and save your image.
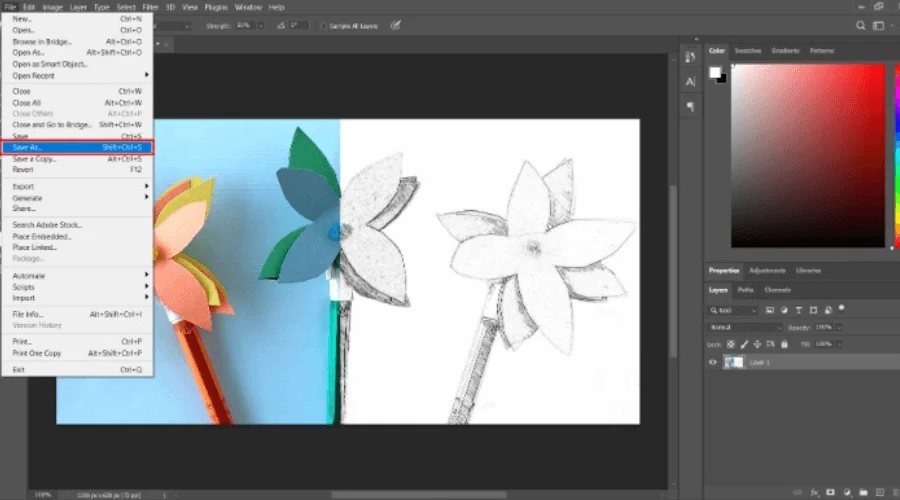
Go to File in the main menu; there are two options for saving the image. One is ‘save,’ and another is ‘save as’. Click on ‘save as’ and save the image in any format you want.
Shortcut
- Layer > Flatten Image
- File > save As > save
- Ctrl + S for save
- Ctrl + Shift + S for Save as
Final Thoughts | Turn Photo Into Line Drawing
It requires skills and practice to turn a picture into a line drawing or sketch. You might find a lot of AI tools to transform a color picture into a sketch with one click, but these photos will not be precise.
Yes, you can use advanced AI tools that are integrated with photo editing software like Adobe Photoshop. That means you have to use Adobe Photoshop, and then Photoshop will apply its advanced technology to your photos.
You can transform any picture into a line drawing by following 8/9 easy steps in Photoshop. But it will not always be easy; it depends on various factors, such as the clarity of the subject and the complexity of the image. A plain background and a clear subject can make your sketch image more effective.
Image resizing, adjusting contrast, fine-tuning details, etc., are crucial steps to sketching. Applying different filters and effects can also provide a wide range of line-drawing options.
We have tried our best to create this tutorial for you. So that you can turn your normal photos into line drawings. Still, if you have any doubts or questions, contact us for the easiest solution at info@graphicscycle.com.
Check Out Our Latest Articles
- 20 Best Drawing Apps for Android
- Pumpkin Drawing in Photoshop Step-by-Step Guide
- How to Use Photoshop AI Generative Fill
Frequently Asked Questions
Can I Turn A Photo Into A Drawing?
Yes! You can easily turn a photo into a drawing using photo editing software like Adobe Photoshop. We have provided a comprehensive tutorial about turning your photos into drawing lines.
Is There An App That Turns Pictures Into Line Drawings?
Yes, many apps are available that can turn pictures into line drawings. Some popular apps or tools are BeFunky, SketchMyPhoto, and Adobe Photoshop Express. Download the app, upload your photo, apply the line-drawing effect, and save it. According to my experience, Adobe Photoshop is the best for line drawing.
What is The Highest-Rated AI Art Generator?
The DALL-E 3 exceptional ability to generate highly realistic and creative images based on your descriptions. Additionally, Midjourney AI provides amazing results.
Which Tool Creates Lines in Photoshop?
In Photoshop, you can use 3 different tools to create lines: the Pen Tool, Brush Tool, or Line Tool. These tools allow you to draw lines of different shapes, sizes, and styles to create your desired effect.
Who is The Best Line Art Service Provider?
The Graphics Cycle is one of the leading vector art service providers. They provide these services at an affordable rate.