




Pumpkin Drawing in Photoshop Step-by-Step Guide in 2024
If you are a beginner in Photoshop learning, it will be best practice to draw different shapes or use Content-Aware Fill Photoshop tools. So let’s learn today how to draw different shapes. For example, pumpkin drawing could feel hard. It will be hard for beginners in Photoshop. But don’t worry it will be fun in this tutorial.
Drawing a pumpkin in Photoshop is not a hard task for a beginner. All you need is some basic knowledge of Photoshop tools and functions.
Suppose you are a stranger to Photoshop photo editing software and start learning. Then you are in the right place; this tutorial is for you and is about pumpkin drawing.
Or if you are a regular Photoshop user looking for answers to some queries, you will find your answer. You can also browse our FAQ section.
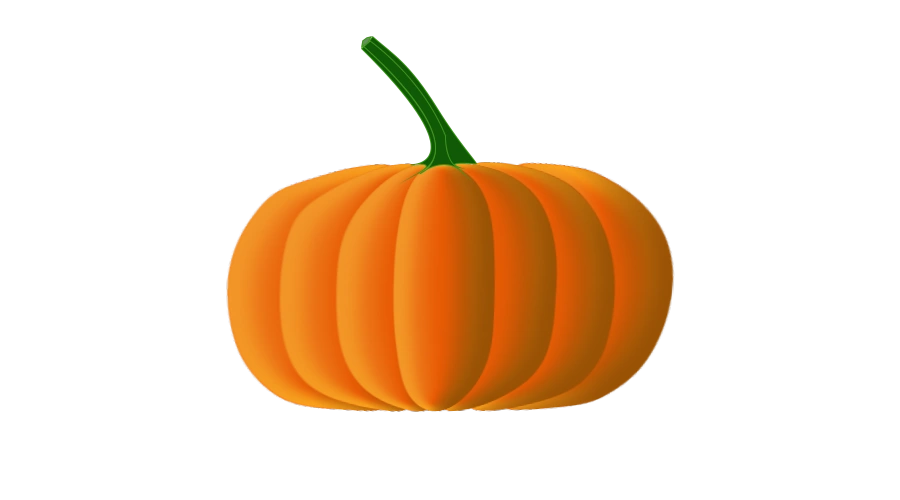
Photoshop Panels and Bars
If you are a very beginner in Photoshop let’s First of all, let’s first introduce to the tools that we will be using in this tutorial. Remember, we just discussed the tools that are needed only in this tutorial for pumpkin drawing.
New Document Window
When you create a new document in Photoshop for drawing a pumpkin, a new window will appear with some measurements and samples. On the left side of the image, above the area marked with a big rectangle, there are sample examples for a new document.You can select any of them to start your work. All parameters are pre-determined in these sample examples.
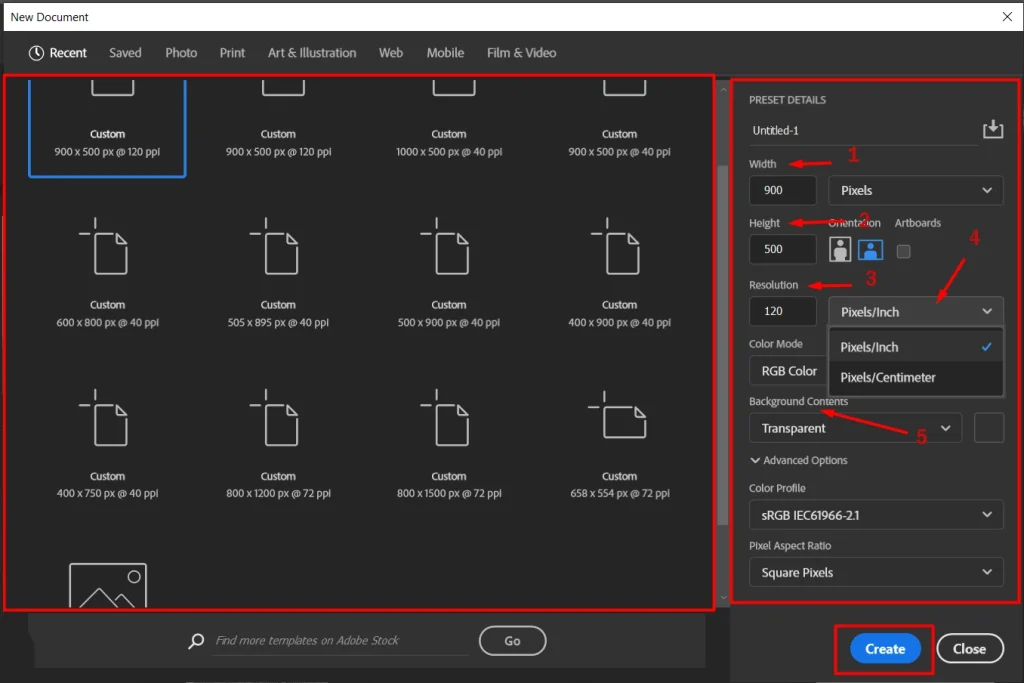
On the right side, there are the parameters that you can customize according to your needs. At the top of the options panel, the name input box is present. By default, the ‘Untitled-1’ name is inserted. You can change it and rename it as you want to name it for the pumpkin drawing or how to draw a pumpkin in Photoshop. The parameters are as follows,
- Width: Width is the total width of your document. There are two input boxes, the right one is for the insert number amount, and the left one is for the unit of measurement. By default pixel is selected, you can change from the drop-down menu to inches, centimeters, Millimeters, points, and Picas. As a beginner ‘inches’ will be easier for you to measure the height and width of images.
- Height: like the width also enter number digits on the input box. There are also three options besides the input box first two for switching in height, and width respectively. The next one is called ‘Artboards’ Click on the checkbox if you want to use your new document as a canvas.
- Resolution: Resolution is the multiple of the height and width. In this case, Resolution is indicated as the number of pixels per unit. This is very important for the sharpness of your image.
- Resolution Unit: The resolution unit decides the pixel number per inch or centimeters. The given number’s pixels will consist of one inch or one centimeter.
- Background Contents: Here you can select the background of your document. Click on the arrow-down icon a drop-down menu will appear then select a background color. you can also select a transparent background.
Color Profile and Pixel Aspect Ratio
The Color Profile is the color that describes the color behavior of the monitor. By default ‘sRGB’ color profile is selected in Photoshop. The ‘Pixel Aspect Ratio is simply a fancy way of saying that the length of one side of a pixel is related to the length of the other. Listen to the Podcast on Drawing Pumking Step-By-Step
By default Pixel Aspect Ratio is ‘Square Pixels’ is selected. For the beginner both are good. So we don’t need to change anything on the color profile and Pxil Aspect Ratio.
Photoshop Interface
After creating a new document with your desired height and width for the pumpkin drawing. You need to know about the Photoshop interface. ‘Adobe Photoshop‘ is very advanced photo editing software and is user-friendly.
You don’t have to select tools or option parameters on the menu every time. You will find the most used tools and options in different panels on the Photoshop interface. Let’s learn about different tools and panels of the Photoshop interface.
A. Main Menu
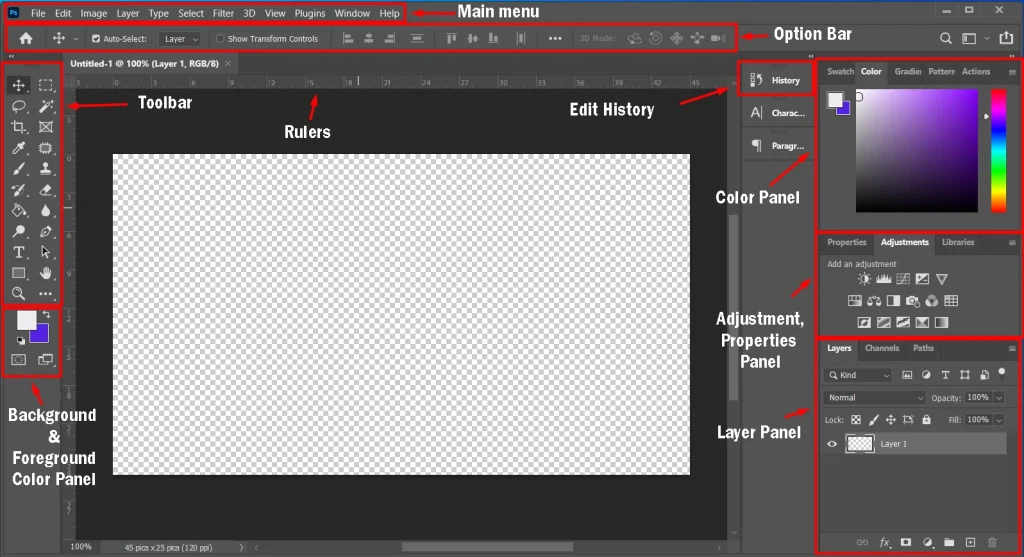
The main menu is also called the menu bar of Photoshop. The menu bar consists of 11 items: ‘File’, ‘Edit’, ‘Image’, ‘Layer’, ‘Select’, ‘Filter’, ‘Analysis’, ‘3D’, ‘View’, ‘Window’, and ‘Help’. Each of those main menus has an additional sub-drop-down menu for related options.
The different drop-down option also has different sub-options. All tools and options of Photoshop software are available in the menubar. All options are categorized into 11 categories.
B. OptionBar
The options bar exists under the menu bar. If you select any tool from the toolbar, the available options of that tool are shown in the option bar. The options bar shows the options of the selected tool such as brush size, shape, effect, etc.
C. Toolbar
‘Adobe Photoshop’ is a user-friendly photo editor software. Photoshop brings the most used and important tools together on the toolbar. If you are learning Photoshop, you must know all the tools and usage of the toolbar.
D. Foreground And Background
At the bottom of the toolbar, you can change the color of your default background and foreground of your document. The background color is the background of your document.
If you erase any area of your document, the erased background will appear on the erased area. The foreground color is the color for your brush and pencil when you use them to make any drawing.
E. Rulers
Rulers help you position your document and elements precisely. Two rulers appear on the Photoshop interface. One is on the top of the active window and another appears on the left side of the active window, which helps you to align and place elements on your document.
F. History
In the history option, the history of your every movement of editing will be listed. If you need to undo any editing, simply go to History and click on the last edit you want to keep.
G. Color Panel
You can choose different colors for the color panel. To set the background color, click on the bottom color preview in the toolbar. Then select a color from the color panel. Similarly, to select the foreground color, select the top color preview or foreground color review option and select any color.
H. Adjustment and Properties Panel
The adjustment and properties panel contains different options for parameters and different properties. You can change and edit the shape, size, curve, and Hub/Saturation values of an element of your document.
I. Layer Panel
Layer panels show the layers of your document. Layer panels also contain different options such as opacity, layer mask option, layer curve, new layer, and delete layer option.
So now you know the names of the different bars and panels of Photoshop. We will learn about the brushes of the toolbar in another tutorial. You can also learn the usage of different brushes from the ‘Adobe Photoshop’ official website. Now let’s draw a Hallowing Pumpkin.
Drawing Pumpkin Step-By-Step
As you know the bars, panels, and height-width of Photoshop this tutorial will be easier for you. Follow our guidelines step by step and remember some of your brush’s parameters are not the same as the tutorial.
Step 1: Open Photoshop and Create a New Document
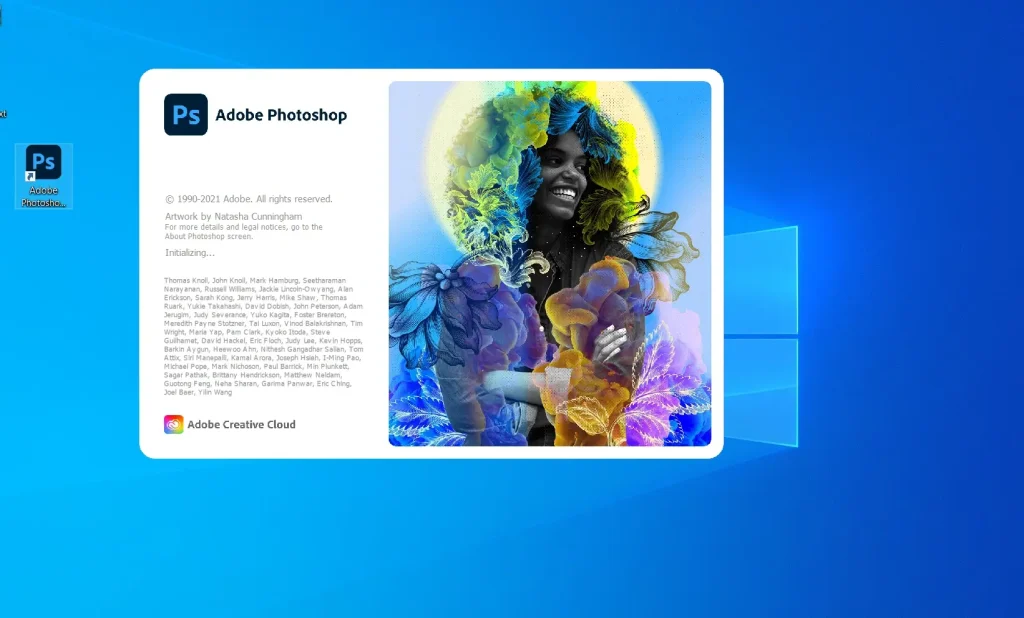
First of all, open Photoshop. If you have Adobe Photoshop on your PC, you will find it on the Start menu. If you don’t have it installed, then first install it. You will find many online tutorials on the topic ‘How to install Adobe Photoshop’. If you have a shortcut on your monitor, double-click on the Photoshop icon. Your Photoshop will start opening an image that will appear on the screen like the image above.
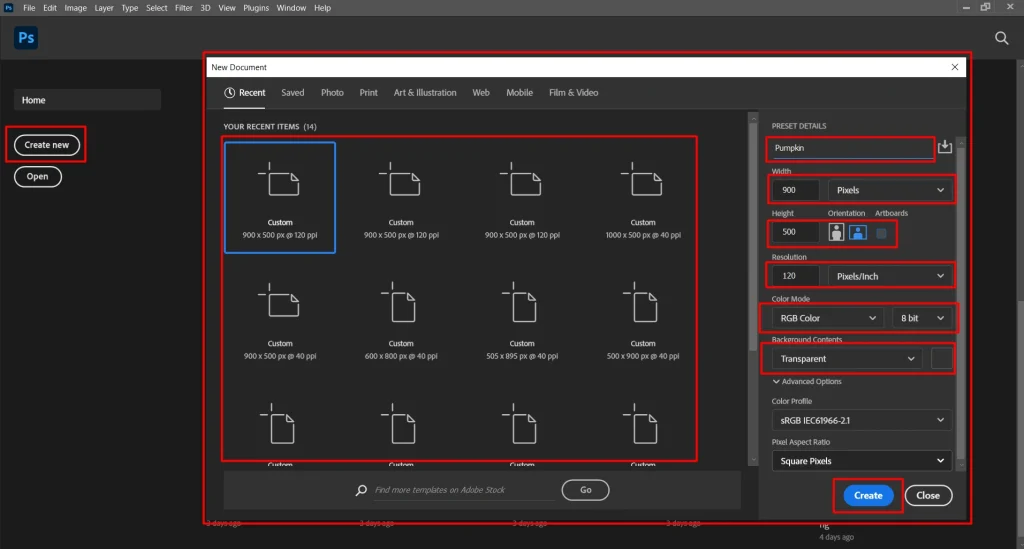
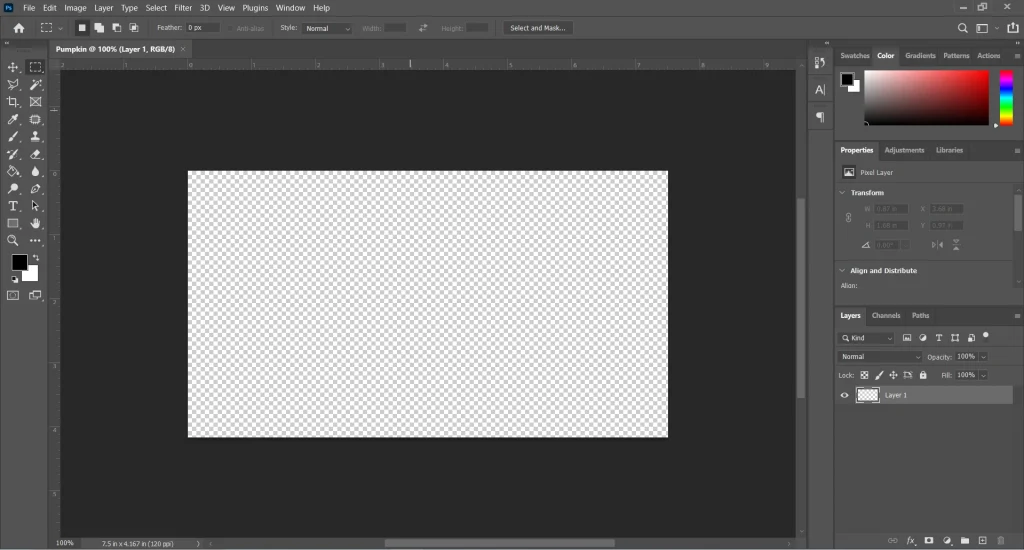
Wait till your Photoshop is ready to draw a pumpkin. Or until the Photoshop software opens with the interface like image two. Click on the ‘Create New’ button. A new window will open as red-marked on the screen. We learned about this window at the beginning of this tutorial.
Set your document’s Name. Set height-width and other parameters. You can also select a sample document from the right side.
Step 2: Draw an Eclipse
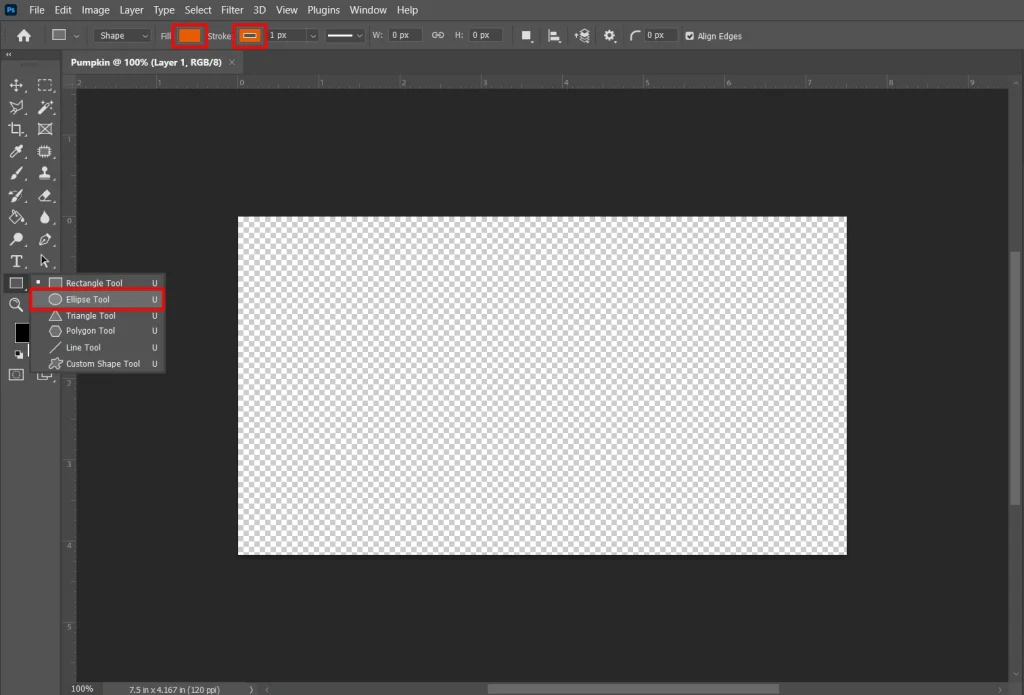
At first in pumpkin drawing, select the Eclipse tool from the toolbar of your Photoshop. The ‘Rectangle tool’ is shown by default. Right-click on it. If you don’t find the tool, simply press the ‘U’ key on your keyboard.
A tool will be selected from the toolbar. If it is the ‘Eclipse Tool ’, then it’s fine. If not, right-click on it. A drop-down tool list will appear; select the ‘Eclipse Tool’ as shown in the picture above.
After selecting the Eclipse Tool, go to the option menu. Set the ‘Stroke’ color. This is the outline color of your Eclipse. Then fill in the color of your pumpkin. Set the same color for both Stroke and Fill. Don’t be confused if the given picture of the pumpkin does not look like a pumpkin. But it is a part of the pumpkin drawing.
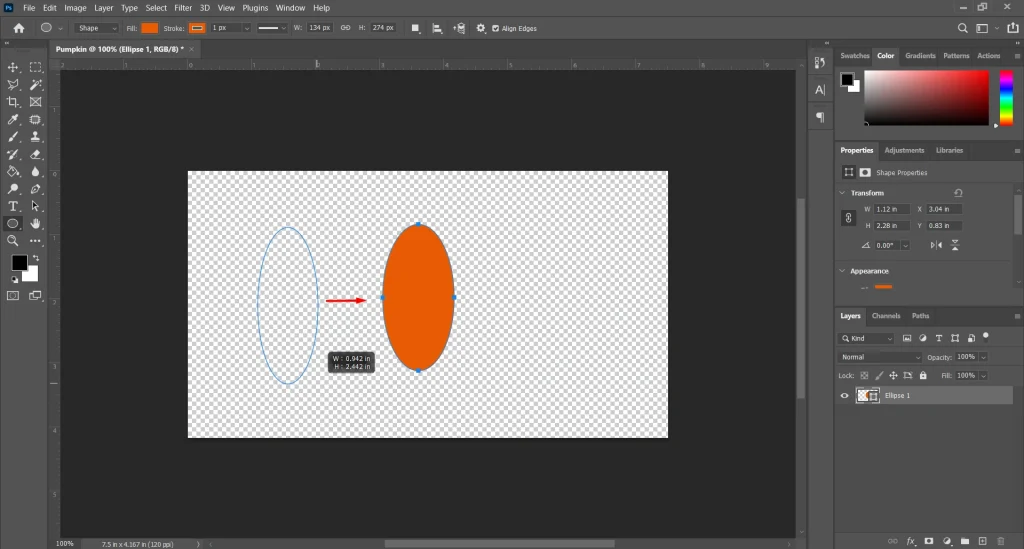
Now draw an Eclipse; the height of the eclipse will be the height of your Pumpkin. Shape your Eclipse according to the slice of a Pumpkin. So draw a longish Eclipse as shown in the picture of the pumpkin drawing.
To draw an Eclipse, click and hold on the active window and drag the mouse toward the window’s bottom-right corner. If you are satisfied with the shape, release the mouse button. The Eclipse will be selected by default; you can change the shape of the Eclipse manually. To deselect the Eclipse, press the ‘Enter’ key on the keyboard. Just maintain the height and width like a slice of pumpkin. We will give a look-alike pumpkin in the other steps of this tutorial.
Step 3: Open Layer Style Window
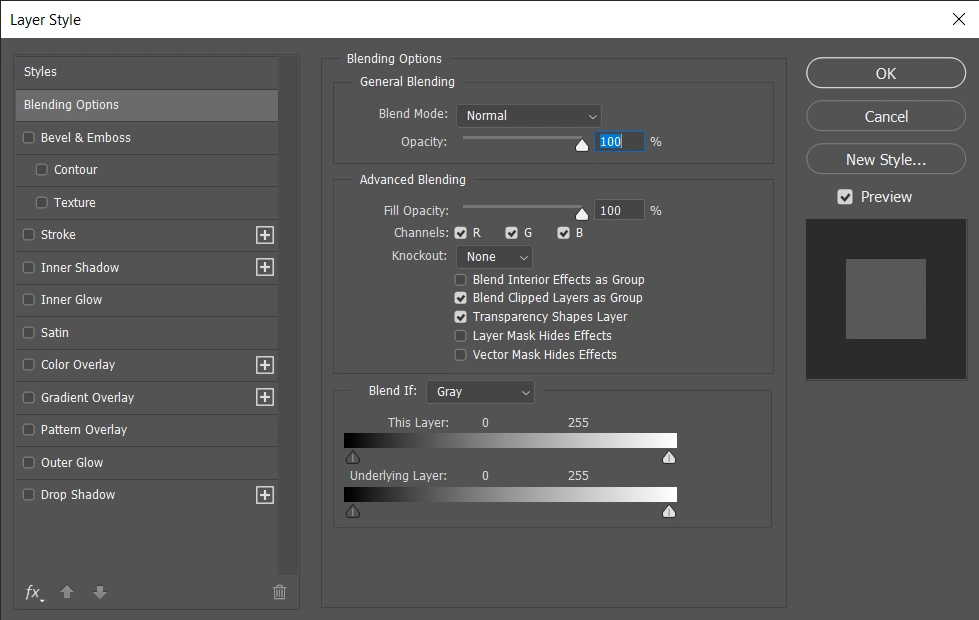
Sometimes the Layer Style window is also called Blending Options. However, there are other important layer style options available. The options that are available on the Layer-style window are,
- Blending Options
- Bevel &Emboss
- Stoke
- Inner Shadow
- Inner Glow
- Satin
- Color Overlay
- Gradient Overlay
- Pattern Overlay
- Outer Glow
- Drop Shadow
We will use only two of these options: Bevel & Emboss (not all options) and Inner Glow for pumpkin drawing.
How to open Layer-Style Window
There are three ways to open the layer-style window.
How to open Layer-Style Window
There are three ways to open the layer-style window.
1. Open Layer-Style from the Menu bar.
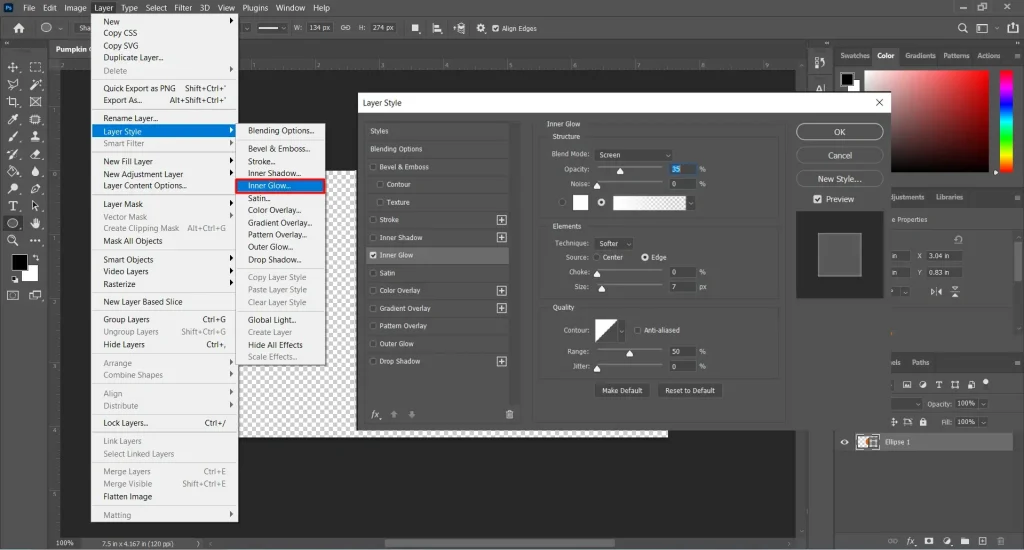
Menu Bar > Layer > Layer Style > Inner Glow
To open the Layer-Style window, select the Eclipse layer on which we will draw the pumpkin. Click on ‘Layer‘ on the menu bar at the top of the screen. Then go to ‘Layer Style ‘; a drop-down sub-menu will appear. For this tutorial, select ‘Inner Glow’. Otherwise, you can select any of your desired options; it will open the ‘Layer Style ‘ window.
2. Open Layer-Style From Layer Panel
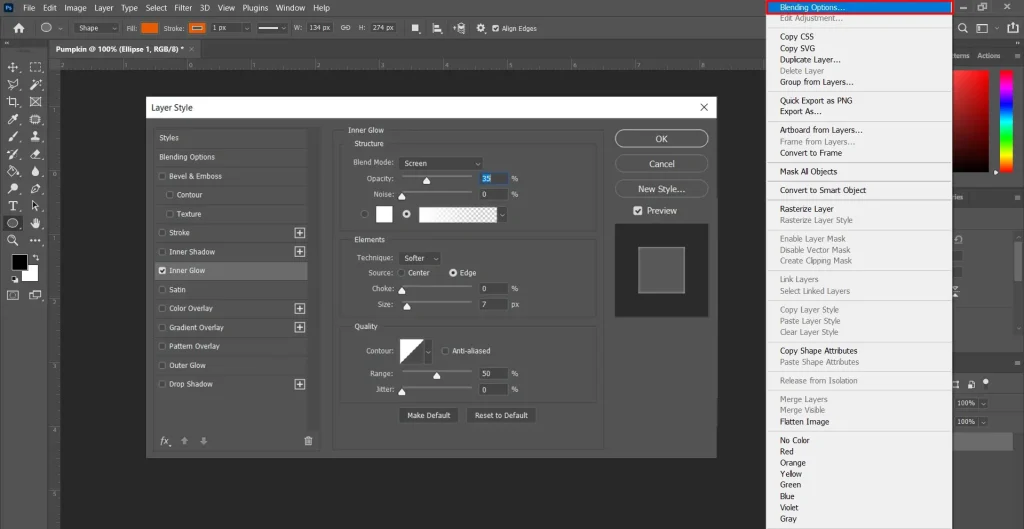
Layer Panel > Right-Click on Eclipse Layer > Drop-Down Menu > Blending Option > Layer-Style Window
To open the Layer-Style Panel, ‘Right-Click’ on the Eclipse layer. A drop-down menu will appear. The Blending Option will be the first option on the menu. Or just click on the ‘Blending Option ‘; the layer-style window will appear on the screen. Now select ‘Inner Glow’ to give the Eclipse inner glow effect.
3. The shortcut way
Double-click on the layer > Layer-Style Window
To open the Layer Style Window, simply double-click on the layer. Remember, if you double-click on the layer name, the layer name will become editable. So click on the layer beside the layer name and the eye icon of the layer.
Step 4: Give an Inner Glow Effect
When the ‘Layer-Style Window‘ opens, click on the Inner Glow checkbox. It will now open the Inner Glow options. To open the Inner Glow option panel, click on the Inner Glow Option.
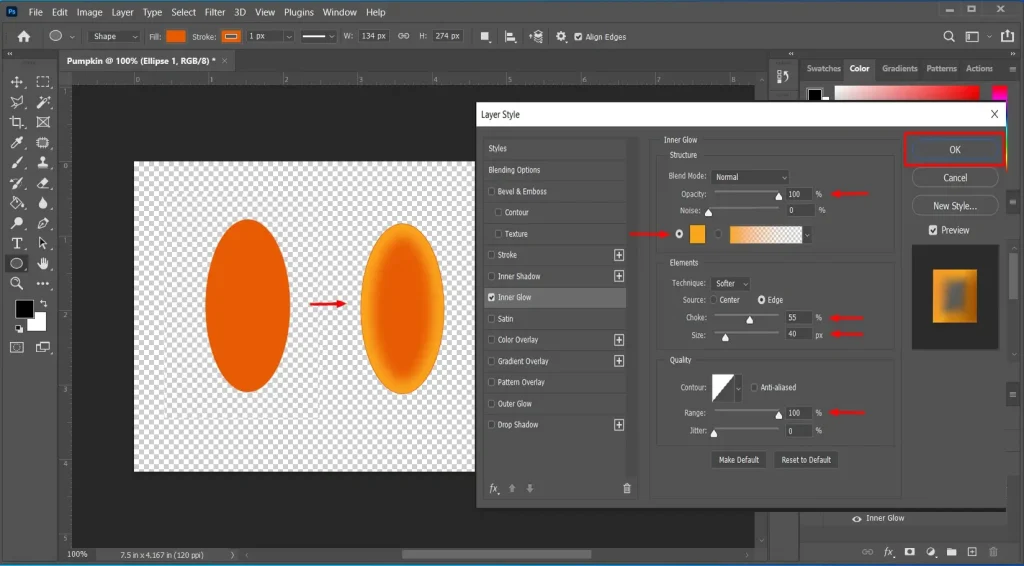
Now, on the Layer-Style window, set different parameters to give your Eclipse ‘inner glow effect’. Remember, it cannot be the same effect for the same parameters in every Photoshop for pumpkin drawing. So for better results, don’t focus on the number of parameters.
Focus on the overall outcome of the pumpkin on the preview panel. The options and parameters we use for the best result of Eclipse on our pumpkin drawing tutorials.
- Blend Mode: Normal
- Opacity: 100%
- Noise: 0%
- Color Option: Plane Color
- Choke: 55%
- Size: 40%
- Range: 100%
you can use different numbers for the options above for your pumpkin drawing. Try and change these numbers if your color processor and Adobe Photoshop software are required for the best result.
Step 5: Bevel and Emboss Effect for Eclipse
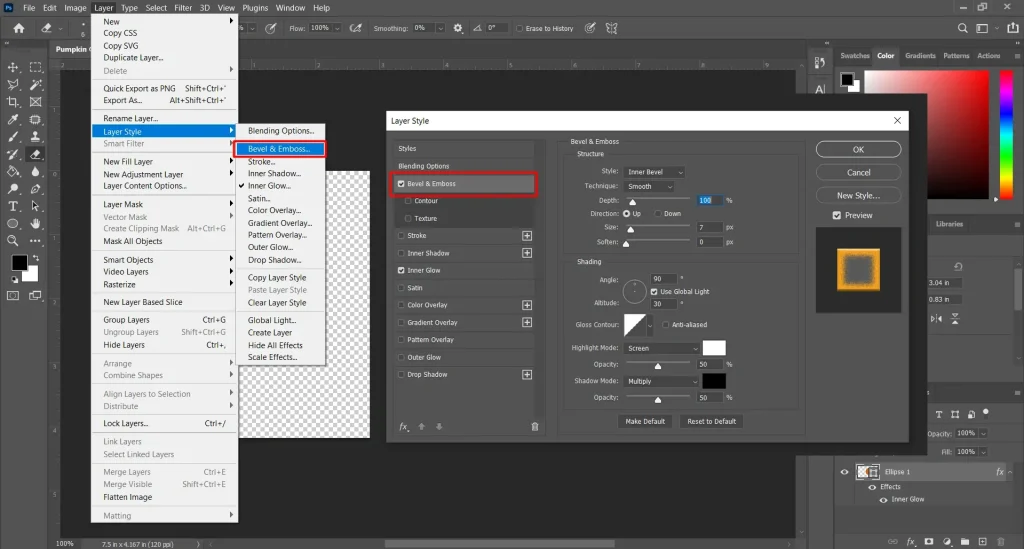
The ‘Bevel & Emboss’ Option exists in the Layer-Style window; open it in any way you feel comfortable. Open the Layer-Style panel and select the ‘Bevel and Emboss’ option from the window.
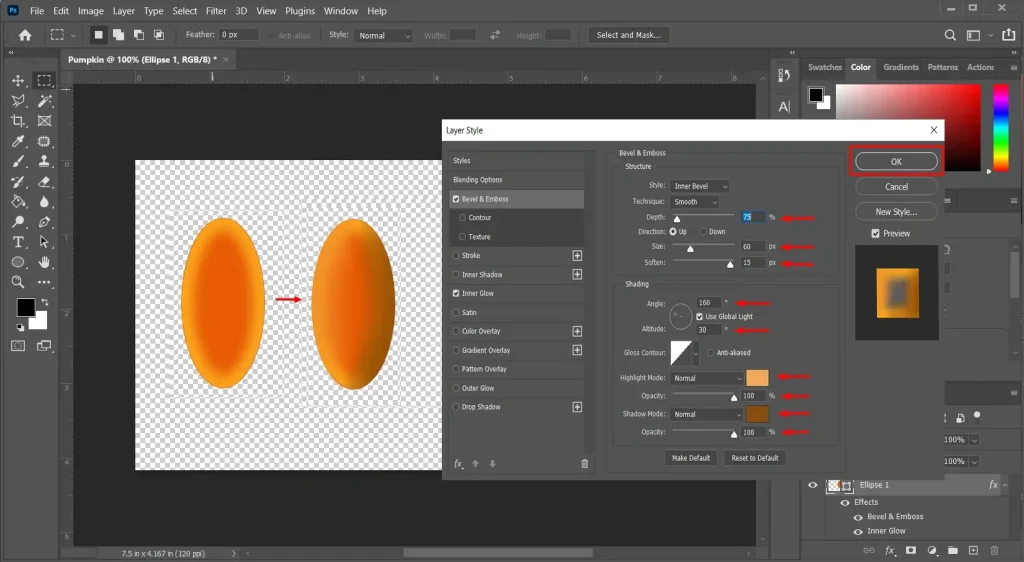
The parameters that we will change to give the best Bevel and Emboss effect to the Eclipse of pumpkin drawing are as follows,
- Style: Inner Bevel
- Technique: Smooth
- Depth: 75%
- Direction: Up
- Size: 60 px
- Soften: 15px
- Sading Angle: 160 Degrees
- Sading Altitude: 30 Degree
- Gloss Contour: linear
- Highlight Mode: Normal
- Highlight Color: #F1A95C
- Highlight Opacity: 100%
- Shadow Mode: Normal
- Shadow Color: #864D10
- Shadow Opacity: 100%
As we told you before, all software does not require the same parameters for the same outcome of pumpkin drawing. Try and change these numbers if your color processor and Adobe Photoshop software are required for the best drawing. Try to give a similar effect as shown in the photo above.
Step 6. Duplicate and Rasterise Layer in Photoshop
Duplicate Layer in Photoshop
Like opening the Layer Style window, you can duplicate one layer in Photoshop in three ways. These are described as follows,
1. Duplicate form Layer panel
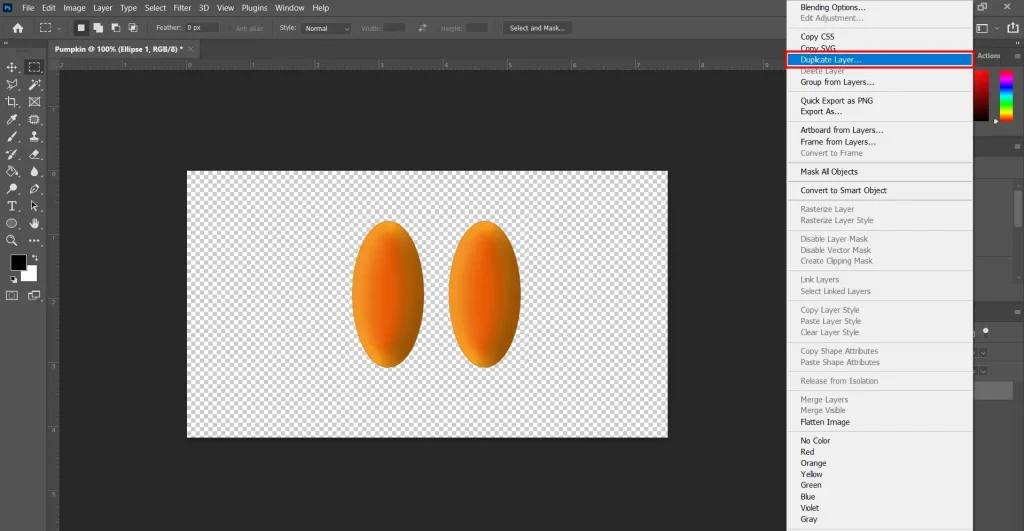
Layer Panel > Select Layer> Double-Click on the Layer > Select Duplicate
To duplicate one layer, double-click on the layer; a drop-down menu will appear on the screen. Select the duplicate layer from the drop-down menu. A dialog box will appear in the middle of the screen. Set the Layer name and press the ‘OK’ Button. Your selected layer will be duplicated, and a new layer will appear on the Layers panel.el.
2. Duplicate Form Menu bar
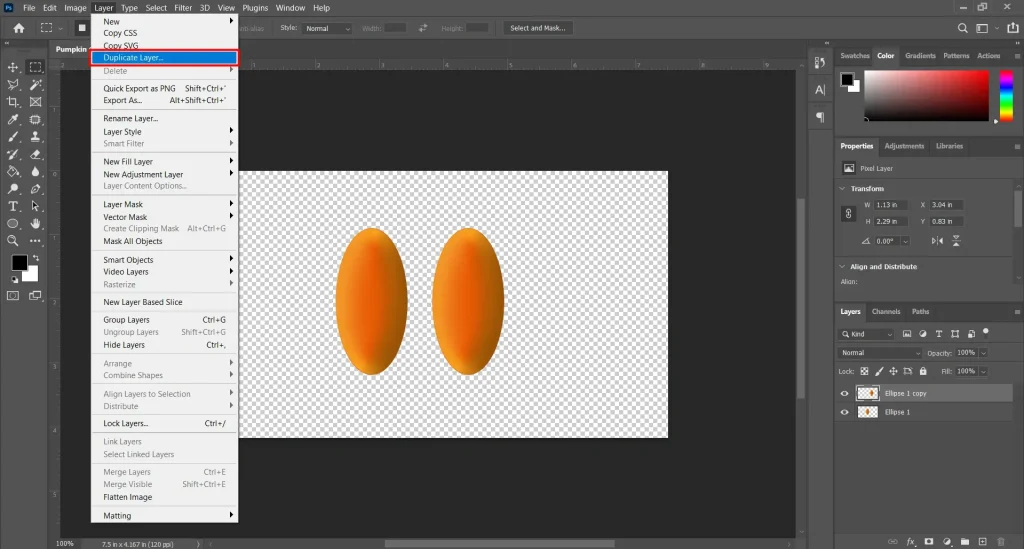
Select layer > Menu Bar > Layer > Duplicate Layer OR press ‘D’
You can also duplicate a layer from the menu bar at the top of your screen on the Adobe Photoshop interface. First, select the layer that you want to duplicate for the pumpkin drawing. Then go to the menu bar and click on “Layer”. From the drop-down menu, select ‘Duplicate Layer’ or press the ‘D’ key on your keyboard. A dialog box will appear. You can set a new layer’s name here. Set the new layer name and press ok. Then continue your pumpkin drawing.
3. The Shortcut Way
Select layer > press ‘Ctrl’ + ‘J’
You can also duplicate one layer in a shortcut. Just select the layer you want to duplicate and then press ‘Ctrl’ + ‘J’ together.
Rasterize Layer
Photoshop creates Type, Eclipes, and shapes in vector layers. When you zoom in, you can see the edges, made up of tiny squares. No matter how much you enlarge the layer, the edges remain sharp and clear. This can destroy the realistic look of your pumpkin drawing.
When you rasterize a layer, it loses its vector features. You can no longer edit the Eclipse or shapes without losing quality. it is good practice to keep one Duplicate before rasterizing any layer.
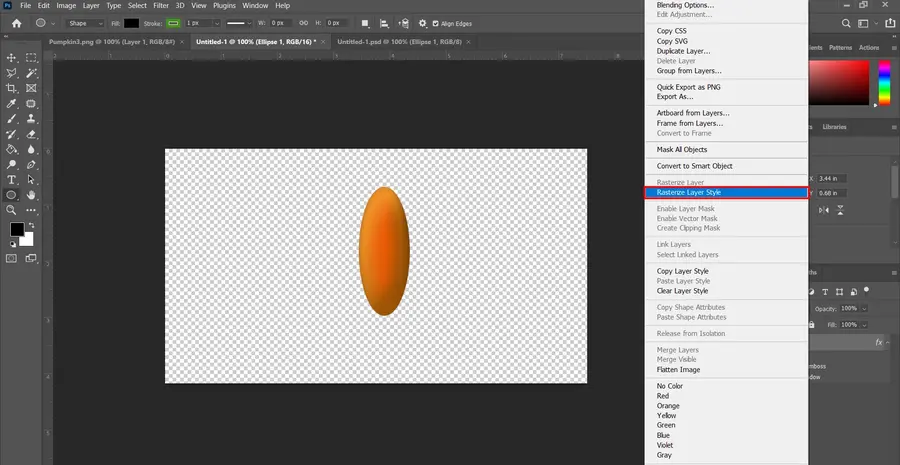
Layer Panel > Right-Click on layer > Rasterize layer
You can rasterize the layer from the layer panel. Please select the desired layer and right-click on it. Then, from the drop-down menu, select the ‘Rasterize layer’ to rasterize the layer. Or ‘Rasterize layer Style’ for rasterizing the layer styles. Then follow the next step of pumpkin drawing.
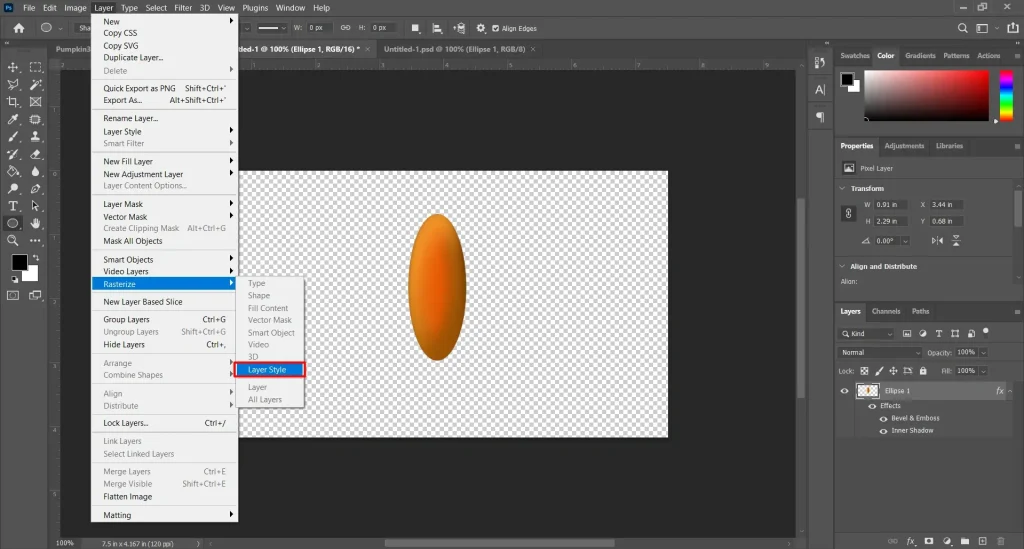
Menubar > Layer > Rasterize > Layer Styel
You can also rasterize the layer and layer style from the menubar. Click on the layer option in the menubar. Then select the Rasterize option from the drop-down menu. Another sub-drop-down menu will appear; select the ‘Layer Style’ Option.
The rasterizing of layers is very important. You cannot follow the next step of pumpkin drawing without rasterizing the layer.
Step 7: Skew with Shear Tool
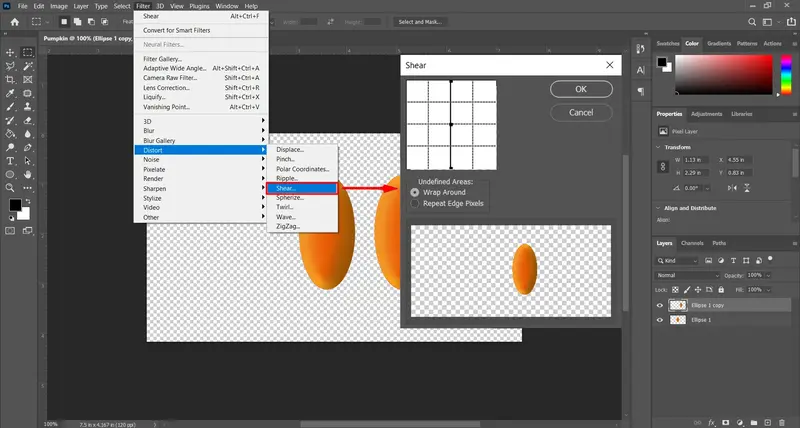
Menubar > Filter > Distor > Shear
You can skew one element of your Photoshop document by using the “Distort’s Shear” filter tool. If you use the CSS6 version or less, your documents should have 8-bit images. Otherwise will won’t be able to use the Distor filter in the pumpkin drawing. ‘Shear’ is a Tool of the ‘Distort’ filter.
First select the layer, then go to the main menu and select ‘Filter’. A drop-down menu will appear. From the Drop-down menu, click on ‘Distort ’. A sub-menu will appear with the list of tools. From the sub-menu, click on the ‘Shear’ option. Select Shear and continue your pumpkin drawing.
Shear Dialog Box
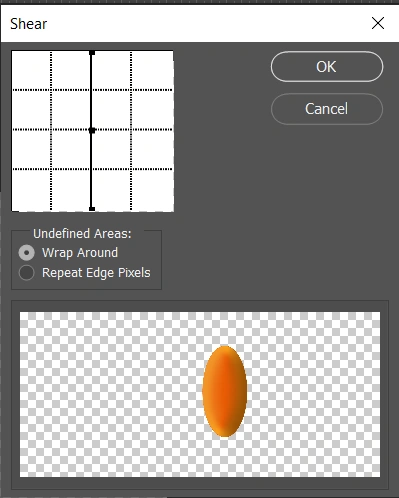
In the bottom shear Dialog Box, you can see the Preview of the element. The skew of the element will be previewed in this preview section. Above the preview section, the Undefined Areas exist with two options.
- Warp Around: Fills new Voids in the image with content from the opposite side of the image.
- Repeat Edge Pixels: Extends the colors of pixels. Banding may result if the edge pixels are different colors.
On the Top left side, a square Edit workspace is available. On the workspace, by default, the element’s position is shown linearly on the graph by a straight line. Click anywhere on the line and drag the mouse to make a curve.
The element will be skewed and a preview will be shown in the preview section. You can add as many points on the curve as you want; just click on the curve and a new point will appear.
Step 8: Skew the Eclipse and make a slice of Pumpkin
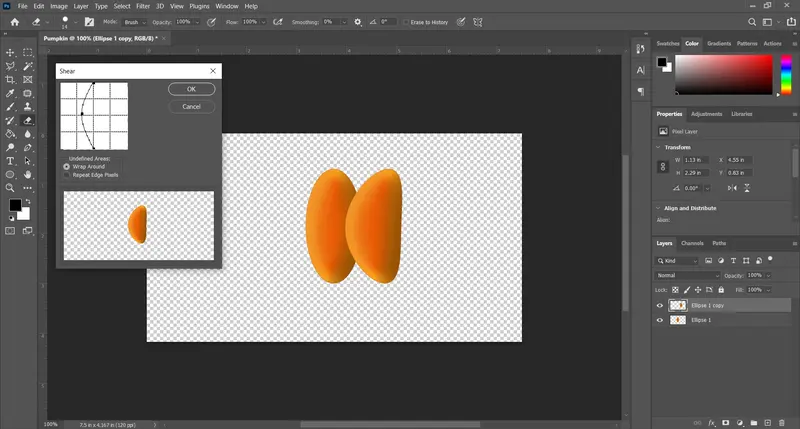
Now give the shape the appearance of a slice of pumpkin to the new layer that you duplicate from the Eclipse. To draw a pumpkin. To skew the eclipse, click on the line in the middle of the workspace at the ‘Shear Dialog Box’. A point will appear and add to the line. Now click and hold on that point and drag to the left to make a curve.
Look at the preview section. If your eclipse shape appears like a slice of a pumpkin, then press the ‘OK’ button in the top right corner. This is an important task in pumpkin drawing. You can practice this several times.
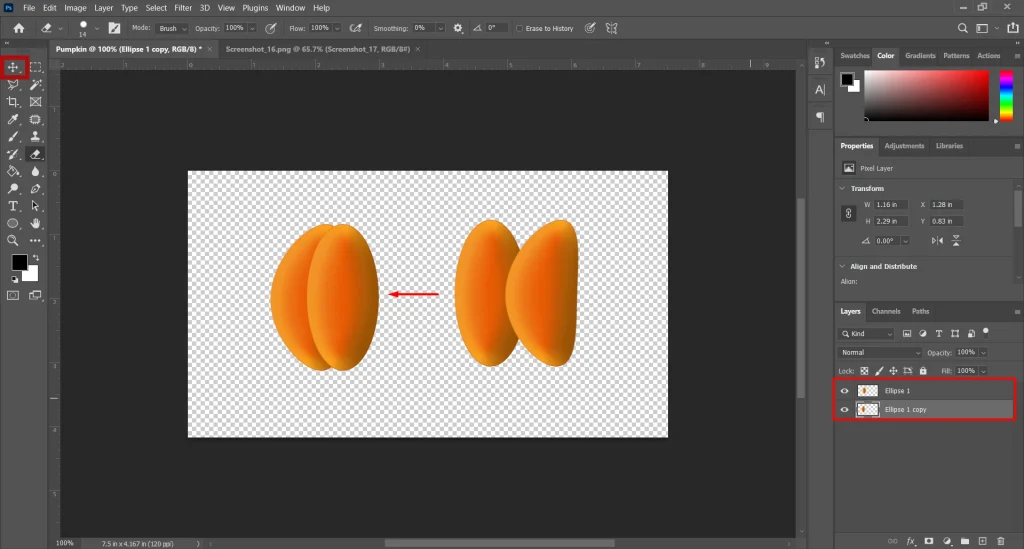
The eclipse drawn for the pumpkin drawing will be the middle slice of the pumpkin, and the skew eclipse will be the left and right slices, respectively. To arrange the slices, go to the layer panel, click and drag down and birth the new layer to the bottom of the first Eclipse’s layer.
Select the move tool on the toolbar and move and arrange the left slice of pumpkin at its position. To move the Pumpkin slice, click and hold on the Eclipse in the active window, then drag to the left of the middle slice of pumpkin. Place the Eclipse under the first eclipse as it looks like a left-side slice of pumpkin.
Step 9: A right-side slice of Pumpkin
Now make the right-side slice of pumpkin. The procedure is the same as we do at Step 7. First, we have to make a new duplicate of the Eclipse from layer 1. Don’t flip the left side slice to the right, and then you will lose the dark effect of the right side of your pumpkin drawing.
Now click on the new layer and select the filter from the menu bar. Go to Distort and click. From the sub-menu, click on ‘Shear ’. The shear dialog box will appear
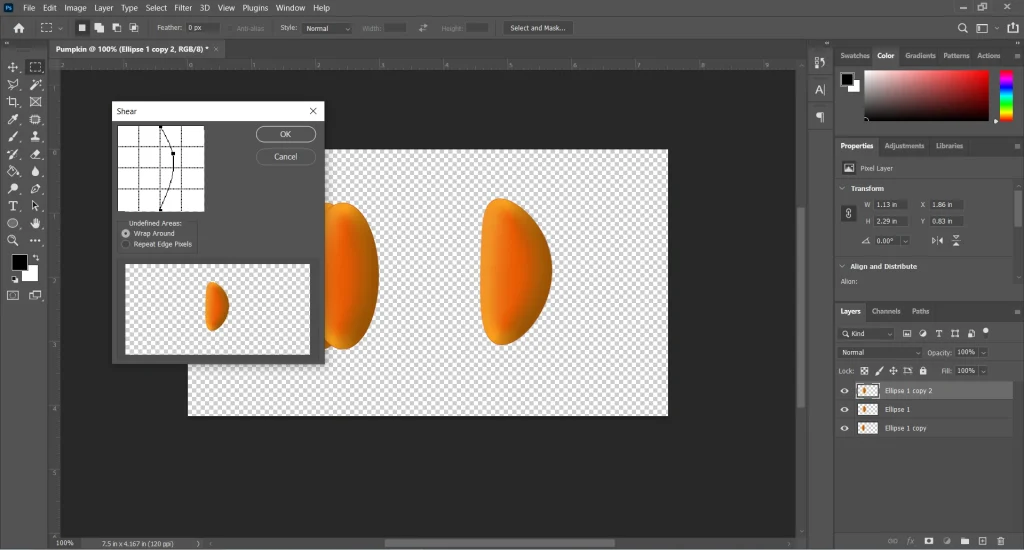
Now click and drag the middle line on the workspace at the top left side of the Shear dialog box. Make a curve and give a proper shape to the eclipse, like a slice of pumpkin. If you are satisfied with the shape of the eclipse in the preview section, press the ‘OK’ button.
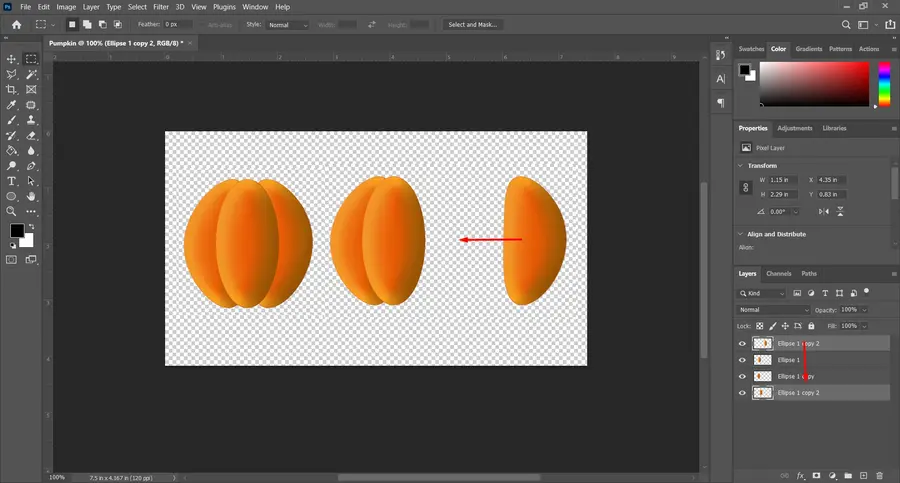
As we did in step 7, arrange the layer. Click on the layer on the Layers panel and drag it to the bottom of the layers. Then select the ‘Move’ tool, move the eclipse, and place it under the first layer so it looks like the right slice of pumpkin drawing.
Step 10: Make the rest of the slices of Pumpkin
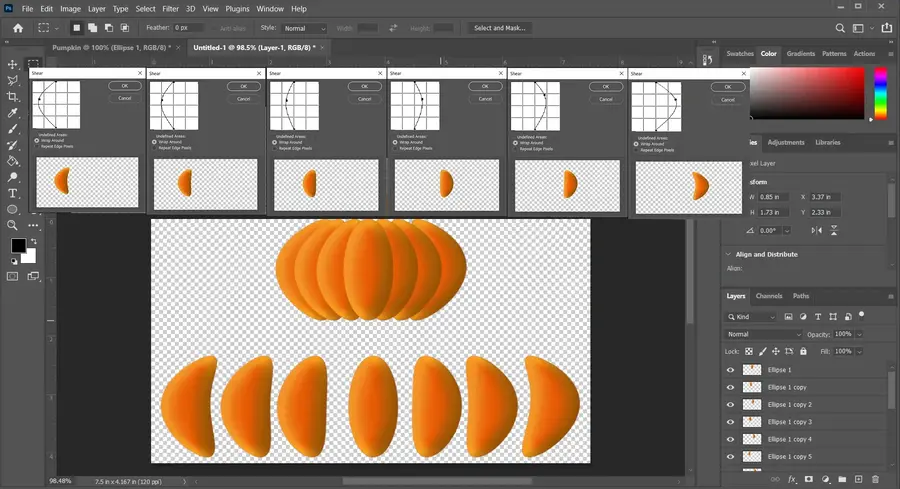
Now make 4 more slices for the pumpkin drawing: 2 for the left and 2 for the right. Give every slice of the pumpkin a proper shape from the ‘Shape Dialog Box’. And arrange them according to the older to newer slices of pumpkin. Make individual duplicates from layer 1 for every slice of pumpkin.
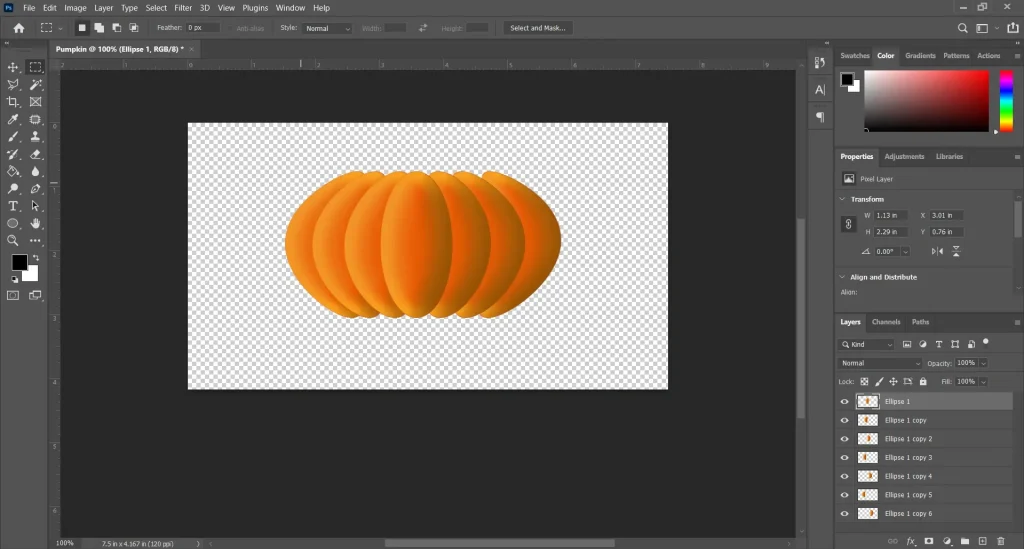
Don’t get confused; repeat Step 7 and Step 8, 2 items each. Take help from the picture given above for further clarification. The result of this Step will look something like the image above.
Step 11: Merging All Layers
Merging layers in Photoshop means converting all layers into one layer of pumpkin. Layers in Photoshop are like transparent sheets of paper that lie on top of one another and allow you to make precise edits to certain areas of the image. When you merge layers, you combine two or more layers into a single layer.
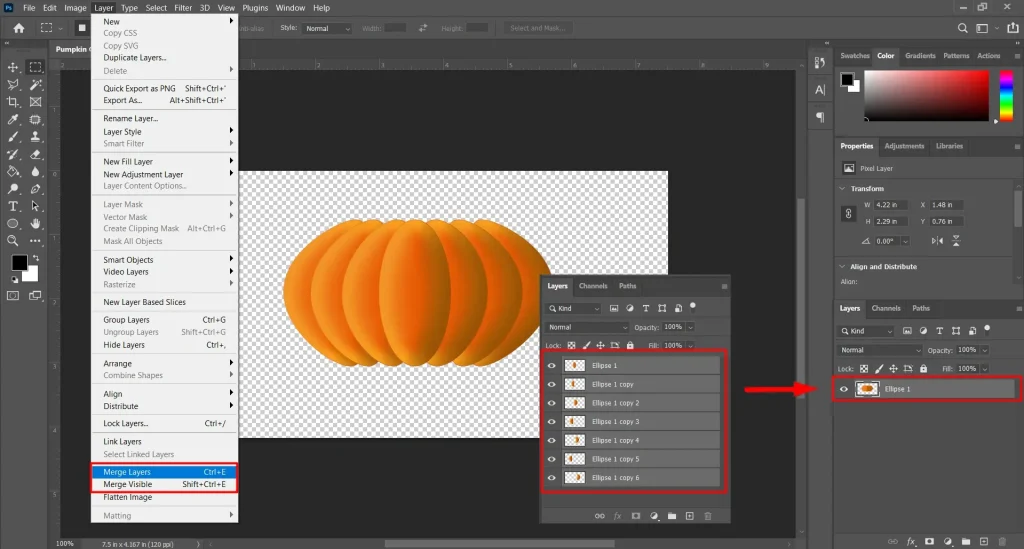
Menubar > layer > Merge Visible
Shortcut: Ctrl + Shift + E
To merge all layers into one layer, go to the Menubar and click on the ‘Layer’. A drop-down menu will appear. From the drop-down menu, select the ‘Merge Visible’ option. This option will keep the image the same as visible as the pumpkin drawing in the active window. You can also do it with a shortcut; press ‘Ctrl + Shift + E’ altogether.
Step 12: Change the shape to a Pumpkin shape with the Liquify Filter
The Liquify filter tools are used to push or pull, pucker pixels of your photos. You can push or pull pixels of your image without losing quality. You can learn about the use of the Liquify filter tools from our tutorial ‘How to Use Liquify Photoshop Filter Tool’
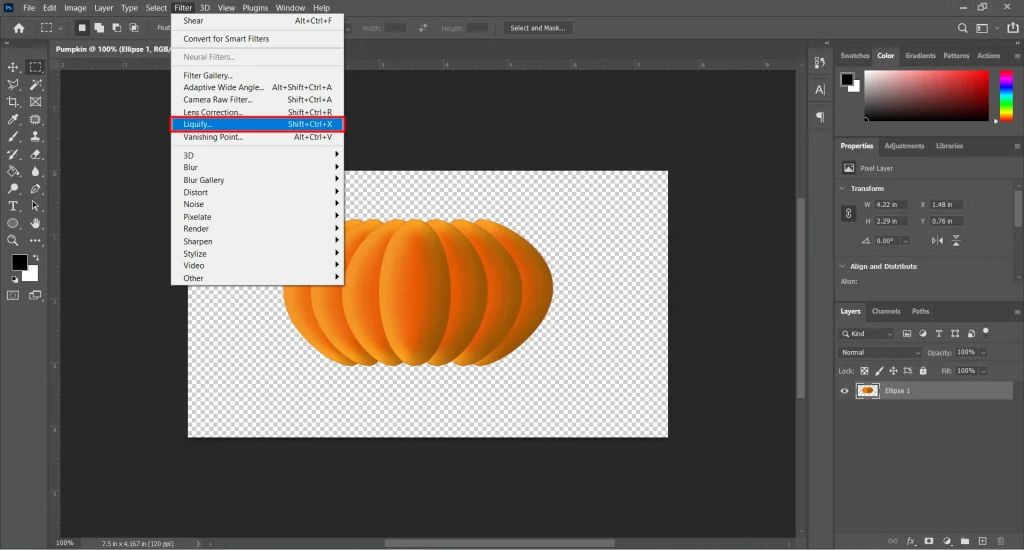
Menubar > Filter > Liquify
Shortcut: Ctrl + Shift + X
Click on Filter at the top of the screen at Menubar. A drop-down menu will appear. From the drop-down menu, click on the ‘Liquify’ option. You can also open the Liquify filters with a shortcut: press ‘Ctrl + Shift + X’ together.
A new window of the Liquify filter will appear.
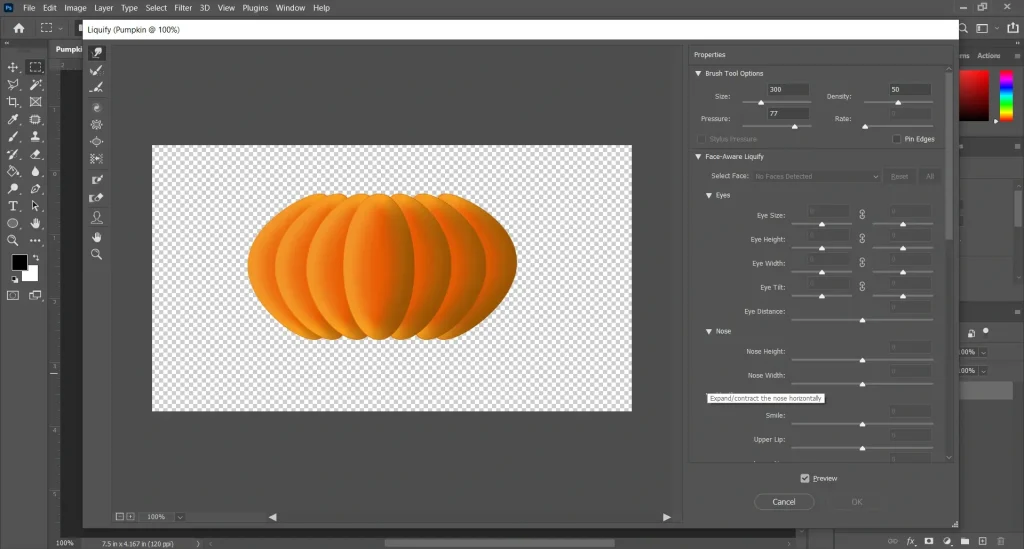
Which is the Liquify filter window. The liquify filter tools are on the right side of the liquify window. The Tool options and parameters are on the right side of the window and the preview section is in the middle where we will give liquify effect to the photo.
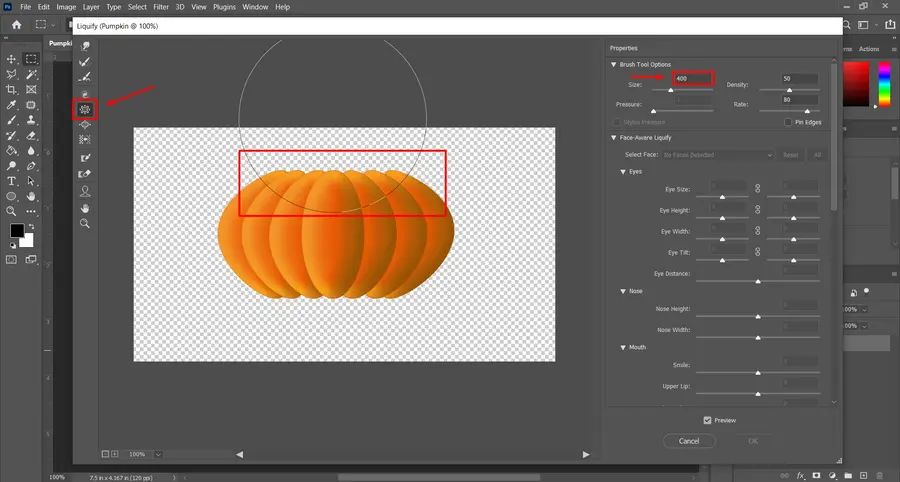
First, we will use the Pucker tool. Select the Pucker tool from the toolbar. Then increase the size of the tool as all the upper edges of the merged Eclipses are covered.
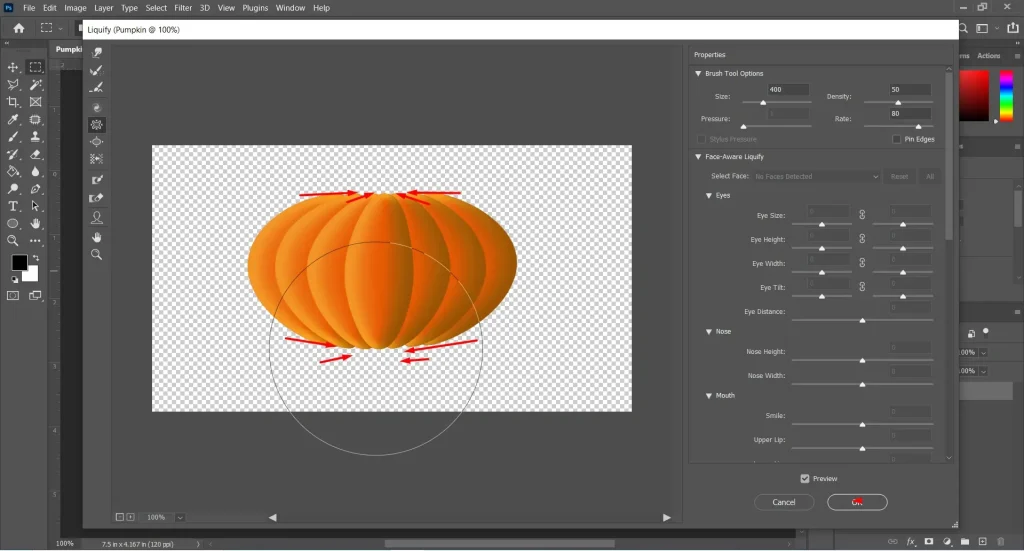
Now apply the Pucker tool to all edges at once. Don’t bring the tool to the middle of the pumpkin. Fit all the edges at the arc of the tool and apply. Apply the Pucker tool at all the upper edges and bottom edges for pumpkin drawing. Make the shape similar to the shape of the image above. Bring all the edges closer, but not at one point.
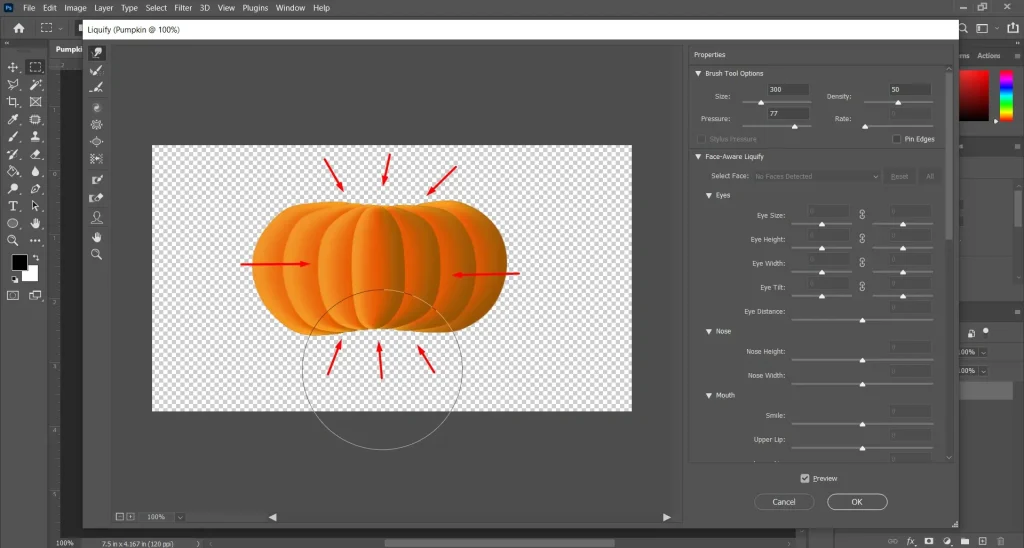
Now select the ‘Forward Wrap Tool’ from the Liquify toolbar at the left of the Liquify window. You can also select this tool with a shortcut by pressing the ‘W’ key on your keyboard.
Now increase the tool size as you can push all the edges of the Eclipses at once. Then click on the top of the document and pull downward. The edges that are increased by applying the pucker tool will pull down. Similarly, push the bottom edges toward the center of the pumpkin.
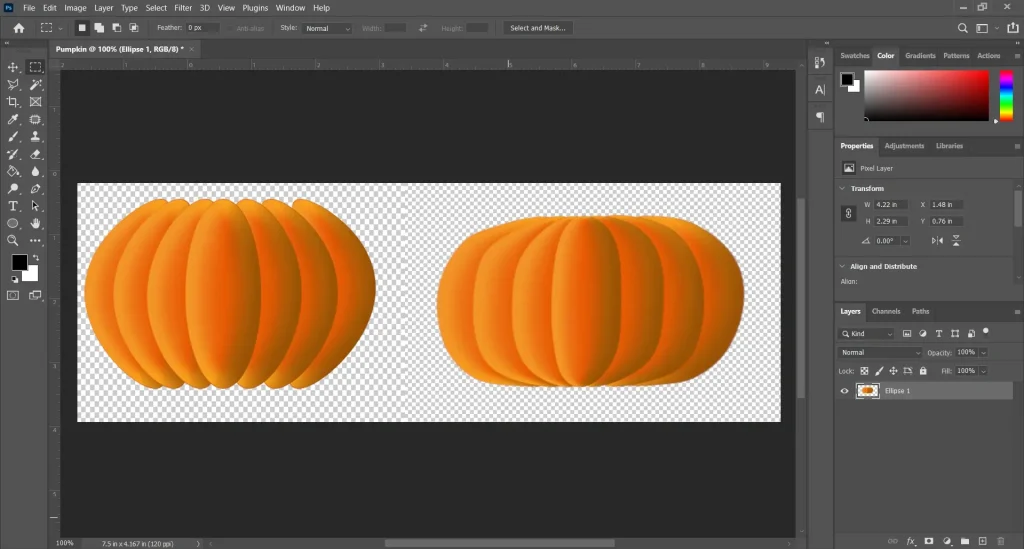
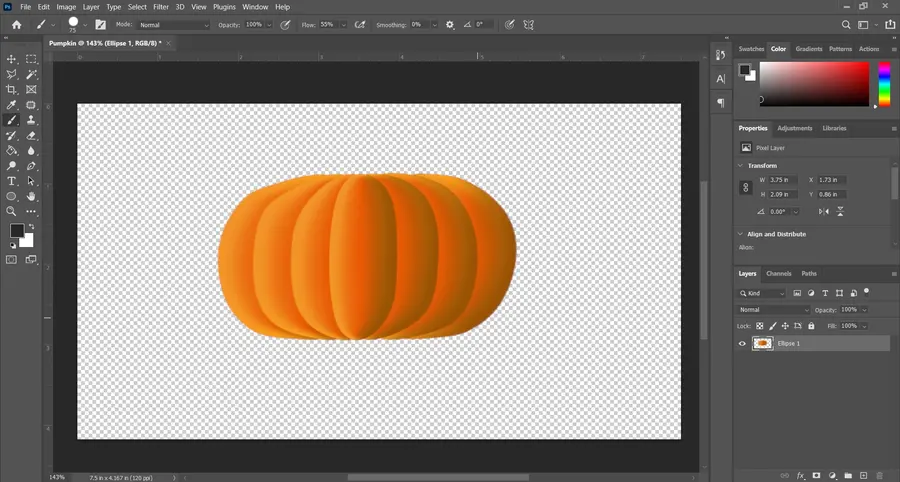
Use the ‘Forward warp tool’ and give a shape to your merged object like a pumpkin. Use the tools we used and the directions given in the picture. Use the tools as you wish. Use the directions just for the ideas, and make a Pumpkin. The result of using the liquify tool will be similar to the above picture.
Step 13: Draw the Stem of the Pumpkin
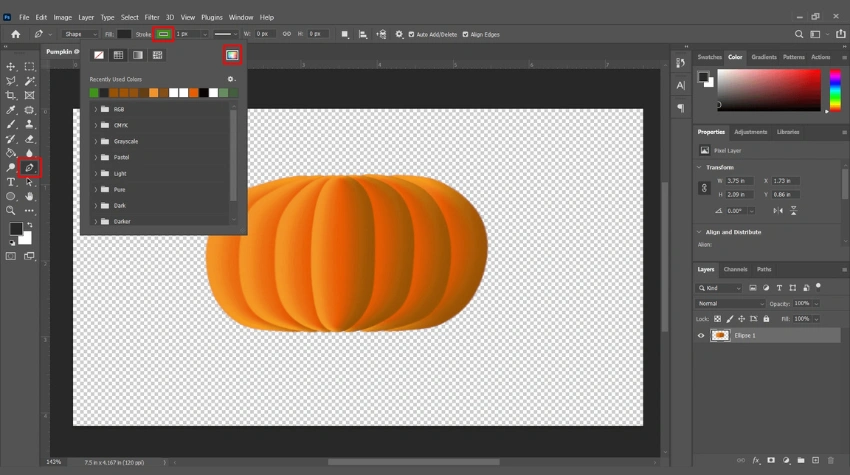
Now draw the stem of the pumpkin. We are going to use the pen tool to draw the Stem of the pumpkin. Select the ‘Pen Tool’ from the toolbar. You can also select the ‘Pen Tool’ by pressing the ‘P’ key on your keyboard.
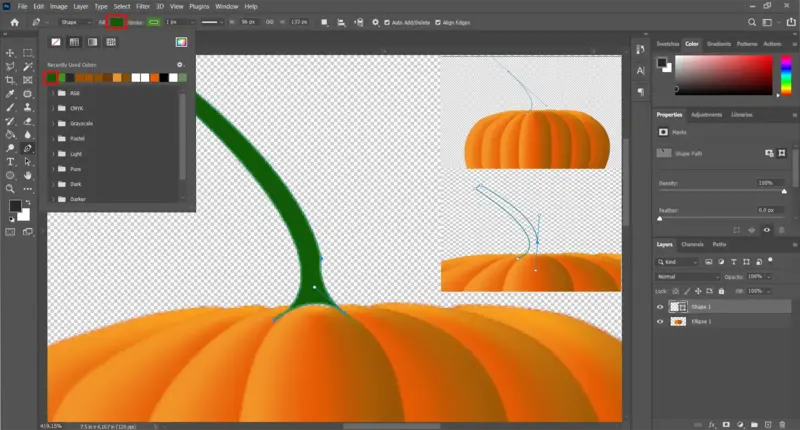
After selecting the Pen Tool, set the ‘Tool Mode’ from the option bar above the active window. Set the Tool Mode to ‘Shape’ by default, ‘Path’ is selected. Then set the stroke color to light green. we set the Stroke color as # 3d941a. Fill will get no color and the width will the 3 px.
Now draw the front part of the stem as shown in the direction. you can make nice curves by using the ‘Pen Tool. After drawing the front side of the stem click on the fill option on the option bar and fill it with a deep green color we use #1f6b0e to fill.
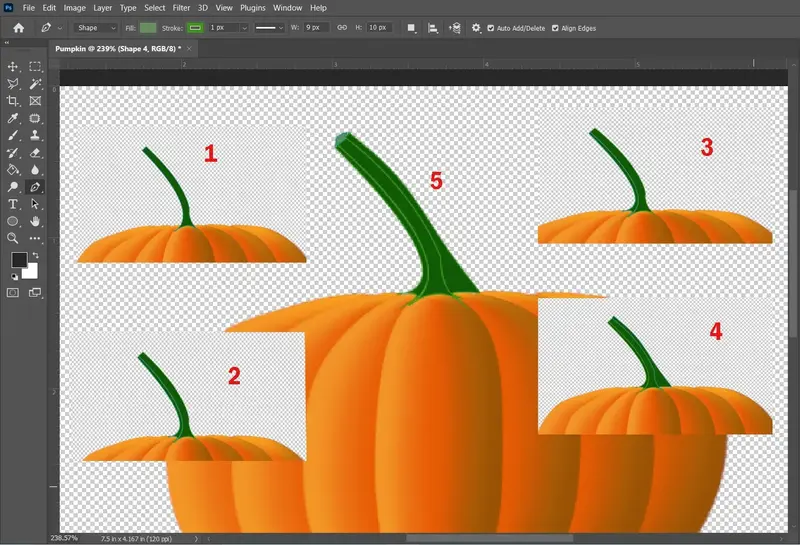
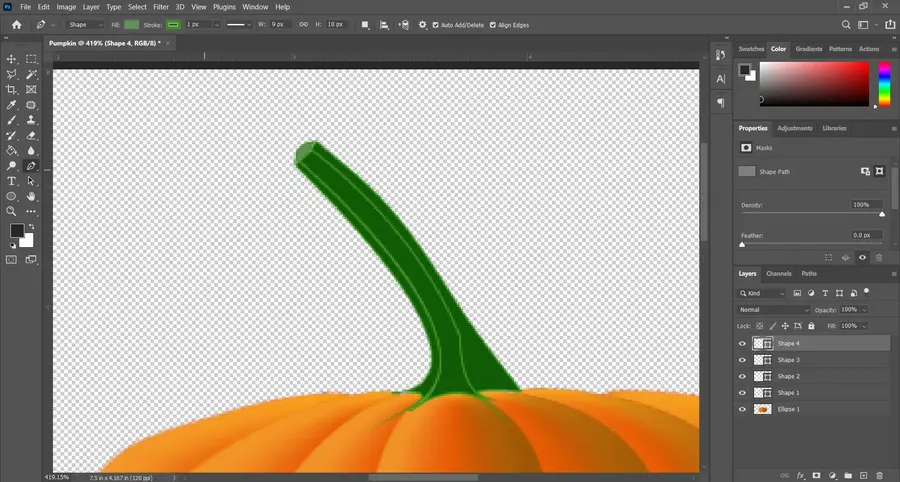
Now draw other parts of the stem as shown in the picture of the pumpkin drawing. Don’t forget to rearrange the shapes layer older to newer. Or arrange the shape for a similar result of number 5. Draw every part individually and fill it with color. First, set No color at the fill option. Then draw and then fill. It will help to bring the best result.
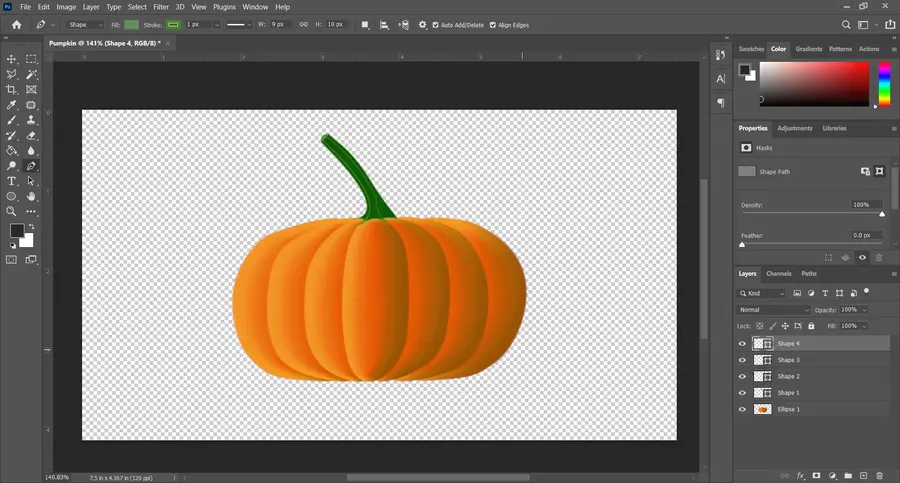
Step 14: Merge and Save
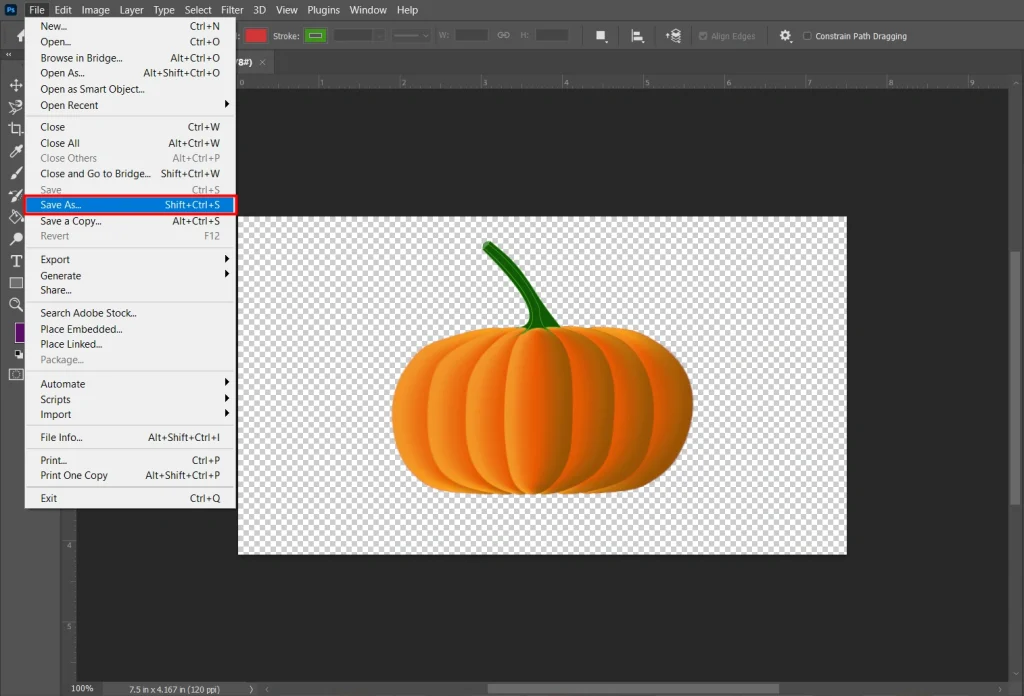
If you are satisfied with the result, then merge all the layers of the pumpkin drawing. To merge all layers press ‘Ctrl + Shift + E’. It will merge all layers. If you want to save the document in a PSD format then skip Merging just save your photo.
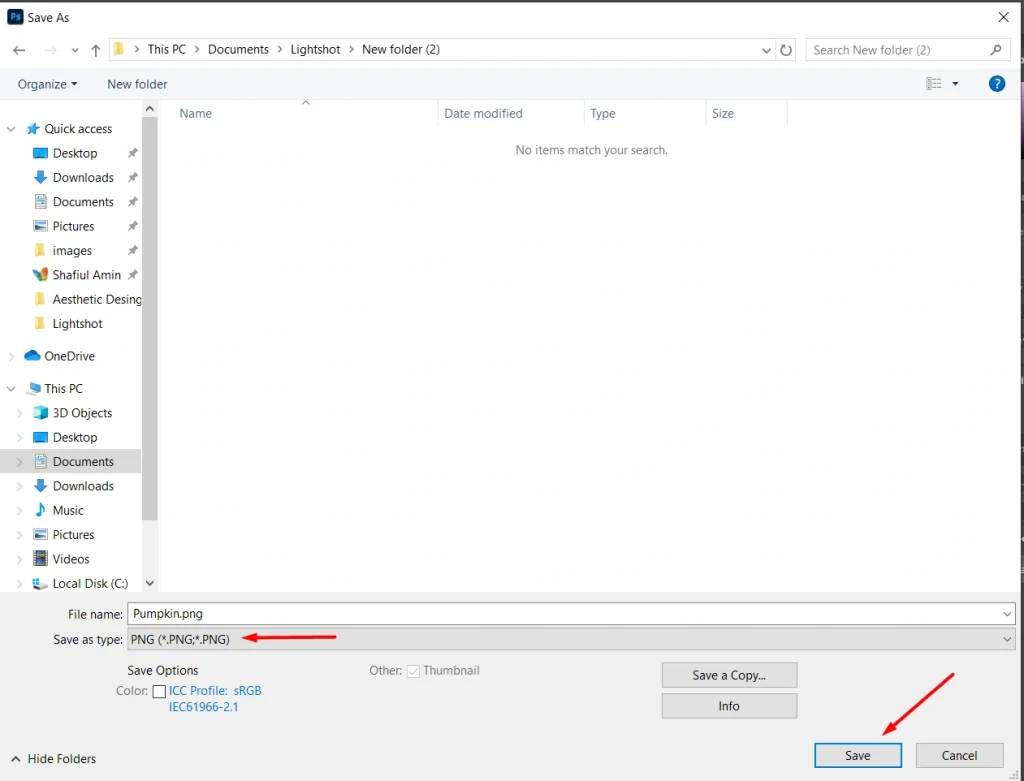
Menubar > File > Save as > Save
Shortcut: Ctrl + Shift + S > Save
Save the photos from the menubar. Click on the ‘File option on the menubar and select ‘Save As’. A new window will appear. You can also open the ‘Save As’ window by pressing ‘Ctrl + Shift + S’. On the Save As window, set the name and the photo format. Then press the Save button at the bottom. Your photo will be saved.
Final Thoughts | Pumpkin Drawing
Don’t try to get the same result as you saw in the picture with the parameters we use. Because the parameter and their result will depend on your graphics processor and the resolution of your display. So try to bring a similar or better result with a similar parameter.
We suggest you focus on the method we want to discuss: how to draw pumpkins in Photoshop. And don’t worry if you don’t get the same visible result with the same parameters. Just modify and make better results.
This tutorial is for beginners in Photoshop. Beginners can practice our tutorial to develop good skills in Photoshop. We want to make this tutorial easier so that beginners can understand it easily. Beginners can also practice our methods and draw similar shapes. Remember, imagination is a powerful weapon to develop skills in Photoshop.